When we bought our house, it was pretty apparent that the basement had at one time been finished, and at another time subsequent to being finished, seen a lot of water. Though damp basements are far from unusual in Maine, they are less than optimal. Our inspector, eyeing the three or four inch trench dug along one side of the foundation by falling water, thought the culprit might be a lack of gutters. So leading up to our closing, we scheduled a gutter installation. The week before the gutters were installed, we had a massive thunderstorm and a lot of water in the basement. The week after the gutters went in, bigger storm, no water.
Problem solved. We thought.
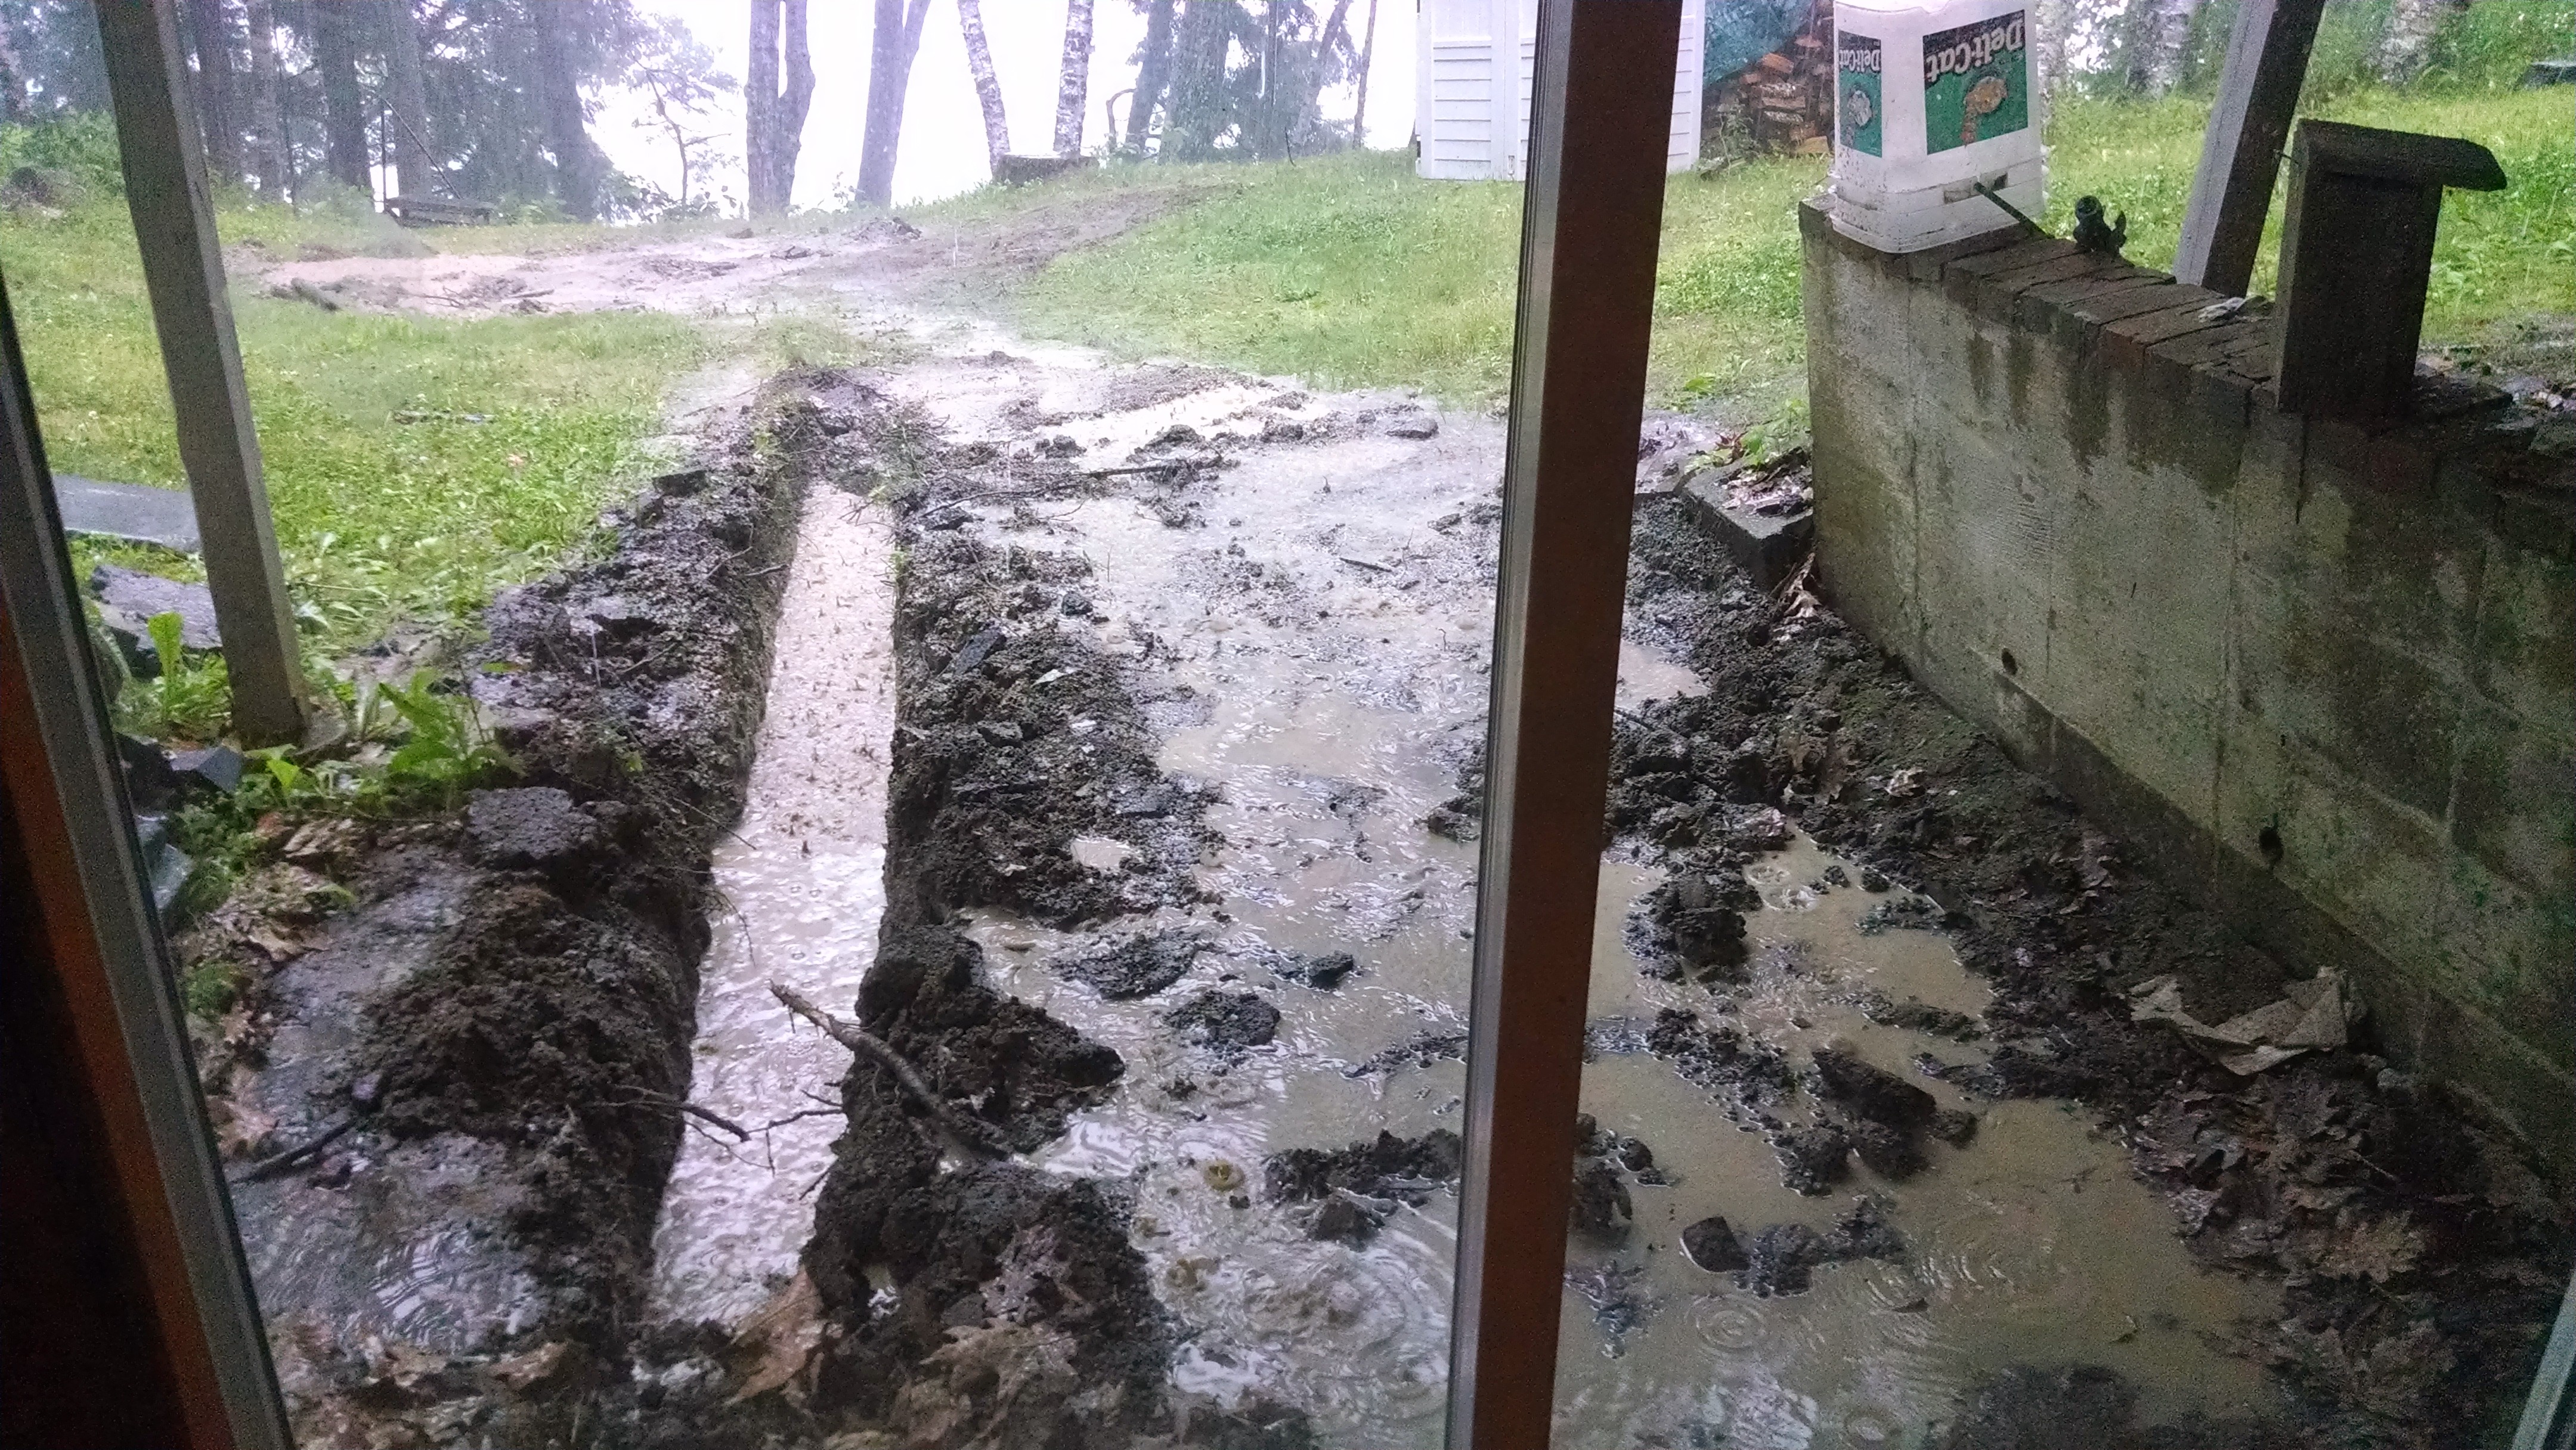
As it turned out, our gutters work perfectly at keeping our basement dry when the ground isn’t frozen. When the ground is frozen, not so much. Unable to soak into the ground, meltwater from the roof and elsewhere pooled in front of our basement door, then poured through it. Which is why every so often last winter I’d blow up on Twitter about how much I loved hauling a 12 gallon (at 8.34 lbs/gallon) shop-vac full of near freezing water out the door, ten feet away from our foundation to be dumped down a hill. It’s also why my back hurt for most of last winter.
Rather than deal with this for a second winter, we looked at our options and eventually settled on what’s commonly referred to as a French drain (named after a person, not the country), or more specifically a curtain drain which is a fancy way of saying “French drain with a pipe in it.”
The theory behind this is simple: when water pools outside our basement door, we give it somewhere more convenient to go than into our basement – water being, after all, inherently lazy. I say theory because we’re not able to test the drain until a) the ground is frozen and b) we have a lot of water. We can simulate B with a hose, but A is a little harder. We have absolutely no idea if this is going to work, in other words.
In the meantime, however, I thought I’d document the process of creating one for any of you that might have drainage issues. It could also be a useful reminder for myself if this plan fails and I have to dig several more of these when things thaw out in the spring, but I’m trying not to think about that too much.
So, how to build a French Drain.
Step 1
Download this article from Fine Homebuilding (which is an awesome magazine, by the way). Seriously, it’s enormously helpful.
Step 1A
Call DigSafe. Unless you want to accidentally cut a power line, a water or waste pipe or – worse – you internet feed, call DigSafe. It’s free and they’ll make sure your path is clear.
True, they missed our Spectrum coax cable at the new house, but at least the mistake was on them.
Step 2

Get a tractor. You think I’m kidding, but I’m not. Sure, you can dig the ditch yourself, but when was the last time you dug a trench that was two feet deep and twenty or more feet in length? In the heat? Through tree roots, rocks and clay soil? Do yourself a favor and beg, borrow, rent or steal a tractor. We got lucky, as my father-in-law jointly owns one with a friend.
Step 3

Start digging your trench. I dug out away from the foundation, and this worked reasonably well. It’s also worth noting that I dug maybe a foot down, then went back and got to the necessary 2′ depth. This was dumb. Dig to the 2′ depth from the start, because going back over a narrow trench with a tractor to dig deeper the second time is a pain in the ass.
Step 4

Position your gravel fill (you want 3/4 crushed rock) as close to the trench as possible. Because your back.
Pickup truck sold separately.
Step 5
Don’t dig your trench right before a major rainstorm is about to hit. Just trust me on this.
Step 6

Get PVC pipe in the appropriate length – I used schedule 40 which is easy to find at Home Depot. Try not to get the flexible plastic kind, unless you want to destroy it when you eventually have to scour out the pipe. Which reminds me, get a sanitary T-connector or similar so that you can blast out the pipe with water easily later. Attached to the head of your pipe, you can dig it up later and snake your drainage pipe if it gets clogged.
The other thing you need to do – unless you can find PVC that’s pre-drilled – is put a bunch of holes in one side of it. I used a 1/4″ or 3/8″ drillbit, I think. I never did find a conclusive answer on how many holes were required, but I probably put in half a dozen per six to eight inches. Enough to allow water entry, but not weaken the pipe.
PVC Protip: deal with PVC cement as little as possible, and do not – under any circumstances – open it indoors.
Step 7

With your trench dug, it’s time to get the trench liner ready; I used this stuff. Basically the purpose of this is to keep as much sediment out of the crushed rock and PVC pipe as possible.
Step 8

Use your tractor to lay down an inch or two of crushed rock, then position the PVC pipe slanted away from your foundation. Point the holes downward. You need a drop of 1/8″ per linear foot, apparently. And no, I have no idea how you’re supposed to measure that if you’re not a surveyor. I just made sure it slanted down, hard.
Articles like the Fine Homebuilding one will tell you to use the gravel to adjust the pitch appropriately, and that’s what you have to do, but it’s a pain in the ass. Just FYI.
Step 9

Cement pipe segments together as necessary. If you thought adjusting the pitch of one segment was a bitch, wait until you try it with two. Also, PVC cement sucks.
Step 10
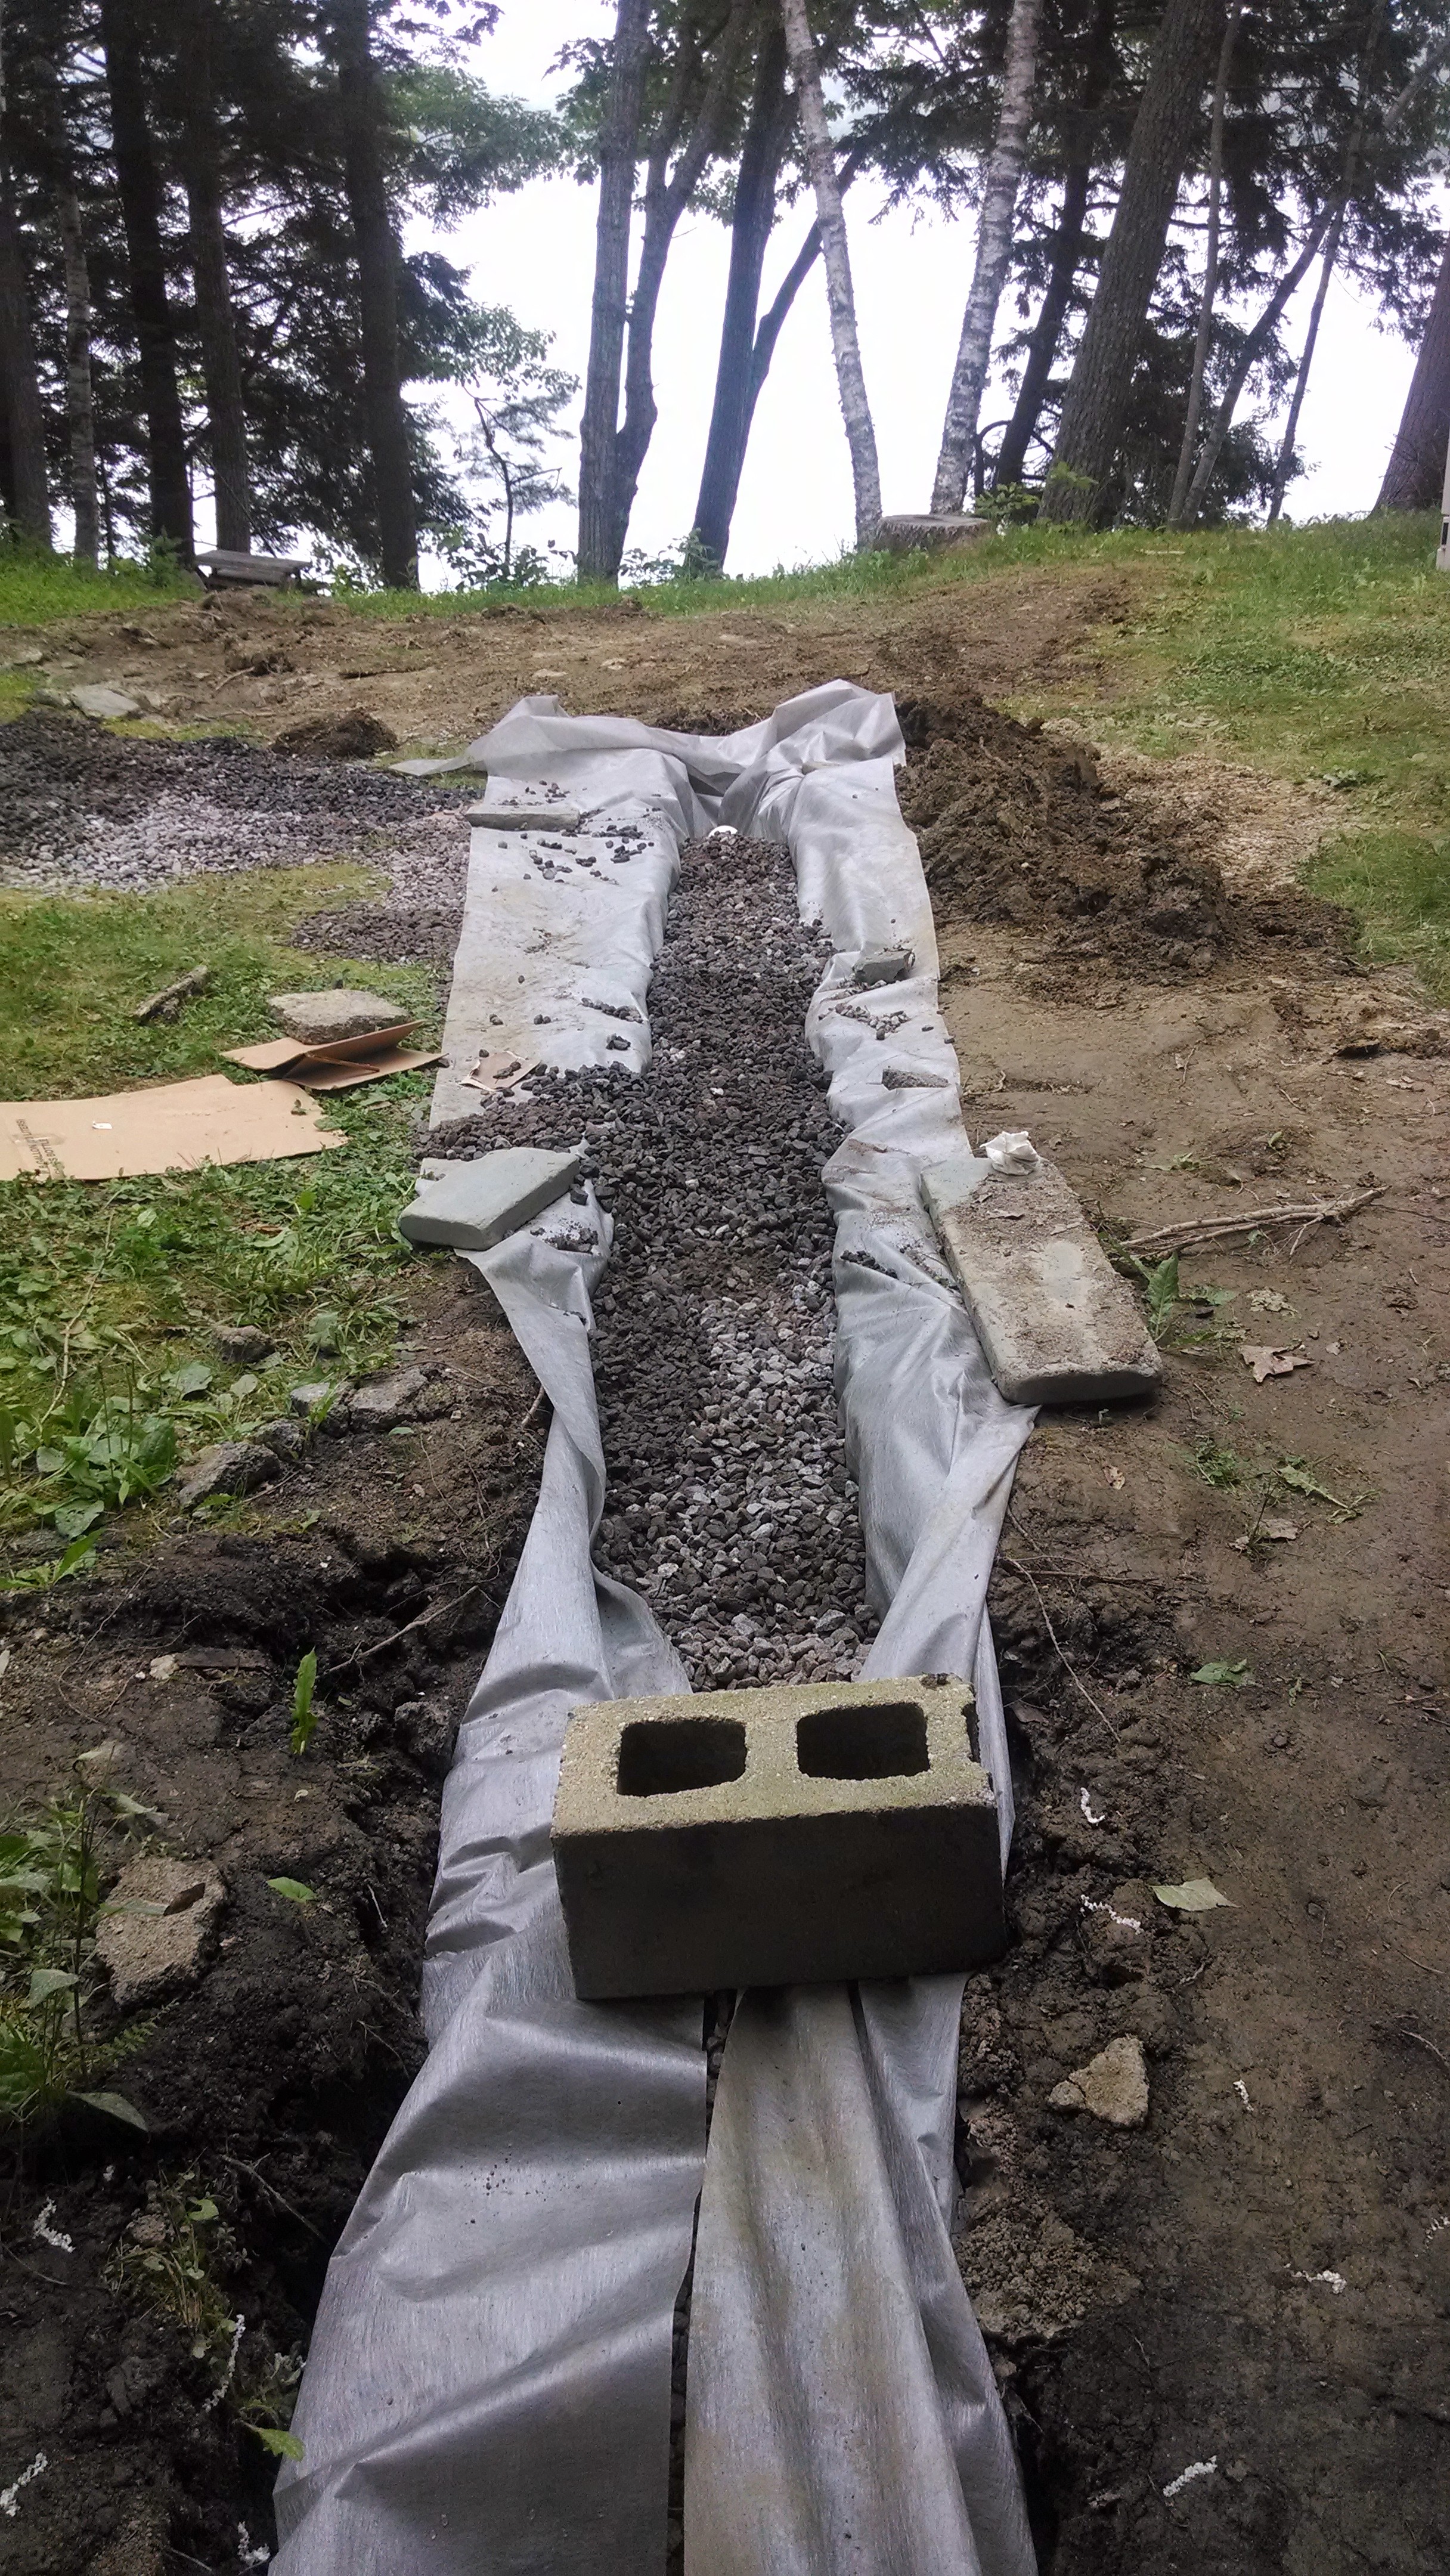
Once you have the pitch correct, begin backfilling the trench with crushed rock. Don’t drop in too much at a time because you’ll mess up the pitch, or if you were dumb and didn’t go with the rigid PVC, you’ll damage the pipe. Once you’re near the top, you can begin folding the fabric over. If you’re an idiot and you dug one section of the trench too wide like I did and you’re short on fabric, just find something heavy to hold the fabric in place. Cinderblock, the giant fucking rocks the goddammned tractor refused to pull up so you had to dig out by hand, whatever.
Step 11
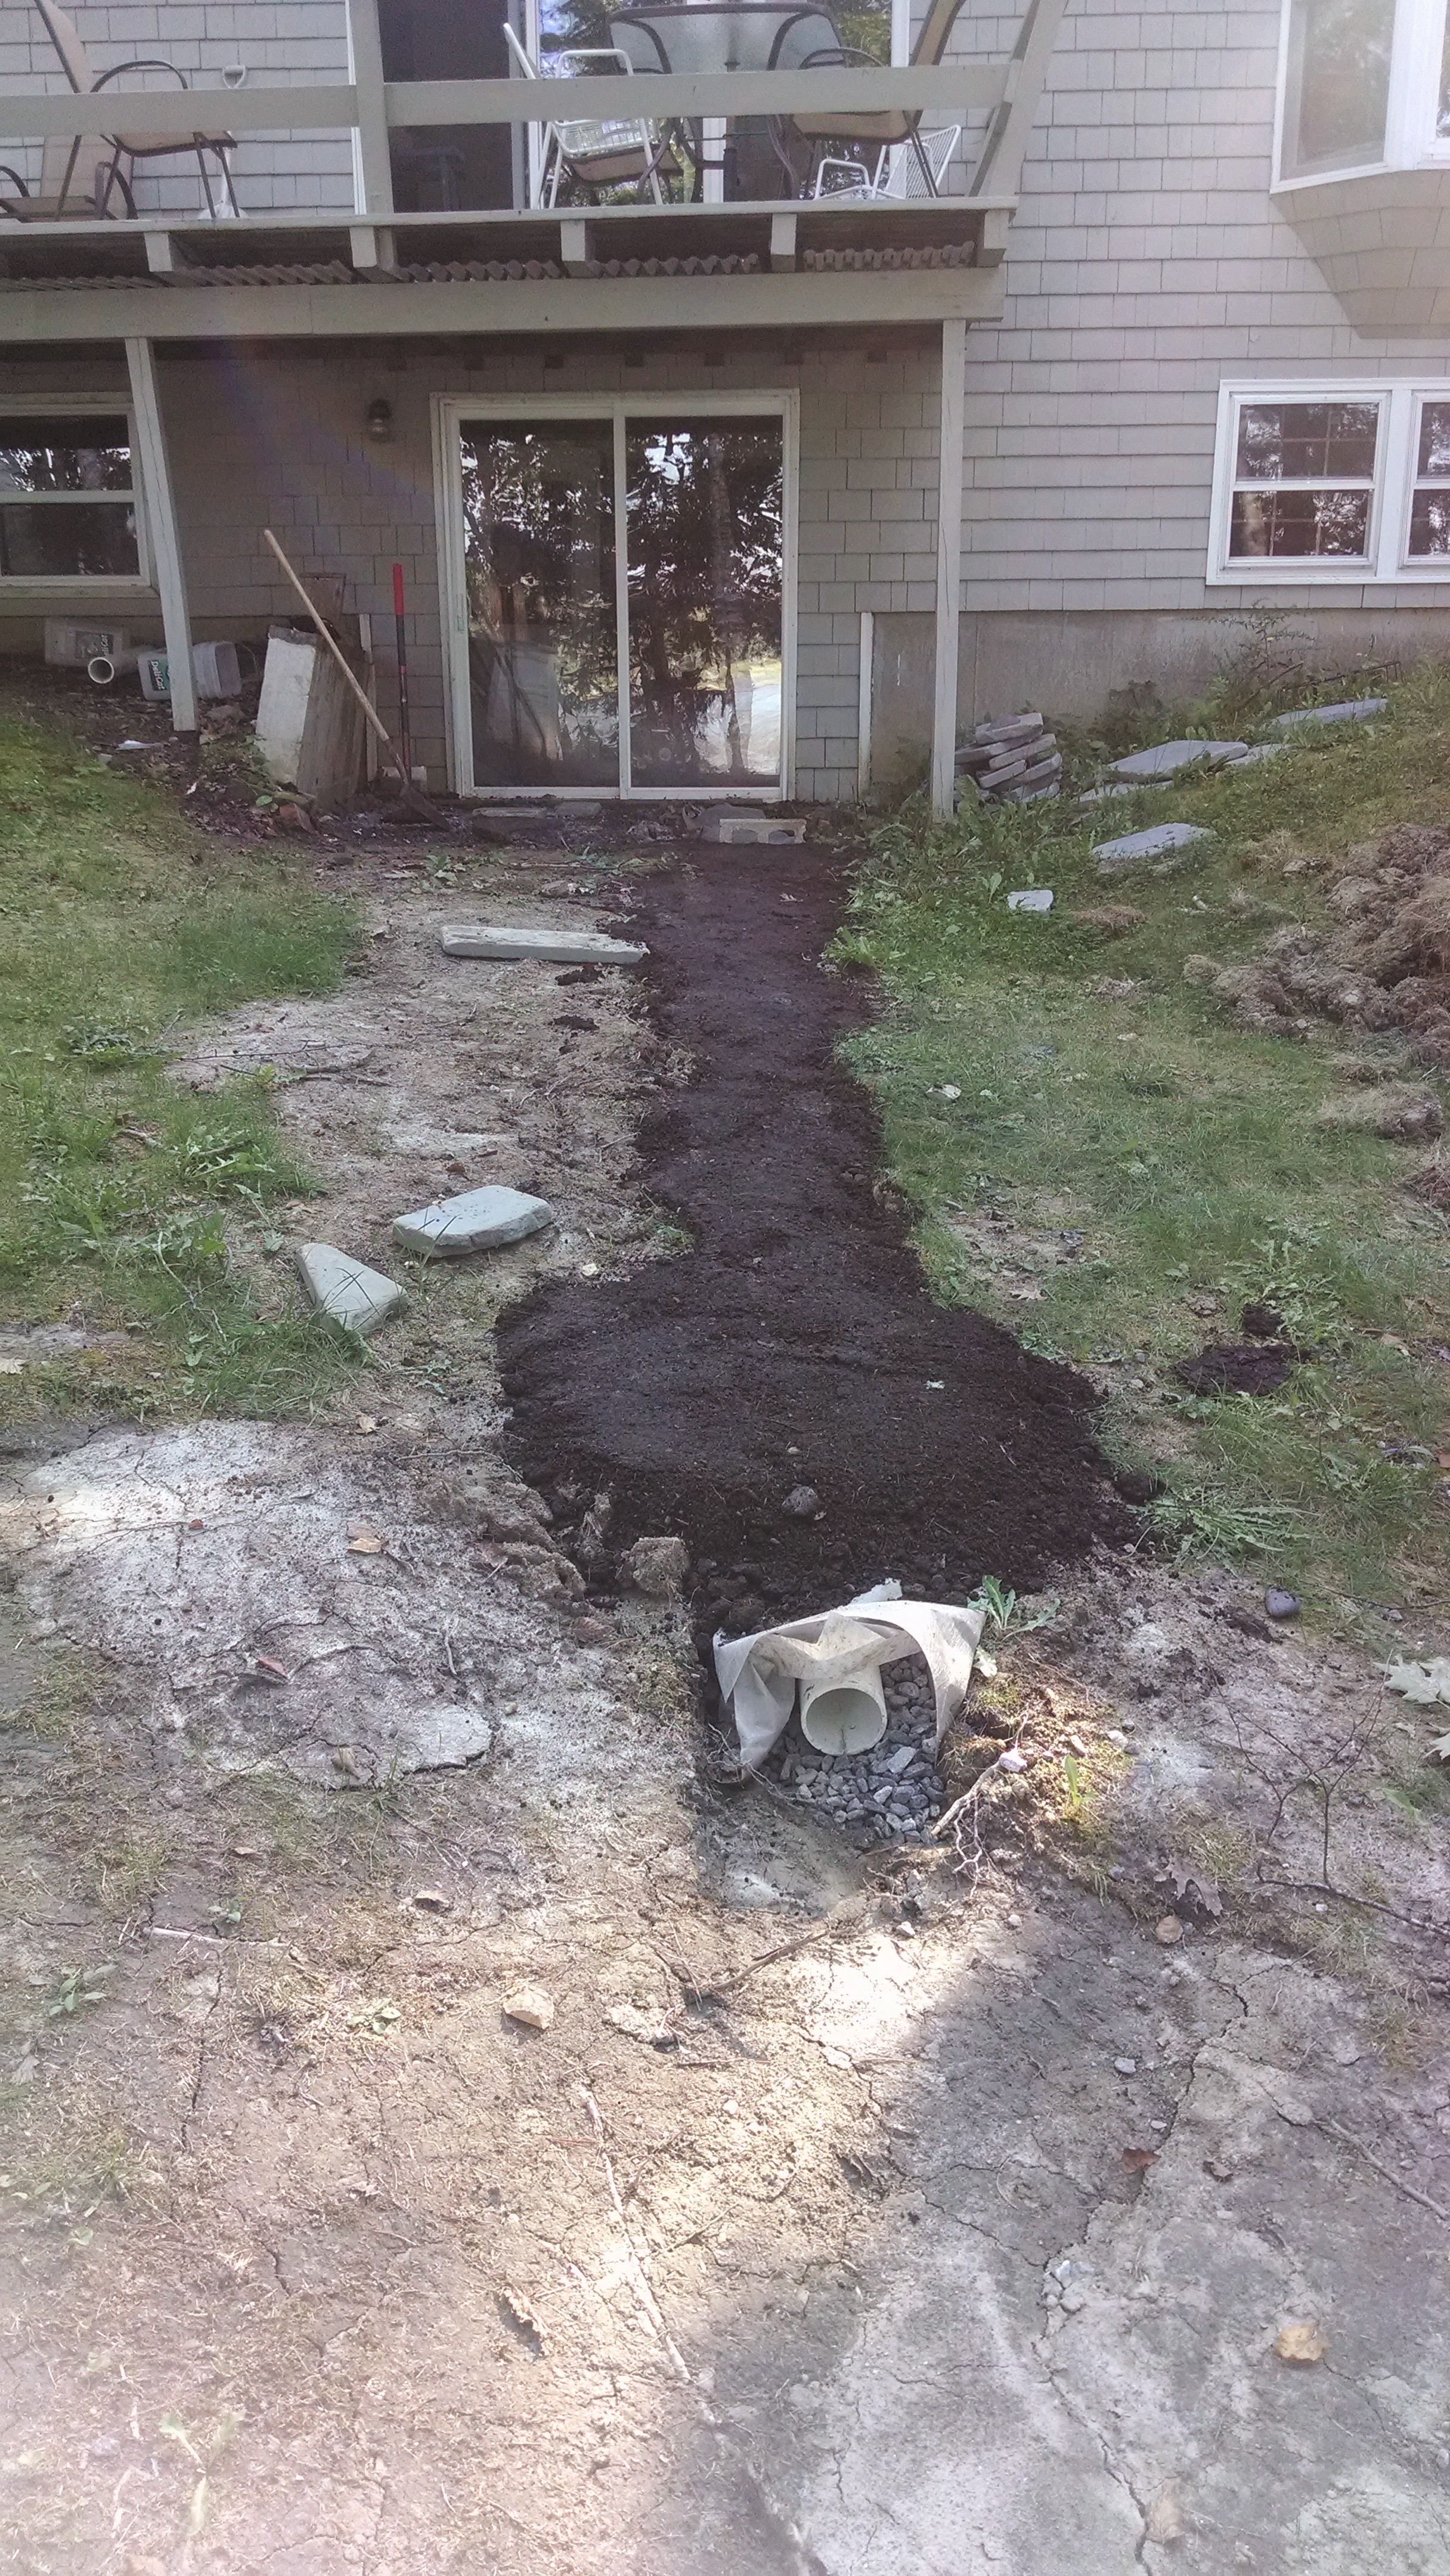
Once you’ve filled the trench, and sealed the top by folding over the typar fabric, you can begin covering everything up with topsoil. Tamp it down tightly or it will all wash away with the first good rain that you get. Or so I’ve heard. I used one of these.
Step 12

Unless you enjoy the Frankenstein-like scar on your lawn, you might want to plant some grass seed when you’re done. Sadly, Scott’s made the terrible decision to no longer sell Fenway grass seed. We used this instead, and while it’s a completely different shade of green from the rest of our lawn, at least we have grass there now.
Step 13
In our case at least, Step 13 is to pray. This project cost us a couple of hundred bucks, several weekends of effort and some blood – though admittedly much less than in our “get rid of closet debris” debacle that landed me in the hospital. In spite of all of that, we have no idea if it’s actually going to work or not.
If it doesn’t, I’m sure I’ll have some equally harebrained scheme to share with you next winter. In the meantime, hope this helps.

Place a two-foot level on top of the pipe. With the bubble showing that the level is level, lower one end of the pipe until there is a 1/4″ gap.
Alternately, plumbing supply houses sell levels which have built-in pitch (ie, they are not actually level, but are off by the correct slope).