When Kate and I bought our house, we knew going in that it had two primary heat sources: an oil furnace and a fireplace. We weren’t thrilled about the former due to the cost of heating oil and a host of environmental concerns, and while we both enjoy a roaring fire, the unfortunate reality is that fireplaces are by and large better aesthetically than they are at actually serving as a heat source. Taken together, our heating situation was less than ideal.
To address this, we first invested in making the house more efficient at retaining the heat it did have. We had blown insulation installed in the attic, we tore out and replaced the existing insulation in our basement, ripped out an old front door and sealed it, replaced the remaining entryway with a new efficient model, installed storm windows where they were lacking and more. This did have the desired effect of cutting our oil consumption substantially – anywhere from a half gallon to gallon per day during the winter heating season. Which was a good start. But it didn’t address the core problem that our heating system – systems plural if you want to count the fireplace – was extremely inefficient. And so we set to evaluating a wide variety of heating options.
Why Wood?
Natural gas, the option involving the fewest compromises both economically and environmentally, is unfortunately not going to be coming to our neighborhood. The cost of a propane-based alternative wasn’t prohibitive, but the payback period versus our existing oil infrastructure was lengthy. My preferred option of a ductless minisplit heat pump, meanwhile, was interesting, but given that they’re less viable in extreme cold and more problematically will not integrate into an existing thermostat system, they’re not quite ready in our eyes. We’ll probably go down the heat pump route eventually, but only when they’re guaranteed to play nicely with our Nest units.
With gas, propane and heat pumps out, we were left looking at wood. Which in turn led us to look at converting the fireplace into something more efficient – both as a heat source and environmentally. After a lengthy research process, we ended up buying a new EPA certified Jøtul fireplace insert – the Rockland 550, specifically. Manufactured here in Maine, they essentially convert your existing leaky fireplace into a woodstove, which a) is capable of heating an entire floor and b) burns wood far, far more efficiently.
Like every other heat source, wood comes with environmental tradeoffs, but it’s the best choice for us at present.
What Does it Mean to Heat with Wood?
Most obviously, you need wood to burn. Given that stacking it inside is impractical for a variety of reasons ranging from space to insects, it also means that you’re going to be making regular trips outside in the winter cold to bring in wood for the stove. Which in turn implies that you have somewhere to store the wood outside, preferably someplace close to a door.
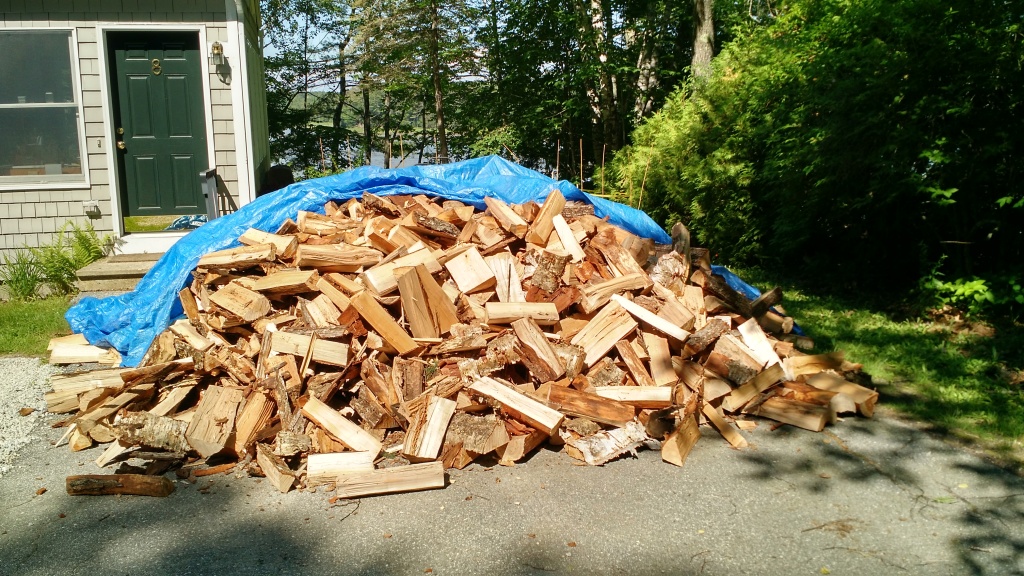
In years past we’ve made do with makeshift wood racks that consist of two metal frames that you attach to the end of a pair of 2×4’s. Given the more primary role wood will play in this winter’s heating plan, however, we needed more wood than was practical to store in this manner. This much wood, in fact.
We needed a wood shed, in other words.
What Kind of Shed?
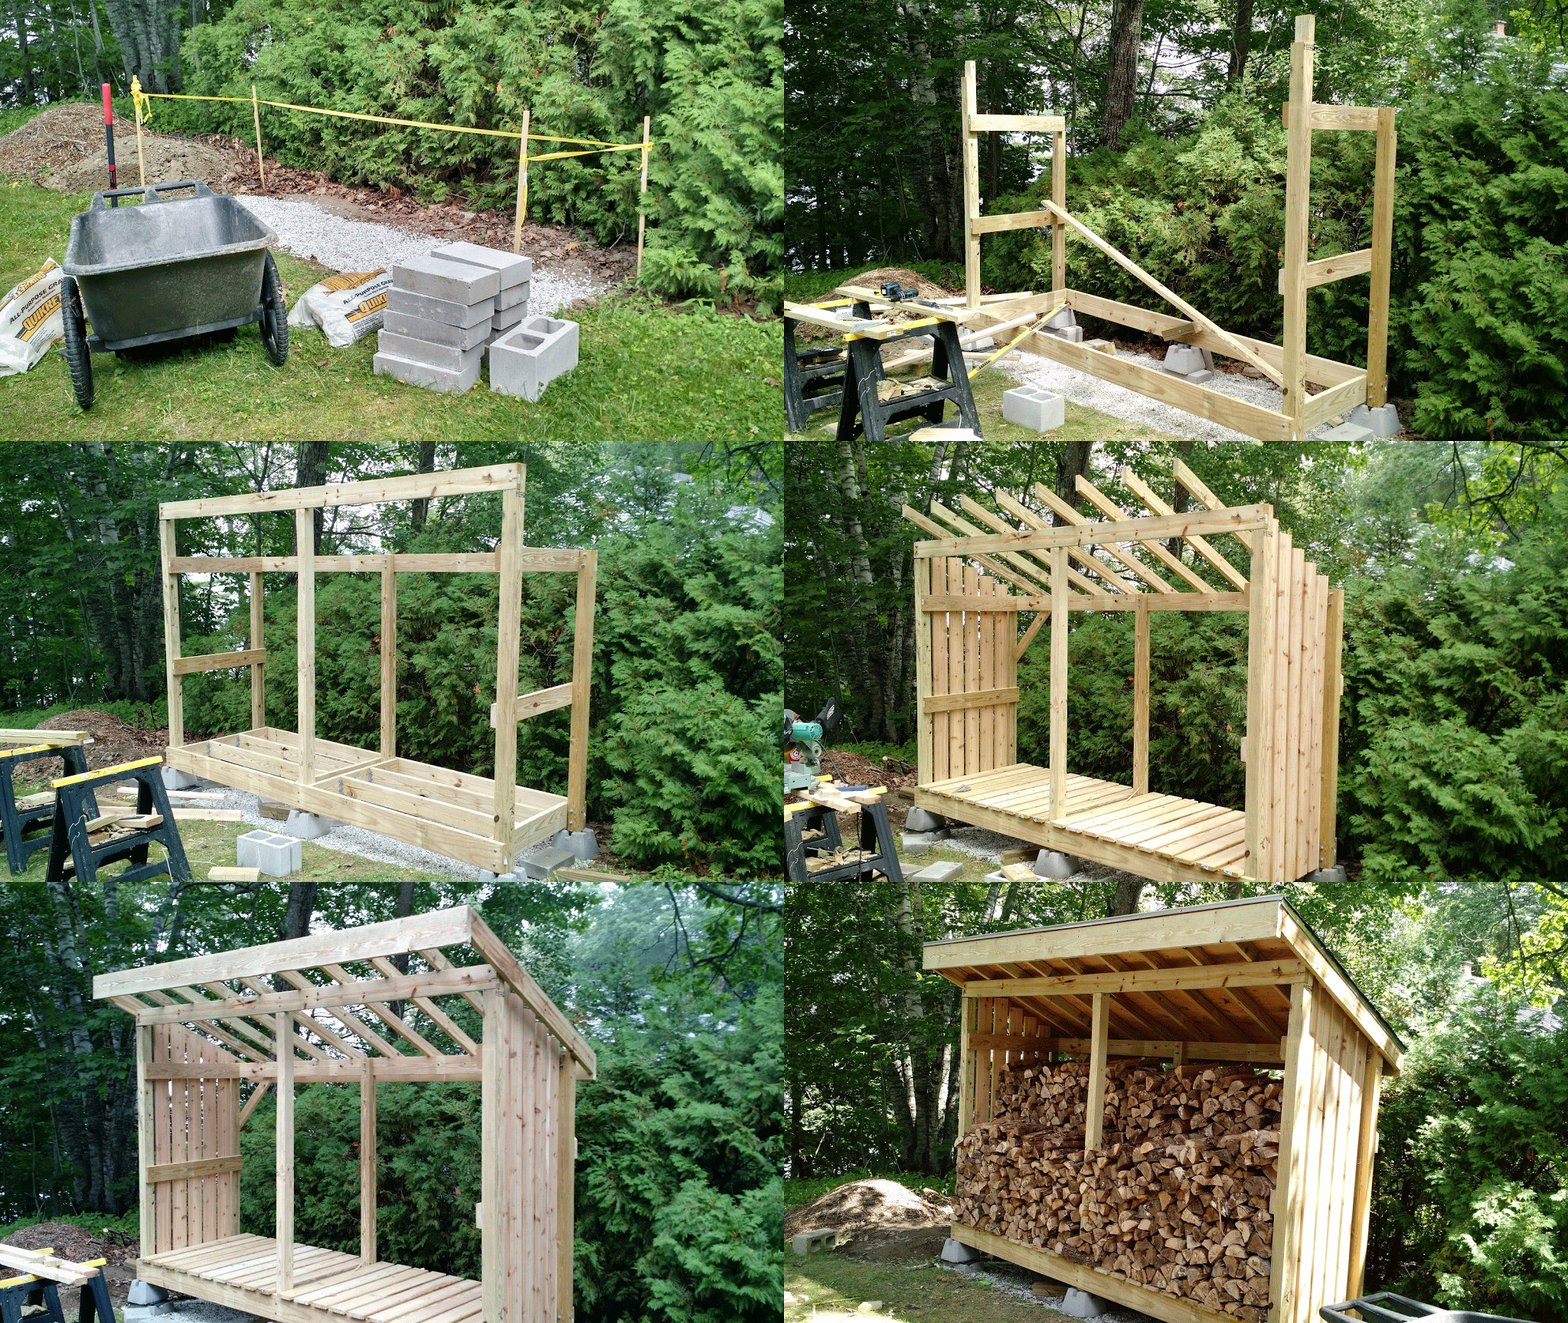
One of the things you figure out quickly when you Google “woodshed” or “firewood shed” is that there are a lot of woodshed plans online. Many hardware stores, in fact, sell packaged shed kits that you assemble like a piece of Ikea furniture. Both because none of these quite fit our needs and because I wanted something a little more challenging, I eventually ended up basing my shed plans on this post and beam design I found on Popular Mechanics.
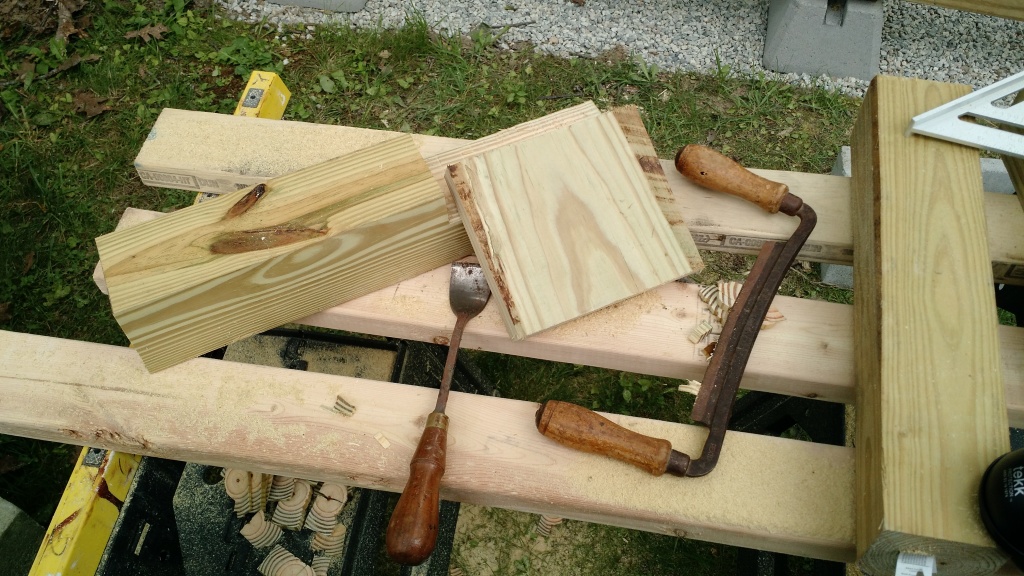
This design involves a bit of actual carpentry such as cutting notches in the posts to seat beams, which made it more interesting than putting together some pre-drilled lego-style pieces. It also gave me a chance to use a set of hand tools like the chisels below that belonged to my grandfather and have been passed down to me to complete the project. This made the experience special for me in a way that something more straightforward would not have been.
As a side note for anyone interested, the Popular Mechanics link does not include the PDF plans, and as they’re not mine I can’t post them here, but the PDF schematic which includes a detailed lumber shopping list isn’t too hard to find.
How to Build It?
Particularly if, like me, you’ve never built anything like this the natural question is where to start. The answer, as always with DIY projects, is YouTube. I watched a dozen or more different videos about building sheds. No matter what your question is, from foundation to roof, there is a YouTube video that covers it. For this project, as an example, I wanted to put on an asphalt shingle roof instead of the corrugated metal one the plans called for. The tricky part was that while I worked construction in high school and college, I’d never so much as looked at a shingle previously. Thanks to videos like iCreatables’ “How To Build A Lean To Shed – Part 7 – Roofing Install,” however, it wasn’t as technically difficult as I expected. It was much, much worse in other ways, but we’ll come back to that.
The other important recommendation is that advance planning is your friend. Even with plans in hand, it’s necessary to work out a host of details – and doing them ahead of time is far preferable to trying to working them out while you’re scrambling around on a roof, for example.
It’s nice to have a cutlist, for example, so that you’re not cutting each piece one by one in the middle of the project. Understanding the precise spacing between beams, joists, posts and rafters is also important. I also liked to have a diagram for myself not just of how pieces fit together, but with which fasteners. 3″ screws? 16d nails? How many per location? The plans I had included a list, but having them laid out on a diagram is much easier to refer to while in the middle of things.
It’s also useful to have a wife patient enough to let you turn her kitchen table into a construction site for a month.
How Long Does it Take?
It depends in part on your skill level: I had to figure out how to do several of the steps from scratch which took longer. The tools you have on hand also make a difference, as does the site choice. Also, weather is a huge factor, because standing on a 12′ metal contractors’ ladder holding thin sheets of aluminum is not what you want to be doing when a typical summer pop up thunderstorm rolls overhead.
All told, this project took me the better part of three weekends, with a bunch of lunch hours and evenings thrown in as well. Your mileage may vary, however.
Lessons Learned
Without walking through the entire construction process, which would be tedious even for me, here are a couple of notes for anyone else who builds this or something similar. It’s also worth getting these down for my own benefit, because while they’ll likely come in handy on other projects later I’m unlikely to remember all of this by that point.
Don’t Do This On Your Own
I picked a bad time to build my shed, as the friends who would normally be up for this kind of thing were either traveling for work or away at the usual summer slate of weddings and so on. And while either my father or my father-in-law would have been happy to help if asked, it’s a longish drive for both of them and the weather was unpredictable enough with sudden thunderstorms so as to make that impractical.
Which is how I ended up building this by myself. I figured out how to do the things that were hardest solo, as I’ll talk about below, but I don’t recommend it. If only because it’s more boring.
Foundation Choices
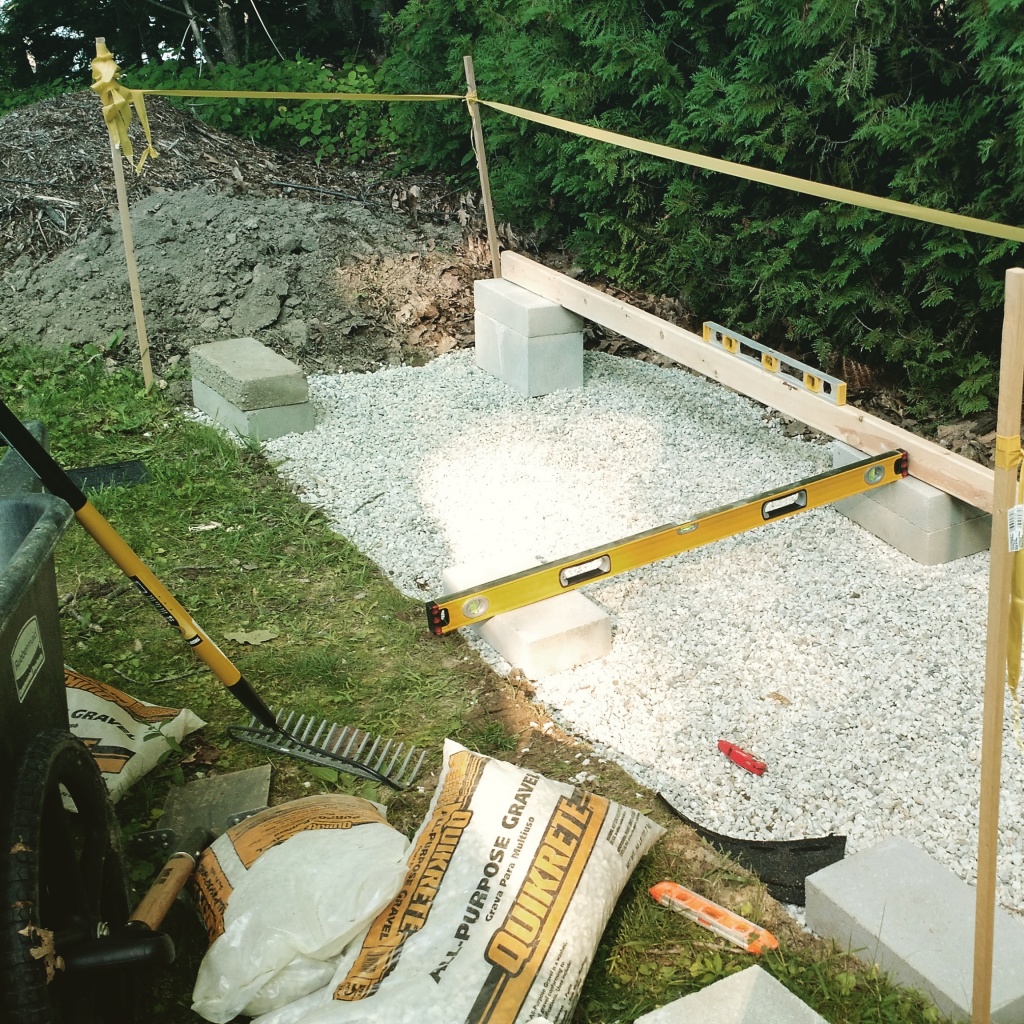
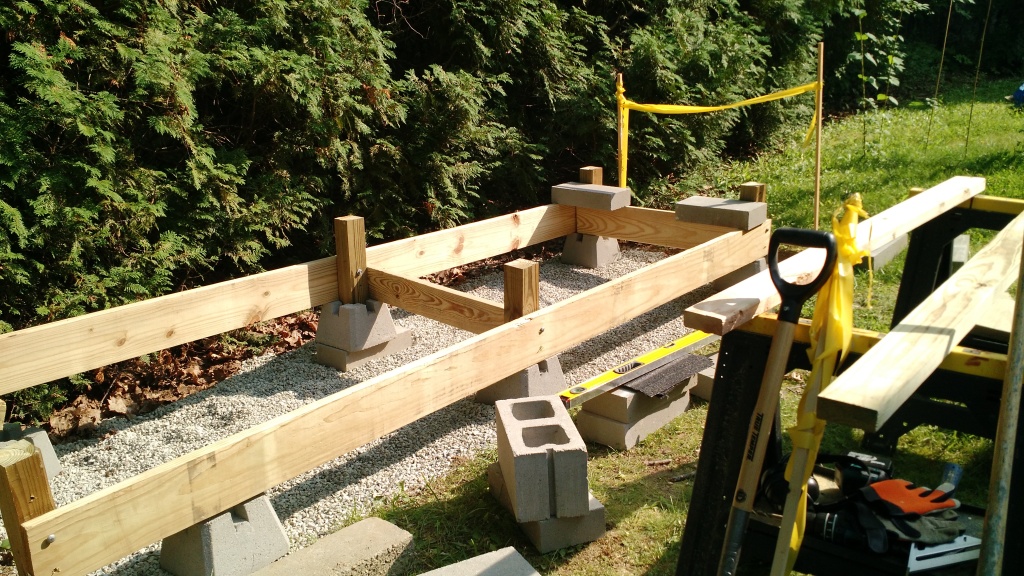
Basically, you have two choices: on-grade (i.e. concrete blocks or similar seated on the ground) or poured concrete footings. While I had to go the former route due to zoning restrictions, I highly, highly recommend you not do the same. Poured concrete footings are substantially easier to level, less vulnerable to things like frost heaves, etc. Speaking of leveling.
Leveling Sucks
There’s a reason they always skip over the leveling process in YouTube videos, and the reason is that leveling sucks. In my case, I was working with six concrete footings. One of the videos I watched, unfortunately, recommended leveling down from your highest point to the middle footing and then to other end. This, as it turns out, is idiotic. If you’re working with six footings, Level your four corners and figure the middle out later. You should also be prepared to work hard, have everything level, and have all of that thrown away instantly when you add a new post, move a foundational piece slightly or similar.
How to Notch Posts and Rafters
As mentioned above, this was a post and beam type project, and so the roof beams actually sit in notches cut into the posts themselves. The simplest way to notch a post, I’ve found, is to set a circular saw to the appropriate depth (1.5″, for example, if you’re seating a 2xX piece) and make a straight (shoulder) cut at the bottom of where you want the notch. Then simply use the circular saw to make a dozen or more cuts above it at the same depth. The remaining thin strips of post are then easily removed with a chisel.
You can kind of do the same thing in notching the bird’s mouth of rafters, but it’s tricky. Make sure you have spare lumber on hand.
How to Hang End Rafters Solo
This seemed challenging because the end rafters were pressure treated 2×6 strips that weren’t light, and not only needed to be fastened to the shed wall but at a particular angle and height to match the rafters. Even solo, however, this was pretty easy: use two clamps to attach them to the wall, adjust as necessary, tighten the clamps and fasten them permanently.
How to Hang a 2x8x12 Fascia
When writing up the instructions for this step the night before I was to hang the fascia, the last bullet was “How?” I couldn’t figure how – or even if – I was going to be able to haul a heavy pressure treated 2×8 over 12 feet long and hang it levelly between two end rafters 12 feet off the ground. After several failed attempts and one crushed pinky, I worked out how to do this. Using two clamps, create a stand or brace of sorts perpendicular to your fascia using a spare 2×4 or similar in the middle of the shed. Make it as close to your ideal height as possible. Then, when you haul the 2×8 up to temporarily fasten it to one rafter, you rest it on the foundation that’s a foot or two shorter than your rafter and you have one end temporarily attached and held up by your 2×4. The stand you’ve created acts sort of like a second set of hands would, holding the fascia up. Then when you move the ladder down to the other end of the structure, the fascia is already near the height you need and thus easy to level and attach.
Simpler still, of course, is simply having someone help you. But if you have to do it this way, it is possible.
Shingling is Awful
After watching all the YouTube videos, I mistakenly thought shingling wouldn’t be all that bad. I was seriously mistaken. It isn’t technically that difficult, as mentioned above. Once you get the idea, the pattern, shingling is straightforward. But there are a few problems. First, the pitch on my roof was greater than in the videos, so I couldn’t walk around like they did and casually use a nail gun to attach the shingles. And not just because I don’t have a nailgun. Best I could do was crab walk around, and then sit sideways on one leg while nailing in a shingle.
There are two more problems, however. First, shingles are like large pieces of sandpaper. By the time I figured this out, I’d sanded most of the leg hair and some skin off my left leg, and I had a fair amount of asphalt embedded in it. Normally, this isn’t a big deal, as you can throw on jeans and be done with it. Because it was pushing 90, however, I opted out of that plan and instead made myself some leg armor using cardboard boxes and duct tape. The other problem with asphalt shingles is that they are deep, deep black, as was the felt building paper under them. So the roof is exceptionally hot as well as painful. Also dangerous, if you were to fall off. Which is why shingling is awful.
Pay Attention to Weather
This is especially true for me, but really for anyone who doesn’t want to be caught holding electrical power tools in the rain, paying very close attention to the forecast and weather radar is important. Otherwise you end up trying to cover the unshingled plywood roof with a giant tarp in 30 MPH winds and driving rain. Not recommended.
The End Product
A leanto firewood shed certainly isn’t going to win any design awards or be featured in architecture magazines. This is especially true of this one, about which the best that can be said is: “mistakes were made.” As one of my friends observed after looking at it for thirty seconds: “little shy on this end?”
But mistakes or no, there’s something satisfying about building things with your hands. Particularly when using tools with handles worn smooth by years of your grandfather’s usage. More to the point, even if it’s not perfect, as another friend put it, its only job is to keep rain and snow off of a pile of wood. So far tonight, it’s been up to the task.
This one’s for you, Gramp.




2 thoughts on “How to Build a Woodshed”