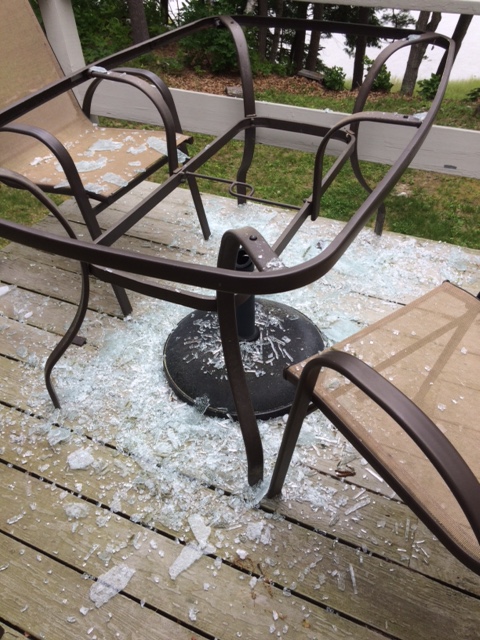
Two months ago, Kate and I got an email from her mother with a subject line of “Oops.” While my mother-in-law was watching our baby, she heard a dull thud outside and walked out on to our deck to investigate. What she discovered was that our glass patio table surface had decided to reorganize itself into thousands of smaller pieces of glass. As best we could reconstruct, a gust of wind lifted the umbrella up off the table, only to drop it right back down on to the glass surface, shattering it.
So much glass.
The good news is that no one was hurt. The bad news was that we needed a new patio table.
By the time July rolls around, however, most of the available patio table inventory is depleted and out of stock. Which meant that we were looking at throwing a few hundred dollars at a table that was of questionable quality, taste or both.
Which is how we ended up declining to go that route, and instead deciding to build a table from scratch. It certainly helped that we now have a pickup truck, which made acquiring the necessary materials substantially simpler, and also that I had vacation coming up on the schedule.
When it came time to selecting the style of table and the materials, I’m fortunate that Kate appreciates the rustic and reclaimed wood aesthetic, both because that makes construction simpler in that it’s easier to hide mistakes, and because the cost of materials was zero dollars – but I’ll come back to that. In the meantime, here’s how to build a pallet table of your own.
Tools Used
- Hammer (Estwing)
- Cat’s paw
- The Extractor (Jefferson Tools)
- Prybar (Stanley Wonderbar)
- Drill (Makita)
- Jigsaw (Makita)
- Chop saw (Hitachi)
- Sawzall (Dewalt)
- Drillpress (Delta)
- Thickness Planer (Ryobi)
- Pocket-hole jig (Kreg)
- Brad-nailer / compressor (Senco)
- Glue (Titebond)
- Lots and lots of clamps
- Shop-vac (Rigid)
Step One: YouTube
This first stop in building a table, as with every home improvement project I work on, was YouTube. For anyone interested, here’s a YouTube playlist of a few of the videos I watched as background. I didn’t follow any of them precisely, because Kate’s preferences were not for some of the fancier implementations like the Herringbone table. Collectively, however, they provided the ideas, tips and tricks I needed to build the one we wanted.
Step Two: Sourcing Pallets
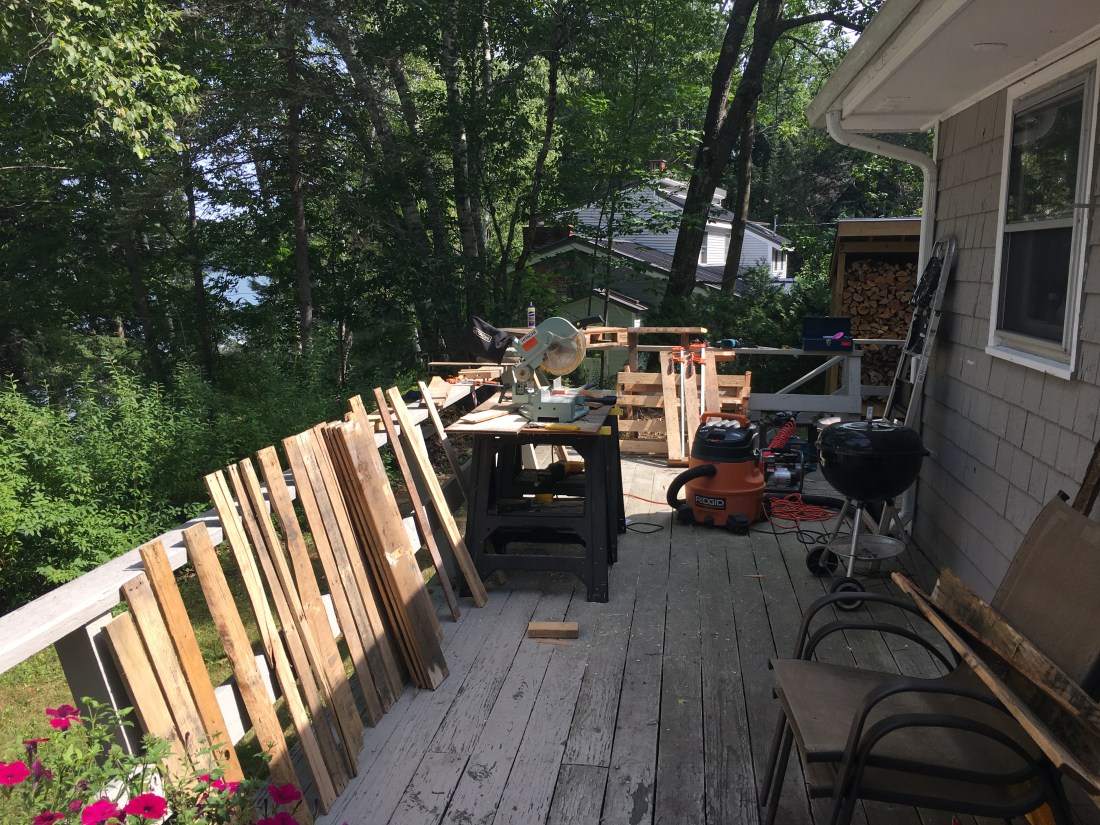
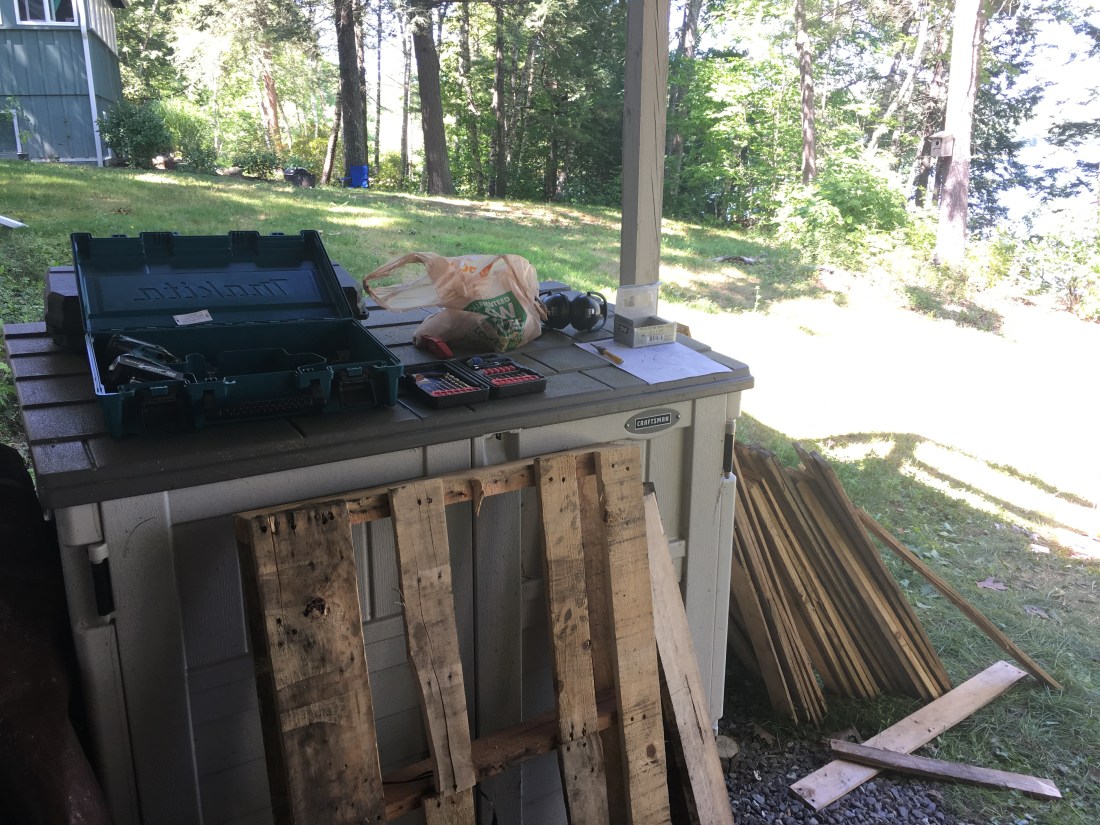
If you’re going to build something out of pallets, it’s pretty important to have pallets. I had one left over from the drop off of the materials I used to build our woodshed last year, but tables require more than one pallet. Craigslist provided several interesting options. There were a number of places that offered pallets for sale for prices ranging from $3 to $7 a pallet, which is still enormously more cost effective than purchasing new lumber. But it also turned up a number of sources that just wanted to be rid of pallets, and made them free for the taking. So two or three times, I stopped by a warehouse out west of Portland, loaded up the truck with four or five pallets and ferried them home for deconstruction.
Note that I did not need all those pallets for just the table: four or five would probably suffice.
Step Three: Deconstructing Pallets
Most of the pallet construction videos I watched suggested that taking the pallets apart was actually the hardest and most time consuming part of the project, and for the most part that was correct. Everybody seemed to have their own preferred style, but having watched a lot of videos on the topic, there are basically three ways to take apart a pallet.
- Use a Prybar:
The advantages of this approach are that you don’t need any particular power tools, and that you don’t risk said powertools encountering a hidden nail. Or cutting something off you’d prefer remain attached. The disadvantages are that it is by far the most time consuming, and depending on the thickness of the pallet slats, you may not be able to pry them lose without splintering them. - Use a Circular Saw:
In several videos, people decided not to pry anything off, and simply cut slats out between where they were fastened. This is by far the fastest approach, but it means that you’re limited to very short sections of pallet wood which may or may not work for your project. - Use a Sawzall:
The hybrid approach is to take a sawzall, and attack the pallet slats where they are fastened to the 2×4’s, simply cutting off the nails they’re fastened with. This isn’t as fast as using a circular saw, but it leaves you with longer pallet slats and they are usually, if not always, less damaged than if you pried them up by hand.
I didn’t try the circular saw approach because I wanted longer slats. Instead, I relied on a combination of prybar and sawzall, depending on the pallet and what I needed to extract from it.
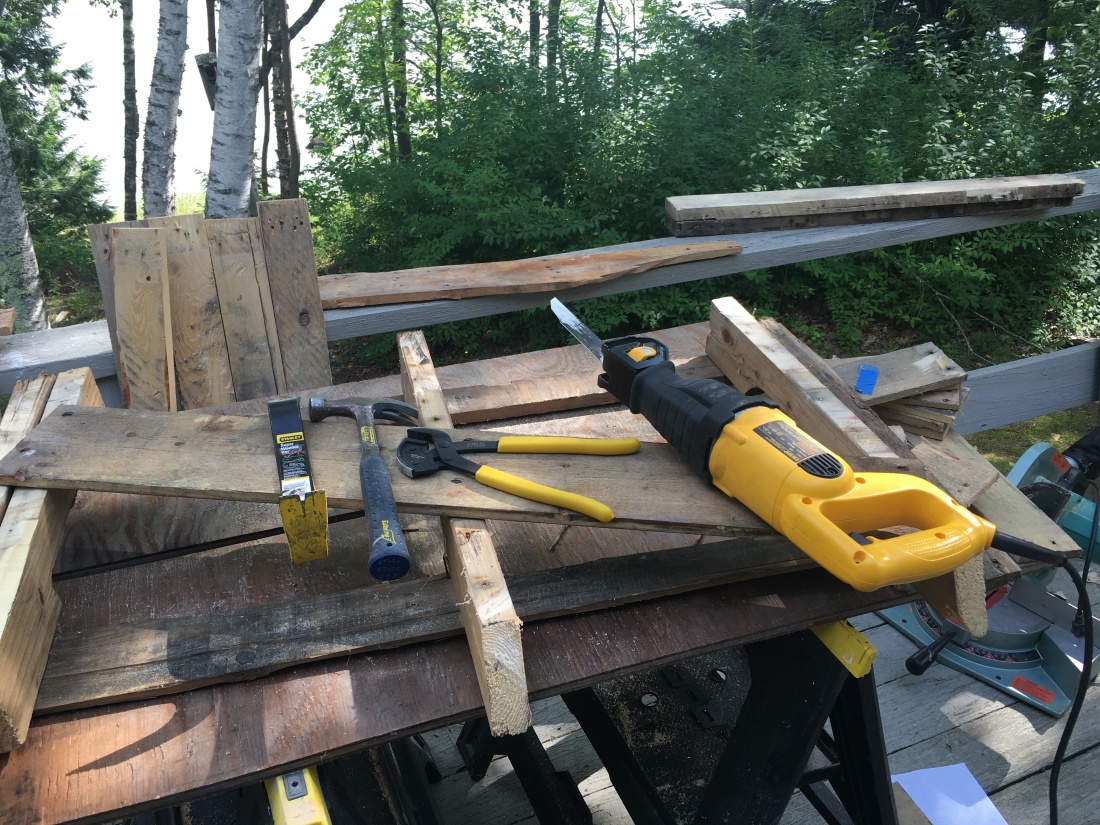
One quick note on the second tool from the right. It’s called “The Extractor,” and I picked it up off Amazon for $29.99. It is unbelievable at extracting nails, even those that have been broken or cut off and are thus impossible to pull with the claw end of a hammer. If you’re going to be doing any work with pallets, I recommend this tool highly.
It’s also worth noting that all pallets are not created equal: if you want a wide plank look, for example, look for that. If you need 2×4 equivalents, look for pallets that provide those.
In general, however, if I had three recommendations for working with pallets, they’d be:
- Watch for nails
- Watch for nails
- Watch for nails
Step Four: Build the Frame
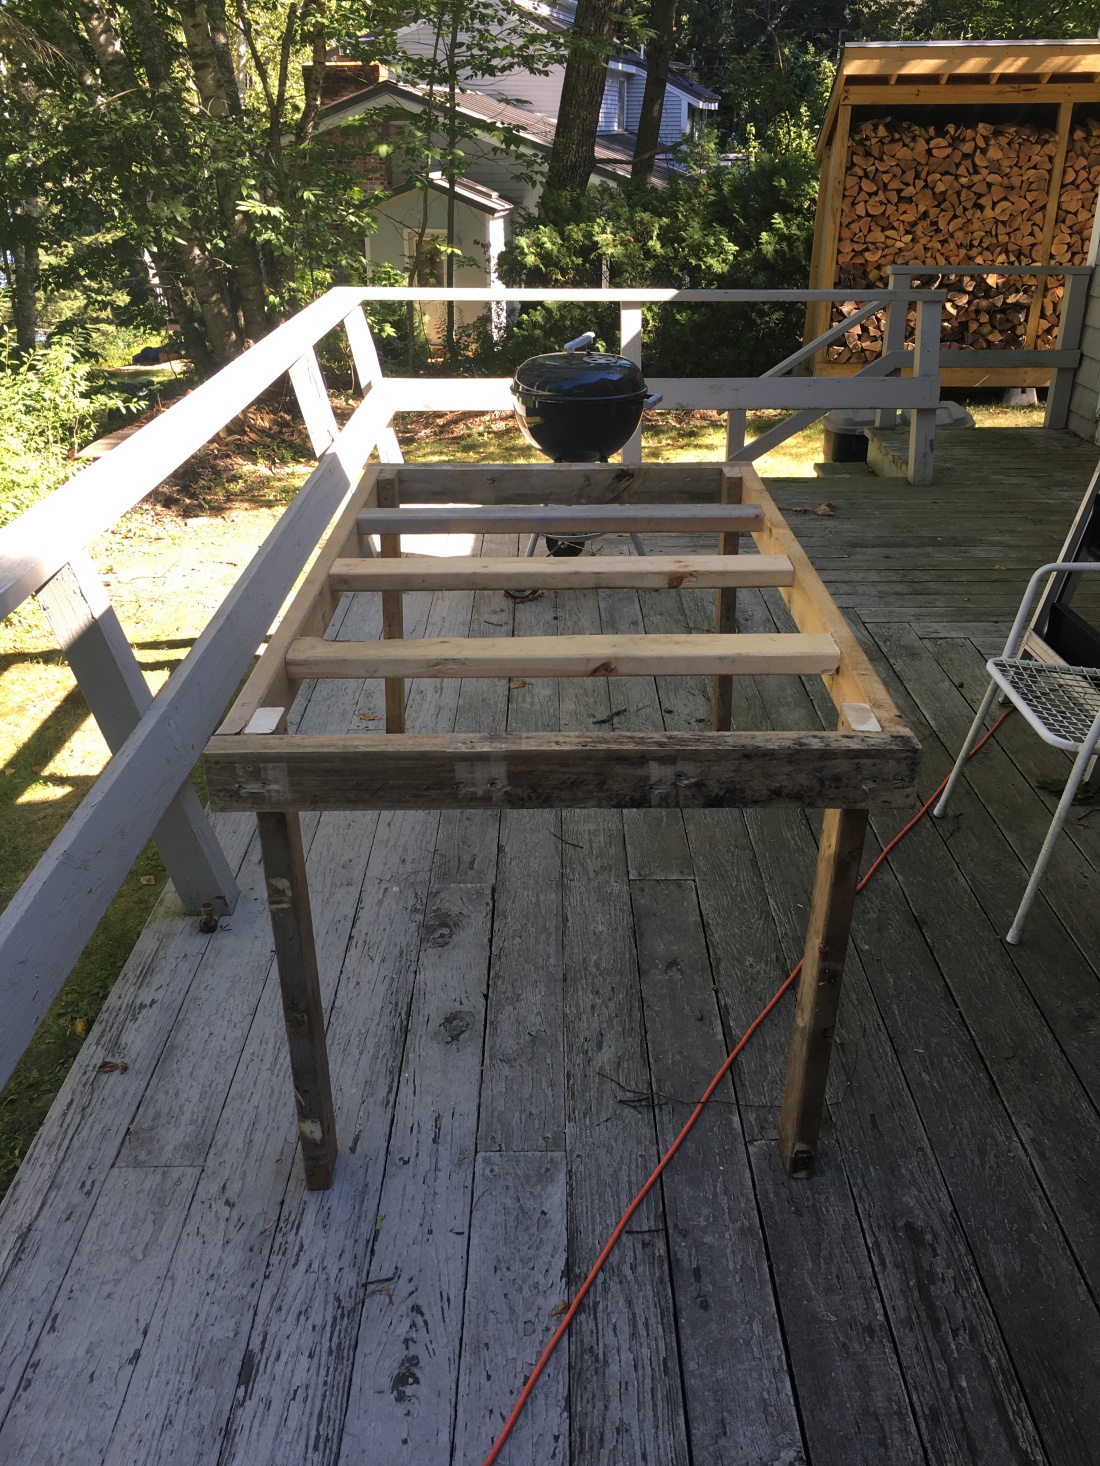
With the pallets deconstructed, the next phase was building the basic frame of the table. For dimensions, I roughly copied our old table. Nothing’s exact when you’re dealing with pallet wood, but it’s also more forgiving in a sense. To build the frame, I picked out all of the thicker, center sections of the pallet that were approximately the dimensions of a typical 2×4 – some slightly thinner, others thicker. As best I could, I matched like segment to like. Once the frame was complete, I clamped on the legs, squared them as best I could and bolted them on.
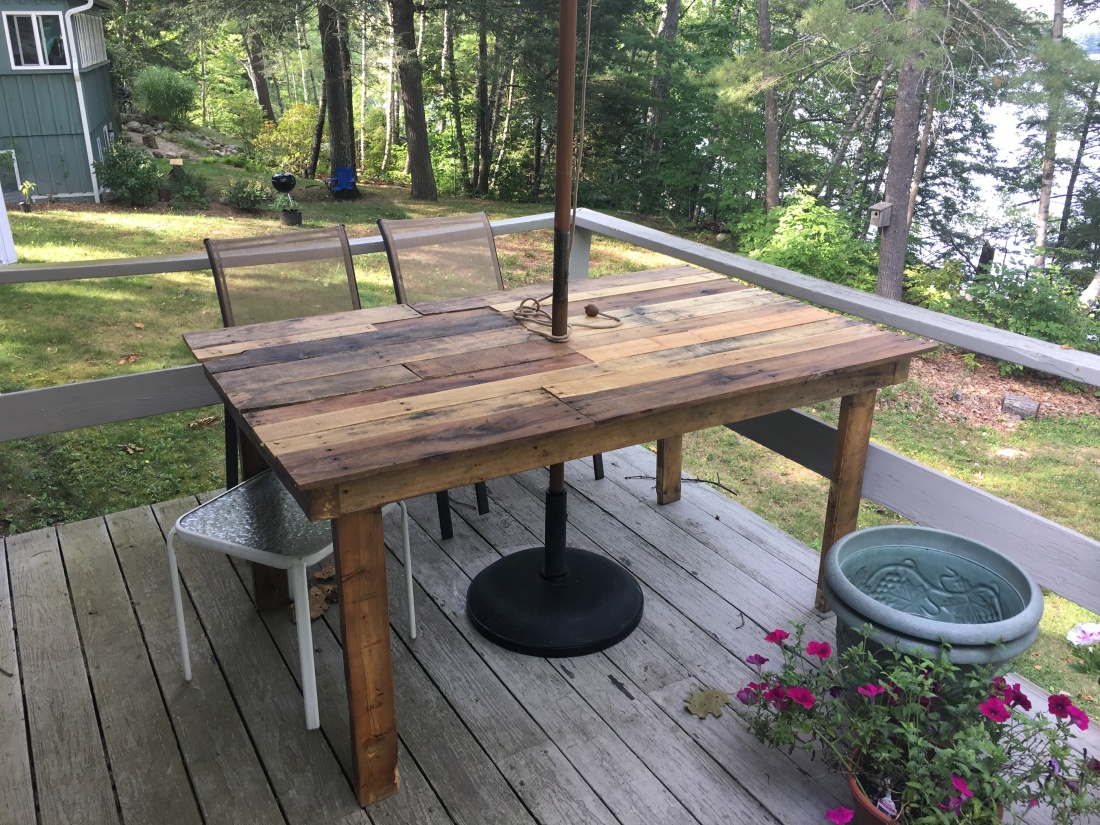
Step Five: Fit the Surface

Once the frame was in place, and knowing I had a specific overhang in mind, I picked out wider pallet slats for the edges, measured them out and then glued and nailed them down. From there, I simply had to fill in the middle segments. Because I don’t have a table saw, I didn’t try and cut pallets down to a uniform width. Instead, I mixed and matched and picked the ones that fit the width most closely, then cut them to fit length-wise. There were a few gaps, but these were acceptable in a “rustic” piece. I also had to trim two pieces slightly with a jigsaw to slot them into place. But eventually, I had a frame and workable – if uneven – surface.
One quick note on the uneven nature of the surface: many of the tables on YouTube are even surfaced, as their builders put all of the pallets through a thickness planer to make them uniform. While I had to thin a few of the thicker segments using a Ryobi planer I bought off Craigslist for $75 from an electrician five miles away, ultimately I decided that some variation was preferable and more consistent with the overall aesthetic. We’ll see if I come to regret this decision later.
Step Six: Sand Everything

Once your table is complete, it’s time to sand. Generally with furniture, you start with a rough grit and keep sanding at higher and higher increments. Given the preference to preserve some of the pallet wood’s character, however, I stopped after a thorough sanding at 80 grit. This smoothed out the wood enough to prevent splinters and shave off sharp corners, while opening it for staining and sealing as necessary. It didn’t take off enough of the surface to lose any of the unique coloring, stains and stamps from the pallet wood, however.
One quick safety tip: while I hooked our sander up to the shop-vac to reduce dust, it’s still important to wear a respirator while sanding pallet wood because you never know what’s in it.
Step Seven: Polish and Seal the Table
This being an outside table, one of the primary concerns was not just polishing the rough pallet wood to highlight the varying natures of the lumber types used, but sealing it against the elements. For this task, Kate asked if there were any natural sealants we could use rather than a standard polyurethane. After a bit of Googling, I turned up a recipe – and YouTube videos, naturally – for making a sealant and polish out of linseed oil (aka flaxseed oil) and beeswax, in a 4:1 ratio.
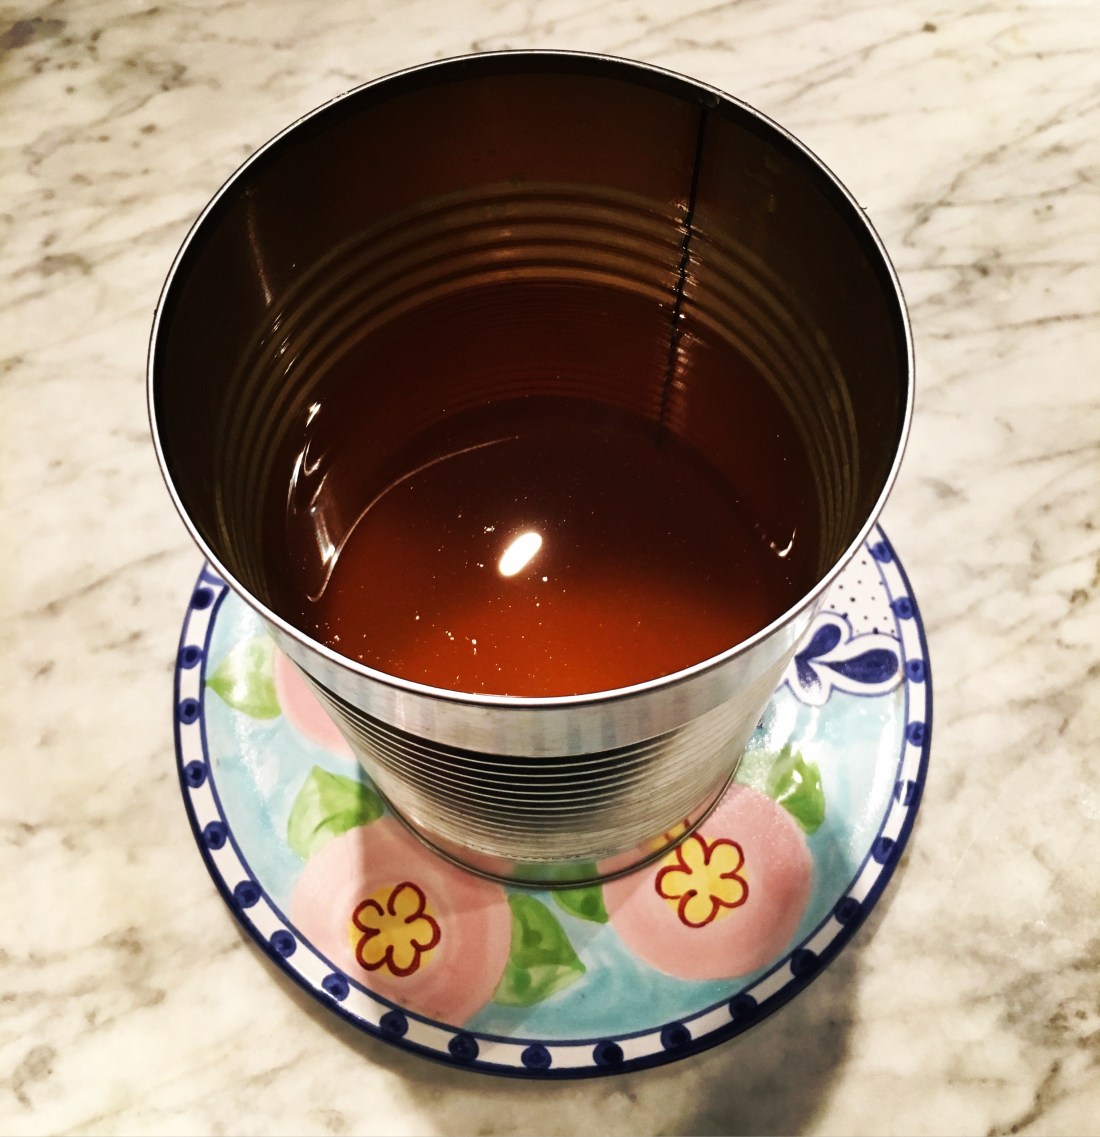
Making this couldn’t be easier.
- First, you cut up beeswax into small pieces and melt it in a can placed inside a pot of boiling water. This double boiler set up is necessary because directly heating the beesax can apparently set it on fire, which is bad.
- Once the beeswax is melted, you slowly stir in four times as much linseed oil. It congeals at first, but stirring will cause it to dissolve into the wax.
- Once you’ve mixed the two completely and you’re left with a clear liquid mixture, turn the heat off and let the solution cool. It will harden into a thick wax.
The wax is not the easiest thing in the world to apply, but it goes on without too much effort and, once applied and buffed out, gives the wood a nice and warm tone, while not being tacky to the touch. And as for water resistance, so far anyway water beads up on contact rather than soaking in.
This natural sealant is both less effective overall and much less durable – it’ll have to be applied annually, at a minimum – than alternatives like polyurethane. But it’s much less damaging environmentally, and it’s easier to work with, so at least at this point it’s been a welcome development.
Step Eight: Build a Bench

Normally, step eight should be have a beer and enjoy your new table. In my case, however, the completion of the table was followed immediately by a project to build an accompanying pallet bench. With the exception of the mortice and tenons, which my friend Joe talked me out of in favor of pocket screws, I followed this build pretty closely. Originally my plan had been to follow this I Like to Make Stuff model, but I made the mistake of showing the first video to Kate and she preferred the wide plank layout and asymmetrical legs.
Because I was headed down to Fenway Park (good guys lost), I ran out of time yesterday afternoon and haven’t finished sanding and sealing the bench yet, or applying trim to the sides, but the bench is in functional shape now. Hoping to finish that up Monday morning. Then it’s time to start on our closet organizer build.
In the meantime, I hope this writeup helps anyone who’s interested in building pallet furniture. As long as you have YouTube, it’s really not that challenging.
