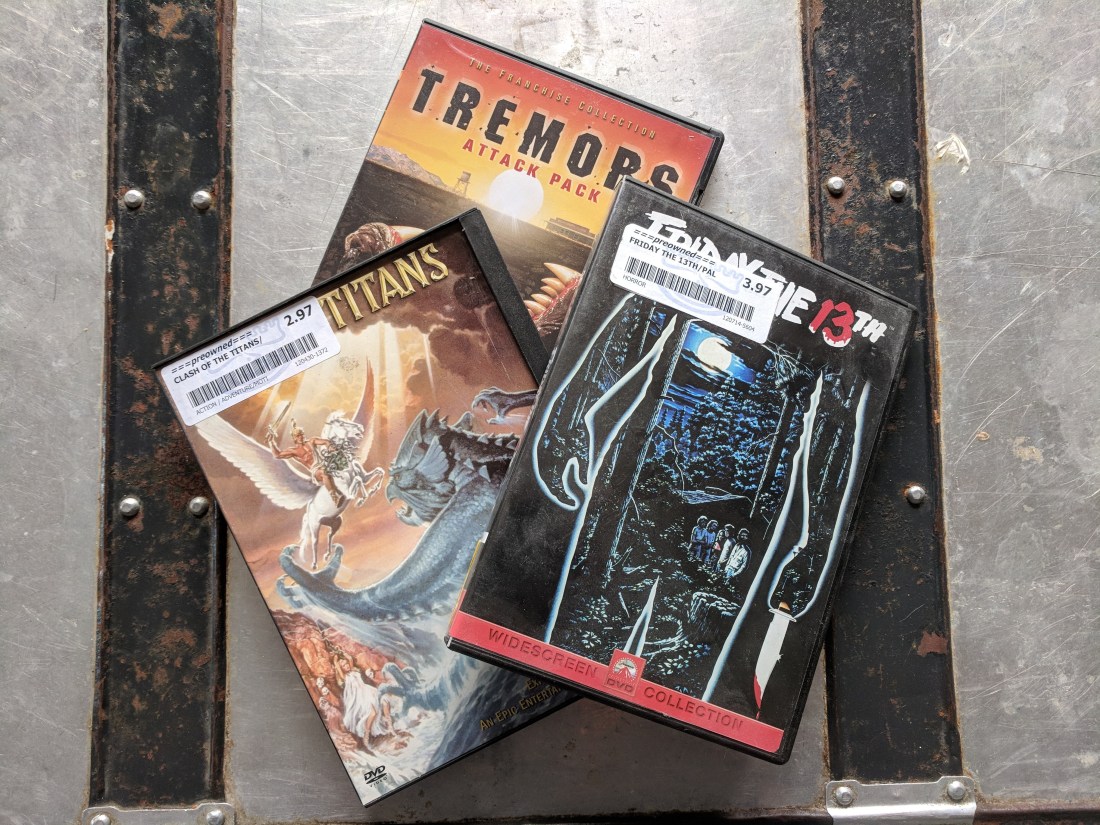
I Have Squandered My Days With Plans of Many Things

This summer’s vacation was unpredictable, as could have been predicted. Rather than the usual three week stretch to close out the summer, it was one off at a cottage up north, a week back in the office, than two more of staycation, where staycation means working as a general contractor on our house. And as with most best laid plans, things didn’t quite go according to schedule thanks to some fun daycare viruses.

For all that, however, it was a great break, one that allowed me to recharge the batteries with the Monktoberfest looming and the usual fall travel slate right on its heels. I didn’t get to about half of my to do’s, and the world beyond the great state of Maine had a rough few weeks as is typical, but any vacation that ends without a trip to the ER is a good one in my book.

Here’s how things went.

For week one, we rented a cottage just around the corner from where our wedding reception was and across the street from the Atlantic.

IMG_20170812_095944

Just across the water on the other side of the peninsula from us was Coveside, one of our favorite restaurants on the water. And by on the water, I mean that while sitting at the bar you get to hear the hostess scrambling to find out a new mooring for an incoming vessel over marine radio because someone was parked in the wrong place.

IMG_20170811_212122_429

One peninsula over is Pemaquid Beach, which reminds me a bit of the beaches I grew up going to on the Cape, just with thousands fewer people.

IMG_20170811_101426

While, unlike the cape, there are no white sharks at Pemaquid (yet), we weren’t completely lacking in sharks.

IMG_20170810_094416

If you’re up that way, visiting places like Fort William Henry is a nice combo of colonial history with a lot of room for kids to run around.

IMG_20170810_170147

And as long as you’re there, might as well eat out on the dock at the Contented Sole which is less than half a mile away.

IMG_20170810_173157 (1)

After a week up north that went too fast, as it always does, it was back to work for a week. Though to be fair, some of that work involved visiting breweries, so it wasn’t all bad. Either way, the following Saturday I headed down to Fenway to see the Red Sox play the Yankees. It was the first time I’ve seen Chris Sale throw live.

IMG_20170819_203427

The game was the same day as the massive anti-Nazi counter-protests in Boston, which if I’d had time I would have come down early for. As it was, however, the TV trucks were out in force wrapping things up when I walked over to Fenway from South Station along the south side of the Commons.

IMG_20170819_173947

While at Fenway, I secured my annual replacement hat. Fun bit of SOG Trivia: any Red Sox hat you see on my head was bought at the park. There has never been an exception to this rule.

IMG_20170820_111353_412

Bright and early Monday morning, I made the first of several trips to Home Depot to pick up lumber.

IMG_20170822_094914

First up was ripping out the crappy wire shelves in our kitchen pantry and replacing them with slightly less crappy melamine coated alternatives. Because a kitchen remodel is on the table at some point, we didn’t go nuts with anything terribly fancy (though the sliding shelves I looked at were cool), just something basic that would be better than what we had originally.

IMG_20170823_161200

Next up was a closet organizer for the bedroom. As with the kitchen, the bedroom is likely to get torn up at some point so we kept the plans simple. The good news is that I learned from last year’s disaster which nearly cost me the tip of a finger, and things went much more smoothly this time around.

Not least because I finally saved up enough to buy a very pricy, but safe, SawStop tablesaw a few months ago. The larger cabinet models have a lot of advantages over the jobsite model I got, but there’s not much that beats working outside in the summer, so portability is huge.

IMG_20170821_140655

While I didn’t injure myself this year, assuming a minor burn with an iron doesn’t count, my execution was not without incident. While cutting the dadoes (read: grooves) for the closet organizer shelves, an enormous wasp landed on my arm. I jerked the arm, the arm knocked the guide for the router and, well, it didn’t end well. Except that I didn’t get stung, which was nice.

IMG_20170822_134410_946

But as these shelves are not intended to be permanent, I didn’t sweat it and just put a shelf right above it. Note that after last year’s debacle, I have a far more reasonable number of clamps for assembly.

IMG_20170822_201304_269

The final product is not going to win any awards, but makes far better use of the tiny closet than the single bar and shelf that were in there previously.

IMG_20170823_152749

In the market for some new deck chairs but short on time, I turned to a simple design based on regular old dimensional lumber. These are dead simple to build, to the point that you could knock several out in an afternoon pretty easily. We’ll see how the pine holds up outdoors, but the plan is to pickle and then seal them with poly and epoxy feet. Worst case and they don’t hold up, I’m out less than fifty bucks worth of lumber and an afternoon. Best case is that I have two new roomy deck chairs for less than a hundred bucks.

IMG_20170825_110724_696

The last home improvement project I was able to get to was one that has been planned for years. One of the first things we did when we bought our house was rip out an unfortunately located closet that was smack in the middle of the living room. With the help of our friend Corey, we demoed the closet and later sealed it up with sheetrock. We’d ignored the strips of missing flooring, however, punting on that and leaving holes like this one.

IMG_20170901_090834

The first problem with patching the floor was finding someone who would sell me less than dozens of square feet of flooring. I eventually ended up at Lumber Liquidators, where they had a lot of oak flooring in the right size for $8 or so. After purchase, however, they apparently discovered that they didn’t actually have a lot that small, so shipped me four times as much as I ordered. The good news is that it was still $8. The bad news is that I have a shitload of 3/4″ x 2 1/4″ oak flooring left over that I don’t need.

But either way, I was relieved to finally, years after ripping out the closet, be able to cross “patch flooring” off of my house projects to do list. And before someone says “why didn’t you try and match the existing flooring, that looks ugly AF,” note that a) the majority of these patches are covered by carpeting and b) if we relocate the stairs as we expect to this is all going to get torn up anyway.

IMG_20170901_154321

Lest you think it was staycation was all DIY all the time, I did manage to get out and about. My brother and his kids were up the first week, which was awesome. My parents have saved literally everything everything Nick and I played with as kids.

IMG_20170820_202303_976

Along with her cousins, Eleanor got to pick fresh blueberries from my parents garden. Not too many actually made it back to the house, but she enjoyed it.

IMG_20170820_160738 (1)

The day before my brother and his family headed home, we all went over to the former naval airbase in Brunswick because the Blue Angels were in town.

IMG_20170826_114923

But while I got to see my favorite aircraft of all time, it turns out that toddlers that refuse to wear their hearing protection are not super excited about jets that roar past a hundred feet off the deck. Our time there, then, was regrettably brief.

IMG_20170826_193616_763

We also got the chance to visit Five Islands while my brother was up. It’s always rated as one of the best lobster pounds in Maine, and is picturesque enough that it’s been featured in a couple of national commercials. It’s also a couple of miles from where my parents live.

IMG_20170825_222800_019

One of the days Eleanor was out from daycare, we got to visit her happy place.

IMG_20170828_141230

On the second to last day of my vacation, I got to visit mine. Temps were in the mid-sixties rather than the eighties that characterize my visits usually, but as an O’Grady I’m obligated to swim regardless of what the air or water temps are. Cold or not, there’s nothing like closing out the summer by drying yourself on a rock next to a waterfall drinking a nice craft beer.

Burst_Cover_GIF_Action_20170831125127 (1)

Time to start planning for Summer 2018.

Everything You Need to Know About Firewood: The Q&A

Four years ago, my wife and I bought a house. In a first for us, the house included a fireplace. This was how I got started down the path that ended with me reading books about how Norwegians stack wood and watching YouTube videos on everything from A/B testing fire building methods to chainsaw bloopers.

Also, I’ve covered half of the front lawn with piles of air drying lumber.

The fireplace has long since given way to a fireplace insert – essentially a woodstove that fits in a fireplace. After debating at length about a variety of heating options, we decided to double down on wood due to the economics, the vastly improved efficiency of modern EPA-approved stoves, its independence from the power grid and a family affinity for sitting around a roaring fire on cold nights.

While it’s a relatively cheap fuel in the economic sense, however, wood comes with other costs. Wood requires a lot of preparation and physical effort, while other fuels typical to the Northeast like oil, natural gas or propane are never touched by human hands (unless something has gone terribly, terribly wrong). The learning curve can also be steep.

Which is why, while I’m no expert, I wanted to capture a few of the things I wish someone had told me when we first started down the path with wood. Queue the firewood Q&A:

Where’s the best place to learn about this stuff?

Two recommendations. First, read Norwegian Wood. Easily the best resource I’ve found, and a surprisingly entertaining read. Second, as always, YouTube is your friend. This channel in particular has a ton of useful information, and the production quality is unexpectedly impressive.

Where do I get firewood?

Obviously, wood is either going to come from your property or someone else’s. Most of us don’t have enough property to provide us with free fuel, which means that we have to buy it from someone else. Your best bet in sourcing wood is to ask around or check lists of the Angie’s or Craig’s varieties. If you live somewhere cold enough to have a fireplace or woodstove, there will be someone selling wood.

What am I looking for in firewood?

You want to know about the quality of the wood delivered (is it largely intact or a bunch of kindling?), whether they’re accurately reporting the level of moisture (is it seasoned or kiln-dried as ordered?), whether you’re getting the species promised (did you expect hardwoods but get soft?) and whether or not you’re getting the number of cords agreed upon.

When do I get firewood?

IMG_20170210_145955
The short answer: as early as possible. The longer answer is that it depends on what kind of wood you’re getting. There are three types:

  • Green: The cheapest option, this is wood that has just been cut, and should not be burned until it’s been dried. If you can, get this early in the spring and dry it all summer and fall and it will be ready by winter (unless it’s Oak, which can take two full years to season).
  • Seasoned: This is wood that’s been left outside to dry – seasoned, in other words – to a moisture content of 20% or less (we’ll get to how to test that). Should be burnable as soon as you get it.
  • Kiln-Dried (KD): The most expensive option, this is wood that’s been baked in a kiln to reduce the moisture content quickly, with the side benefit of killing insects. This is burnable right away.

If it’s green wood and it’s not oak then, it needs to be drying by early spring. If it’s properly seasoned, summer or even fall/winter is fine. Same with KD.

How do I measure the moisture content of wood?

IMG_20170717_160655
Ideally, with a moisture meter like this one.

If you don’t have one, or if the cursed thing’s nine volt battery has died on you (again), you can take two splits and knock them together. If they crack, the wood’s dry-ish. If they thud, it’s too wet to use.

What kind of wood am I getting?

There are two kinds of wood to burn: hardwoods (e.g. ash, oak, elm, etc) and softwoods (e.g. fir, pine, spruce, etc). The former are generally preferred because they offer more energy on a per unit basis, but either will work. You’ll read from time to time that you should only burn hardwoods, but according to most stove manufacturers, you can burn all of the above.

Here in the Northeast we’re generally burning hardwoods, but in other areas of the country pine and other softwoods are used exclusively.

In Scandinavia, stove owners will often use softwoods to start a fire because they light more quickly and then transition to slower, longer burning hardwoods to keep the house warm overnight.

How much wood do I need?

This is an impossible question to answer precisely, but here are a few of the variables you’ll need to consider.

  • Is wood your primary heat source, or a supplementary system?
  • How efficient is your stove or fireplace?
  • What type of wood are you burning?
  • How cold do the winters get where you live, and how long do they last?
  • How warm do you want to keep your house?

For a rule of thumb, however, this is pretty reasonable:

So, if you just use your fireplace for romance and relaxation, buy a half cord of firewood each spring and let it season until fall. If you supplement a heating system with a woodstove or fireplace insert, buy two cords. If you heat exclusively with firewood, you’ll need about 4 to 5 cords, depending on the severity of your winters.

We go through between three and four cords per season with our fireplace insert, however.

What the hell is a “cord” of wood?

Firewood is generally ordered in units called cords. A cord is 128 cubic feet of wood, or a stack around 4 feet tall by 8 feet wide by 4 feet deep. The weight varies depending on wood species and moisture content, but is generally well over a ton ranging from 3,500 to over 5,000 pounds. It’s not going to fit in a pickup bed, in other words – it’s usually delivered by a large dump truck.

IMG_20170711_151630_319

This wasn’t even close to a cord, for example.

How to process the wood?


For those purchasing firewood, it most commonly comes already split. In this case, your only job is to store the wood, which admittedly is the worst part of dealing with wood heat.

If you get your hands on unprocessed trees, however, you need to cut them down to size and split them. That process is actually pretty simple.

  1. Determine what the maximum length of log is for your fireplace or stove. Our Jötul, for example, can accept 24″ inch lengths. Not everything needs to be 24″, and it can actually be beneficial to have different lengths, but nothing can be longer than that.
  2. Cut the tree into the segment lengths you need.
  3. Split those segments using an axe, splitting maul or wedge and sledgehammer.

What should I know about splitting wood?

Many things. Here are five specifics, however.

  1. Do not aim for the center of the log. The wood is strongest in the center, aim for an edge.
  2. The safest approach is to aim for the edge directly opposite you. The bad news is that if you miss you’re going to impact the log with the handle, which hurts like hell. The good news is that the axe cannot continue its arc towards your feet.
  3. Don’t overswing, but if you snap your wrists on the downswing you can get some extra acceleration and a better angle for the blade strike. See the video here for a demonstration.
  4. Have a stump or chopping block that’s the correct height. According to Lars Mytting, assuming logs between 12-16″, axe manufacturers recommend that “your chopping block should be no higher than your knees, and probably even lower.”
  5. It’s fun. There is no domestic task more enjoyable than splitting wood.

What are these splitting mauls and wedges and so on?

You’ll need a couple of things. Here’s my setup, and for full disclosure most are Amazon affiliate links, simply because I’m curious which recommendations are most useful.

  • Splitting Maul: Fiskars 7884 X27 Super Splitting Axe, 36-Inch
    IMG_20170717_160621
    This thing is basically Thor’s hammer. The combination of its axe blade and wedge shape simply destroys wood. If you have relatively straight wood without a lot of knots and branches, this will make short work of it. Even without swinging at full strength, I’ve had logs literally explode with large pieces ending up ten feet away (so make sure no one else is around, and/or use the bungee cord or tire methods). Really can’t recommend this thing highly enough. It’s so good that even traditional axe fans reluctantly acknowledge its effectiveness.
  • Chainsaw: Husqvarna 141
    IMG_20170717_160550
    You can spend a lot of money on chainsaws, but for most homeowners, you want something that’s light and will start easily. I’ve generally used a Husqvarna of my Dad’s, a model 141, but they don’t make this one anymore. If I was buying a saw today, I’d get another Husqvarna for three reasons. One, Scandinavians know a few things about chainsaws. Two, Husqvarna dealers are everywhere which makes service and getting parts trivial (the case bolts are $0.94 per, in case you were curious). And last, because this one’s been great. I’d probably get the model 440E.
  • Sledge Hammer: Truper 10 lb sledge
    IMG_20170717_160901Nothing fancy about this sledge. It’s the same length as the axe, so moving from one to the other is easy. Mine’s a 10 pounder, but lighter would be fine for splitting wood: mine has to do double duty as a demo tool.  Again, nothing fancy about the wedge. I picked this one up mostly because I like my Estwing hammer.
  • Gloves: Carharrt Flex Tough:
    IMG_20170717_161214
    I go through a lot of gloves, and for winter you’ll want an insulated pair, but these Carharrts have been good to me. They breathe, the padding in the palm is useful if you mis-strike a log, and I’ve discovered the cowhide fingertips will work a smartphone touchscreen.

What about kindling?

If you’re interested, there are literally hundreds of videos on YouTube about how to split kindling. Personally, I’ve never needed to split much. First, because I save all the scraps from the cords dropped off or the wood I’ve split myself. And second, because I strip each log of smaller splits or pieces before tossing them onto the fire and collect them in a bucket.

What’s the most important thing to remember?

In a presumably apocryphal story, triumphant returning Roman generals would have servants whisper memento mori – remember that you have to die – in their ear to keep them grounded and remind them of their own mortality.

Similarly, it’s useful to remind yourself every time you pick up an axe or chainsaw that these are tools that can kill you. And death would hurt badly and probably not come quickly.

So be careful.

Where to store the wood?

If the wood is green, it’s best off being stacked in loose piles like the ones at the top of this piece to provide better airflow for drying.

If your wood is seasoned or KD, it can be put up immediately wherever you plan to store it during the winter. Generally, storage inside the house is not recommended for reasons that vary from allergens to insects. There are a myriad of options for outdoor storage, from basic 2×4-and-bracket setups like the one pictured here:

IMG_20170413_162114

to woodsheds:

IMG_20150711_151107046_HDR-ANIMATION

to artistically crafted woodpiles. We opted to build a shed, your mileage may vary.

Do I store my wood bark up or bark down?

Before we moved into our house and became a wood burning family, I would have assumed the following quote from Norwegian Wood was a joke.

In Norway, discussions on the vexed question of whether logs should be stacked with the bark facing up or down have marred many a christening and spoiled many a wedding when wood enthusiasts are among the guests.

I understand now. If you store bark-down, you are dead to me.

How do I build a fire with my firewood?

If you’re starting fresh, my preferred method is top down. As a national campaign from Norway in 2010 argued, this is reliable and reduces emissions. It works like this:

  • Bottom layer: logs
  • Middle layer: large kindling or wood strips
  • Top layer: newspaper and/or small kindling/shavings

You light the top and it burns its way down.

If you have coals from a previous fire, the easiest way to relight them is to rake them forward and put a piece of kindling behind it and then larger logs behind that. That way, the fire will burn from front to back, improving the aesthetics if you have a fireplace or your stove or insert has a glass door, and it burns more slowly than if all of the wood is exposed at once.

You said this would be everything I wanted to know about firewood, but I have other questions.

Then fire away in the comments and I’ll update the post accordingly.

Books: Summer 2017

A couple of years back, I took some time to write up some quick and unambitious reviews of books that I’d read – the good, the bad and the ugly. To be honest, I mostly did it because I hated the Southern Reach trilogy with the white hot intensity of a thousand suns. A year later, I repeated that process. Nothing fancy, just quick thoughts on some of what I’d been reading for people that might be looking for something new to read.

A month after that last post we had a kid and time to read – let alone write – came at something of a premium.

Fast forward a little less than two years and time is still very much at a premium, but I’m now able to sleep in more than three hour increments. Which means that I’m able to read again, if not at the pace I was familiar with. Which in turn means that I’m once more capable of having conversations with other friends who read, and with whom I trade book recommendations.

In an effort to scale that process, I’ve repeated the exercise of reviewing the last few books I’ve run through. This time, just for the record, I’ve added Amazon links not for the pennies I’d earn but to see whether any of the recommendations work, and if so which ones. With that, here are the reviews.

The Modern Entertainment


Station Eleven, Emily St. John Mandel

eleven
Link

One of a growing set of “literary” fiction set in post-apocalyptic environments, Station Eleven has been compared in some quarters to Cormac McCarthy’s The Road. It’s not in that class of novel for me, but then there are few that are. Station Eleven is, however, a brilliantly executed and well written account of the world after the end of the world. It avoids nearly all of the pitfalls of the genre, it’s strikingly original and the quality is well above average. Recommended.

If you like this, try: The Last Ship (William Brinkley), The Stand (Stephen King)

The Beautiful Thing That Awaits Us All, Laird Barron

beautiful
Link

Originally described as a better written Lovecraft without the racism, this pretty much lived up to the billing. It’s a set of short stories that is best classified as “weird fiction,” which is another way of saying that if you like Lovecraft or the first season of True Detective, chances are pretty good you’ll like these. What’s distinctive about this collection beyond the relative quality of the prose is the diversity of settings and characters: from loggers to hunters to Prohibition gangsters, you’re not reading slightly different versions of the same story again and again. Barron also understands well what so many modern horror directors forget, that what can’t be seen is more frightening than what can be.

If you like this, try: The Complete Collection of H.P. Lovecraft (Lovecraft) or Between Here and the Yellow Sea (Nic Pizzolato)

The Hike, Drew Magary

hike
Link

The fact that I’m recommending this in spite of Drew Magary’s hatred for my beloved Maine (which outdoes even Lev Grossman’s) tells you something about the quality of The Hike. It’s difficult to describe this book. It’s not quite magical realism, not quite surreal, but it’s got elements of both. It’s dark at times, but has a heart and the prose makes for a quick read as it’s not terribly ambitious. It’s a perfect beach read, in other words, and the end delivers.

If you like this, try: Angelmaker (Nick Harkaway) or The Book of Lost Things (John Connolly).

The Classics

Right Ho, Jeeves, P.G. Wodehouse

jeeves
Link

Inexplicably, I somehow made it to adulthood without reading any of the Jeeves’ novels by P.G. Wodehouse. I wish I’d found them years ago, however, because they’re incredibly enjoyable. If you’re unfamiliar with the series, it’s the story of a British valet trying to keep his dim employer out of trouble. The latter ignores the former’s advice, hilarity ensues. If you enjoy Dilbert’s “The Boss is an Idiot” brand of humor but can’t deal with Scott Adams’ obvious and growing insanity, the Jeeves’ novels are for you.

Trouble is My Business, Raymond Chandler

trouble
Link

There’s a funny story about Bacall/Bogart’s 1946 film The Big Sleep based on the novel of the same name by Raymond Chandler. During filming, neither the director nor the screenwriter could figure out who killed Bacall’s chauffeur in the novel, so they asked Chandler. Problem is, he didn’t know either.

The point is that Chandler isn’t considered a master of the hardboiled crime genre for his plotting skills. The stories are interesting, to be sure, and include the requisite action and drama. But what distinguishes Chandler from hundreds of others in the genre is that he can write. In a characteristic clipped style with sparse but stylish dialogue, Chandler has Marlowe, the private detective that is literally the prototype, weave his way through what we’d today refer to as a noir landscape.

Trouble is My Business isn’t the equal of The Big Sleep or The Long Goodbye, but it’s an accessible set of short stories that will give you an idea of whether Chandler’s for you.

If you like this, try: The Big Sleep (Chandler) or Red Harvest (Dashiell Hammet).

The (Auto)Biographies

The Stranger in the Woods, Michael Finkel

stranger
Link

Many of us idly contemplate leaving everything behind at some point, but almost no one does it. And certainly no one does it the way that Christopher Knight did, who parked his truck and simply walked into the Maine woods and lived as a hermit without human contact for 27 years. If you read Michael Finkel’s profile of Knight in GQ when it came out, you already have the gist of the story, but this full length treatment affords the author and his (very reluctant) subject more room to explore the details of just how one goes about surviving in the Maine woods without ever seeing anyone or making a fire. Whatever one thinks about Knight, his adaptability to incomprehensibly harsh conditions is without ready comparison. Don’t expect any mystical revelations or real confessions from The North Pond Hermit, but if the story interests you this will more than flesh it out.

The Road, Jack London

theroad
Link

If you’re like me, you read Jack London in school, probably at an early age. Call of the Wild, White Fang, To Build a Fire – one of those. If you’re like me, you didn’t know that London spent years of his life as an itinerant, rail-riding hobo and later documented his experiences criss-crossing North America by hopping trains in a decidedly unstandard autobiograhy. As someone who enjoys learning more about other times and places, this was interesting, but the culture, methodology and art of riding the rails made this a particularly fascinating read. My only warning: because this was published in 1907, like many historical works, some of the descriptions and language are offensive to modern ears. If you can get by that, however, it’s a look at a bygone world that most of us knew nothing about.

If you like this, try: The Amateur Emigrant (Robert Louis Stevenson)

The One on Firewood (Seriously)

Norwegian Wood: Chopping, Stacking and Drying Wood the Scandinavian Way, Lars Mytting

norwegianwood
Link

To be fair, while this was a best seller throughout Scandinavia, as a book about chopping, stacking and drying wood, it’s less likely to be a page turner for those of you without woodstoves or at least a fireplace. Which is, presumably, most of you reading this. Even so, it’s well written and anything but a textbook. The prose has a bit of a lighthearted “The Hundred-Year-Old Man Who Climbed Out of the Window and Disappeared“-quality to it, and is surprisingly enjoyable. It’s informative and well researched, but as surprising as it might be to say that a book about firewood was a great read, it really was. There’s a reason it had basically a five star rating with north of a hundred reviews when I bought it. If you have a stove or fireplace, it’s a must buy, and even for the rest of you, you’ll learn something and be entertained in the process.

The Histories(ish)

Kon Tiki, Thor Heyerdahl

kontiki
Link

This was my second reading of Kon-Tiki, as I’d read a copy as a very young child at my grandfather’s place on the Cape. Besides refreshing myself on the actual details of the journey of a handful of young men on a Balsa raft all the way across the Pacific, my adult self was curious as to how some of the historical theories of Heyerdahl had aged. The answer is: not particularly well. Heyerdahl’s theory of a lost white race that taught the Incas everything they knew being the ancestors of today’s Polynesian populations is not only largely disproven by modern genetic research, it’s also implicitly racist when viewed from a modern perspective.

That’s the bad news. The good news is that, shaky historical theories notwithstanding, Kon-Tiki is still a fascinating read. While Heyerdahl may have been wrong about the idea that Polynesia was populated by South Americans traveling west on the Pacific’s Humboldt current to Polynesia, he risked his life and proved that it could be done. If nothing else, Kon-Tiki is a remarkable story of human achievement and drive and worth a read for that alone.

Atlantic, Simon Winchester

atlantic
Link

I read this at my parents’ recommendation and while I’m not quite sure what I was expecting, it wasn’t what I got. Atlantic is essentially a series of personal or historical anecdotes upon which are hung a stupefying amount of detail and research from geology to climatology. The good news is that if pure science isn’t your thing, you don’t have to wait long before the author’s talking about the time he spent in Greenland or the Falkland Islands or visiting a remote shipwreck on the coast of Africa. If you enjoy history, geology, oceanography, local cultures or a thousand other areas of study, you’ll find something to love about this book.

An Instance of the Fingerpost, Iain Pears

fingerpost
Link

If you enjoy historical fiction generally and historical mysteries such as The Name of the Rose specifically, you’re likely to enjoy An Instance of the Fingerpost by Iain Pears. I don’t mean to imply that it’s in the class of Eco’s masterpiece, but set in late seventeenth century England, Pears’ novel is an account of the same series of events told from four different perspectives – all of which are unreliable, some more than others. The varying perspectives affords the novel greater breadth than it would have had access to if restricted to a single narrator, both in terms of their socio-cultural standing as well as their geographic access. It doesn’t have the blinding erudition or strict attention to period language that characterizes other novels of this type, but what it lacks in rigid adherence it more than makes up for in accessibility. Which means that you don’t need to be a scholar of English history of the period to enjoy the novel, which traverses ground from the royal court to academia. It’s on the longer side, but it’s time well spent in my opinion. Recommended.

If you like this, try: The Name of the Rose (Eco) or Q (Luther Blissett).

The Meh

Fer-Da-Lance / The League of Frightened Men, Rex Stout


Link, Link

Before the hard boiled detective fiction of Raymond Chandler, there was the so-called “cosy” school of which Agatha Christie is probably the best known practitioner. The former, in many respects, can be viewed as a response to the latter. Nero Wolfe, the protagonist of Rex Stout’s series, doesn’t properly belong to either category, which might be one of the reasons these novels didn’t do much for me. Unlike Chandler, who hated Christie, I can read both styles and enjoy them. But the Wolfe novels, for me, embodied the weaknesses of both categories with few of the strengths. I read the first two of the series largely because Stout is an acclaimed writer and Wolfe is a celebrity fictional detective up there with Marlowe, but frankly the plots were ill-constructed and the writing wasn’t enough to make up for it. I will say that the depression era setting and descriptions were interesting from a historical perspective.

If there are Wolfe fans reading this who can persuade me otherwise regarding the merits of these books, I’m willing to listen, but at present I have no plans to read the remaining 31 novels.

My 2016 in Pictures

I’m a bit behind this year as my Christmas and New Year’s week holidays were erased by a variety of illnesses – none major, fortunately – that swept our household. But late being preferable to never, it’s time for my annual year in pictures post. It’s always a useful exercise for me, as I can revisit a year easily and quickly. And by doing it in pictures, I’m not required to invest time I don’t have.

On balance, 2016 was a fine year for me personally, and a year of many, many firsts (kid-related, mostly). The fact that it was an abject disaster from a macro, geopolitical perspective takes some of that shine off, however. Election or no, however, I’m still here, my family and friends are still here and we’re all committed to soldiering on. So I’m grateful for that.

Before we get to the pictures, however: a couple of statistics from 2016.

Travel

2016 was a second consecutive year of improvement, travel-wise. My mileage was way down, as I flew less this year than I have since 2008. Only 2013 is close. Most years I qualify for JetBlue’s Mosaic program in May or June. This year, it was during my last trip in December (though admittedly some of that delay is that Virgin has poached most of my travel to and from San Francisco from JetBlue thanks to a better loyalty program). I’m unlikely to sustain quite this slow a pace of travel as a fair bit of the downturn was due to one time events like missing the Monki Gras due to paternity leave. Some of it, however, is attributable to having another analyst on board, changes in where conferences are hosted (Austin being closer than Portland, as one example) and so on. Which implies that I should be able to maintain a slightly reduced travel schedule at a minimum.

In the meantime, a few other tidbits courtesy of Cemre’s TripIt Year in Review tool and Openflights.org.

  • Distance: I flew 68,365 miles, down 25% or so from 2016.
  • 100K: This was the third time in six years I failed to reach 100,000 miles. Love it.
  • Carrier: 41 segments were on JetBlue. Virgin was up to 12 this year thanks to the aforementioned loyalty program. Thanks to some client engagements in non-standard locations as well, I flew Delta a dozen times as well for the first time in years.
  • Airport: Thanks in part to Virgin, I ended up flying out of Boston (35) more than Portland (21) again this year.
  • First Time: Had never been to Tahoe before, but I can cross that off the list. Reno as well.
  • Where To: Was San Francisco, most frequently. I spent more than twice as many miles headed there as to the second most popular destination, Las Vegas, where I found myself (again) far more than I’d like to be.

Personal Stats

  • My Top 5 non search-engine referrers to the work blog were 1) Hacker News 2) Twitter, 3) Reddit, 4) Wired, 5) Facebook.
  • Looks like I drove between 500 and a thousand refererrals over to Amazon for specifically referenced items. It’s too bad that Amazon and Maine don’t get along so I can’t get referral commissions on that traffic.
  • Per FitBit, I took 3.2 million steps in 2016, up over 500,000 from last year. My daily average was up ~1800 per day to 8710. This was largely a function of Eleanor getting older, and our enjoyment of taking her for walks around the neighborhood, but after two consecutive down years of steps it was also something I was paying attention to. Love to get that number up again next year.

With that, on to the pictures.

January 1

Got an early start on the year, as the Graveyard Shift after the baby came home was mine. I’d stay up until 5 or 6 AM, then Kate would clock back in and I’d sleep until 9 or 10. I don’t miss that sleep schedule.

January 2

img_0512

One of the pieces of advice we got as new parents was to take the baby out as early as possible, the theory being that they get used to be in public spaces and will therefore learn how to behave while out. We’ve tried to practice this, and pretty much the entire staff at our local place, the Broad Arrow Tavern, has known Eleanor since this first trip out.

January 9

Baby’s first brewery? Allagash, naturally.

January 14

Our first time leaving the baby in the care of someone other than ourselves or the hospital staff, Kate and I popped out to the theater to take in Star Wars while my parents babysat for us. All the nostalgia.

January 15

Baby’s first trip to Oxbow. Unfortunately, she fell asleep and missed a visit from the brewery cat.

February 21

For my birthday this year, Kate commissioned a painting of my grandmother’s house. This was the scene of some of my happiest childhood memories, and a house that had been in our family for well over a hundred years. Just this picture brought a few family members to tears.

March 11

mar11
Got out for a little stroll at Winslow State Park.

March 21

Second day of spring. Not joking.

April 2

0402
Finished building a (cheap) workbench. Nothing but 2x4s, 4x4s and some birch ply. I took it from this side because the lumber on the back side was so warped it looks like a pretzel.

May 9

0509

Filed under things I wish I hadn’t had to learn, but it turns out that you can get a passport turned around in Boston in around 90 minutes as long as you’re willing to live with a passport photo taken by CVS up around the road. How long ago had my old passport expired? Six days.

June 7

0607
Courtesy the gentleman and scholar known as Brady Murray, made my first trip ever – I know, I’m as surprised as you are – to AT&T park to see the Giants play the Sox. Beautiful venue.

June 10

About a month prior to this, I got the devastating news that my beloved Volvo S40 – my friend and companion on many adventures – was living on borrowed time,  with a head gasket that was ruptured. This began the search for a potential replacement, and while I would have happily bought the exact same car, Volvo killed off the model and no longer sells cars with manual transmissions. I ended up with a truck.

July 8

I don’t remember my first trip to Fenway as well as I’d like, and Eleanor won’t either because she spent most of it in her stroller asleep. But she’ll have pictures.

July 12

Winter is coming.

July 14

Some “work trips” are easier than others.

July 29

Way up north in Lubec for a wedding, got to visit the easternmost point in the US.

July 30

0730
This was the scene from said wedding. Not too shabby.

August 12

Turns out that when it’s hot and humid it’s hard to run the white noise machine and fan that help your baby sleep. The good news is that my annual preventative maintenance on the generator worked and it fired up immediately.

August 17

The long national nightmare that began when one of the other dads at daycare inexplicably walked off in my flip-flops – which looked literally nothing like his – was over 24 hours later when he returned them.

August 24

My first effort at building furniture was…uneven. Literally.

August 26

0826
Great seats, courtesy my brother-in-law. Even better? The other two in our section didn’t show up.

August 30

With the leftover wood from the table, I built a bench. Unfortunately, I made the mistake of showing Kate one of the fancier YouTube builds which she preferred to the simpler one I had in mind.

August 31

It would seem impossible to nearly lose the tip of a finger due to plywood, but I nearly managed it. Four plus months later my nail is mostly grown back.

September 1

Annual pilgrimage to my happy place.

September 3

After a year’s hiatus, made it back to Chamberlain for our summer vacation.

September 8

Where life was hard.

September 9

0909
Never miss a chance to visit Monhegan Island.

September 14

We do sunsets ok in this state.

September 20

This project, as you might be able to see from the picture, was a tire fire. First, it almost cost me a fingertip. Then, it was setback after setback. Eventually I got the thing built, however, and while it’s terrible to look at, it mostly works.

September 24

Winter wasn’t here, fired up the stove anyway.

October 1

Everyone loves the Monktoberfest.

October 2

1002
I was very happy that Eleanor was awake and mostly willing to sit and watch the celebration of Big Papi’s career. He was the author of more happy Red Sox memories for me than anyone, and one of the best hitters I ever saw wear a Red Sox uniform. It was an honor and a privilege to watch him play, and I’m pleased that my daughter can (technically) say the same thing.

October 6

1006
Survived the Monktoberfest yet again. No biblical flooding this year definitely helped.

October 20

It wasn’t. Unfortunately.

October 31

1031
Best Halloween costume ever.

November 3

Aside from the years the Red Sox were in it and won it, which I prefer for obvious reasons, this was the best World Series of my lifetime. I had a very difficult time choosing a favorite, as either outcome had its positives. In the end, it had been longer for Chicago so I was content. The best part about this series, however, was the fact that I happened to be in Denver and got to watch it with my BFF and his family.

November 6

We try to get outside and hike as a family regularly. Feedback varies.

November 12

The outcome wasn’t ideal, but Eleanor enjoyed her first Biggest Little Game in America.

November 23

1123
With this big oak dead and dropping branches everywhere, we were forced to have it felled. I’ve still got a ton of log splitting to do.

November 25

1125
Until I had a child, I’d never heard of the Polar Express. But at least we learned that Santa is her worst enemy.

November 28

Today’s PSA: if you hate beards and don’t want to have one, do not under any circumstances let your significant other see you in one. Because you may have to keep it. Who would have thought that a Halloween costume of Benny from Stranger Things could have backfired so badly?

December 19

1219
Popped down to Atlantic Hardwoods in Portland and picked up some rough 8/4 walnut stock.

December 28

1228
And turned it into a pair of end grain cutting boards, Christmas gifts for both sets of parents. Cutting boards, as it turns out, are sort of a Woodworking 101 project, but learning how to mill raw lumber as part of this process led to some, ah, imperfections. As always.

December 28

A short bed pickup can hold more than you think.

December 29

Enough to build these storage shelves, at least.

December 30

The day before New Year’s Eve, we were expected to get a mere dusting.

December 30

I spent it swapping out a garbage disposal. For once, I didn’t get electrocuted or cut, nothing got broken or flooded, and everything more or less went according to plan.

If Destruction Be Our Lot

margaret_chase_smith

Today our country is being psychologically divided by the confusion and the suspicions that are bred in the United States Senate to spread like cancerous tentacles of ‘know nothing, suspect everything’ attitudes.

Those words could have been written yesterday, but they were actually spoken by Maine Senator (R) Margaret Chase Smith on June 1st, 1950. Her famous address, The Declaration of Conscience, was a response to the tactics of Wisconsin Senator (R) Joseph McCarthy and the House Un-American Activities Committee. Although Senators McCarthy and Smith were members of the same party, Smith’s conscience compelled her to reject the behavior and tactics of her colleague, even should it should cost her party the election.

I don’t want to see the Republican Party ride to political victory on the Four Horsemen of Calumny — Fear, Ignorance, Bigotry, and Smear.

Though her stand was ultimately ineffectual, as it took this country another four years to master its fear and repudiate McCarthyism (thanks in large part to Joseph Welch), it was no less brave for this. It is, in these dark times, sadly incredible to see a politician willing to put her country before her party.

Everyone reading this knows why I bring this up. Since founding RedMonk fourteen years ago, with the exception of my advocacy for same sex marriage in my home state, I have never publicly commented on political matters before. Ever. This is, however, the most important election of my lifetime. This country is at the kind of crossroads it has not known since 1860, and if you think comparisons to the Civil War are mere hyperbole, I would respectfully suggest that you have not been paying close enough attention.

Much of this fraught election has been driven by fear. Fear of immigrants, fear of minorities, fear of terrorists, fear of people that are different. There are always, in every era, legitimate reasons for the United States to be concerned. There is, at this moment, no reason for this country to be afraid from external threats.

Twenty-two years before he assumed the presidency in that similarly troubled year of 1860, Abraham Lincoln gave a speech to the Young Men’s Lyceum of Springfield, Illinois on January 27, 1838. Although it has come to be known as the Lyceum Address, it was in fact titled “The Perpetuation of Our Political Institutions.” In it, the man who would become the greatest President this country has ever known said the following:

Shall we expect some transatlantic military giant to step the ocean and crush us at a blow? Never! All the armies of Europe, Asia, and Africa combined, with all the treasure of the earth (our own excepted) in their military chest, with a Bonaparte for a commander, could not by force take a drink from the Ohio or make a track on the Blue Ridge in a trial of a thousand years. At what point then is the approach of danger to be expected? I answer. If it ever reach us it must spring up amongst us; it cannot come from abroad. If destruction be our lot we must ourselves be its author and finisher. As a nation of freemen we must live through all time or die by suicide.

I sincerely hope that this nation of free men and women shall live through all time.

If you are reading this and you are a US citizen, please vote.

Things To Know About Closet Organizers


I’d never really thought much about closets, to be honest. Whether that’s because I don’t generally wear things that need to be hung up, or that even if I did I wouldn’t, isn’t important right now. What happened was that I ran across a closet organizer product and showed it to Kate. In my defense, recreating one didn’t look that hard at the time. And probably isn’t, actually, if you have the right tools and know what you’re doing. But I’m getting ahead of myself.

The basic idea of a closet organizer is that most closets don’t use their space efficiently. Hangers, for example, are typically at a height to accommodate longer garments. Have mostly shirts? Too bad, it’s wasted space.

If you have a lot of closets, or if you don’t have much worth hanging up, this isn’t a particular concern. In our case, the fact that we were wasting maybe a third of the available space in our closets was less than ideal.

Most people, if they care about their closet space at all, will just buy a solution.

We had a complicating factor in our testbed, otherwise known as the second bedroom, however. The entrance to the attic happens to be in that closet’s ceiling. Which meant that a closet organizer either needed to be designed with that in mind, or be entirely removable. Neither of which described most of the commercial closet organization products, so we were doomed to a custom job whether we liked it or not.

Rather than starting from scratch, I borrowed ideas from other closet organizer systems – hanging two rows of dress shirts, one on top of another, for example. I didn’t think building one of these would be that hard, which is almost funny in retrospect. I won’t go into detail on how to build one, because anyone who’s handy can figure that out. Basically you build a narrower bookshelf with fewer shelves, then hang things off its side. No big deal, right?

Well, there are a number of things I wish I had known ahead of the project.

  1. Melamine Plywood is Heavy. Also, Sharp.
    Some people build closet organizers out of expensive hardwoods, but given the fact that we didn’t know how long it’d be in there as we are planning on remodeling, we were going with plywood from day one. Given that, we opted for melamine – a white plasticky material – coated plywood. The good news is that it looks clean, is easy to maintain and you don’t have to paint it. The bad news is that a 3/4” 4×8 sheet of melamine plywood is heavy. Heavy and unwieldy enough that if you’re working by yourself, as I usually am, it’s a pain to even get a full sheet up on to sawhorses for the initial cuts. As for the sharpness, let’s talk about clamps.

  2. You Need a Lot of Clamps

    I have a fair number of clamps, but most of them are smaller and of no use in clamping bigger projects. In total, I had three 36” clamps that I could use to build the center console which was six or so feet high and had seven shelves. Ideally, each shelf would be clamped front and back during the glue in – 14 clamps in my case. When you have three clamps total, you’re looking at two to three days minimum just to glue in the shelves with three clamps – time which I did not have. Instead I tried using my three clamps to glue up the completed console – twice. The first time, the lack of clamps holding everything in place meant that it collapsed, knocked over a sawhorse and snapped one half of the console in half (which was the cause of much later woe). The second time, it was still unstable and collapsed again. This time I couldn’t get my hand out in time and four shelves and half of the console fell on the tip of my index finger, with the sharp melamine edge slicing the nail on my right index finger in half. I was fortunate to not lose the tip of my finger entirely, though I still don’t have much feeling in it. Melamine is sharp. The third time, I bought a few more clamps and was successful. Depending on your definition of “successful.” Basically, have all the clamps.

  3. Check Your Router Bit Width

    While I initially considered using a jig to drill holes for pins to make the shelving movable, given the requirement that the shelving system be removable in case of a need to access the attic, I decided on a fixed central console for the closet organizer. To accomplish this, I decided to cut dados (“a groove cut in the face of a board, into which the edge of another board is fixed”) and glue the structure together. Given that the melamine plywood was 3/4” thick, this meant I’d need a 3/4” router bit, which I ordered from Amazon. It showed up, and I cut a few dados with no issue. Trouble was, it was actually 11/16” – a sixteenth shy of what I needed. Generally when people have issues with router bit sizes for dados, it’s that the bit is larger because the plywood is actually smaller than claimed. This was the opposite. I ended up having to drive down to Rockler to get another 3/4” router bit, and recutting the dados. Sometimes this worked. Other times, the second pass cut was slightly too big as you can see in the picture above.

  4. A Table Saw is Helpful

    The workroom in our basement is tiny, which is why I haven’t prioritized a tablesaw. For this project, that would have been much simpler. I have a homemade cutting guide that I can use, but making straight eight foot cuts into plywood with a circular saw is a pain even with a guide. Add in all of the repetitive smaller cuts you have to make for things like shelves and it’s would have been a lot easier and faster if I had a table saw. You can make it work with just a circular saw, at least to my level of dubious competence, but I don’t recommend it.

  5. Glue Goes Through Drop Cloths
    One of the few things I did correctly on this project was realize before I started that if I’d assembled the bulk of the closet organizer in my tiny basement shop, I would never be able to get it out of there. Between its small size and the fact that it’s at the end of a long narrow hall, anything large built in there stays in there. Instead, I did the glue up in our upstairs hall. Which has a nice carpet in it. A carpet that I responsibly protected with two layers of our painting dropcloth. Which wasn’t enough, as it turns out, because – surprise! – glue goes right through dropcloths. This is where I’m at with that issue. If anyone has suggestions for removing glue from a carpet that don’t involve cutting it (that’s been forbidden), I’m all ears.

The bad news is that the resulting project is charitably described as a mess. More than usual, I mean. Two of the dados were cut too wide thanks to the router bit issue, so the shelves don’t fit tightly. Two other shelves seated improperly thanks to a lack of clamps and aren’t flush, which looks weird. The good news is that, functionally speaking, none of that matters particularly. The shelves will still work fine, as will the clothing rods. Also, the closet has doors – which we took the opportunity to paint – which help conceal my shame. All of which in turn means that our closet will be much more efficient at utilizing the available space, and if you don’t look at it too closely you might not notice how poor the implementation was.

The big question now is the master bedroom closet. Was the lesson a) building this is dumb and a waste of time, just buy one or b) building the first one gives me the experience to get it right the second time around? The answer? TBD.

I Have Squandered My Days With Plans of Many Things

All good things must come to an end, and in spite of another home improvement injury (no hospital this time), a multi-day storm without historical precedent, and the fact that I spent the majority of my time off from work working with my hands, it was a good vacation.I may have negatively impacted my ability to make fun of my parents for being the world’s worst retired people based on their inability to stop actually working, however.

As is usual, the world spun on without me. Also as is usual, things in the technology world went bonkers in ways large and small. Sooner or later, those craving stability are going to relent and pay me to never go on vacation. Though admittedly my weather-blackmail scheme shows more immediate promise.

The plan going in to my mutiple weeks off was to take the downtime and leverage the bulk of it on projects in and around the house. The good news is that I completed 13 of my vacation To Do’s. The bad news is that the original list had 28 items on it. Part of the poor completion rate was project setbacks, part of it was injury, but mostly it was the fact that a bunch of the work consisted of doing things I’d never had the opportunity to do before. Which made for a great learning experience, but terrible efficiency.

Lest all work and no play make me a dull boy, I took a day off from hurting myself for a road trip, then closed out my vacation with a week in a cottage up north with the family. And by up north, I mean within an easy driving distance. The best part about living in Maine is that I don’t have to get on a plane to visit amazing places, which is fortunate because I spend so much time on planes for work that literally the last thing I want to do in my free time is fly.

Anyway, the following is my report on what I did on my summer vacation.

img_1592

With a bunch of construction projects looming, we tested the hearing protection for my shop assistant. She wasn’t terribly enthused, but we’ll work on that.

img_1638

After watching dozens of YouTube videos to look at how other people did it and optimize my technique, I used everything from a simple prybar to a sawzall to deconstruct six or eight pallets I found in Portland on Craiglist for free.

IMG_1644

This yielded a fair amount of “reclaimable” wood, which is another way of saying wood with a shitload of nails in it.

IMG_1629

The first project with the pallet wood was building a patio table to replace the glass one that was shattered by a freak gust of wind. If you’re interested, here’s more on how to do that.

IMG_1616

Building the table was the first of many days spent wearing a respirator.

img_1612

Though it turns out that a shop-vac makes a reasonable dust collection system for a random orbital sander.

img_1625

For this and my follow up project, I bought a used but perfectly functional lunchbox planer off Craigslist. The seller’s story was interesting: a former master electrician, he and his wife were headed out to California to work for the National Park Service. His first post? Death Valley.

img_1691

With the wood left over from the table, I built a companion bench. This would have been a somewhat easier task, but I made the mistake of showing Kate a video of a substantially more complicated model than the one I had planned on building which she preferred.

img_1661-pano
Thanks to a very kind brother-in-law, made my first second appearance at Fenway this season. The knuckleball giveth, but it also taketh away.

img_1693

Next up after the bench was building a closet organizer, which was going swimmingly until a saw horse collapsed and snapped one of my two center panels. This required some in project adjustments and compromises that resulted in a center portion that is, well, let’s just say mistakes were made.

img_1698

To be fair, if someone had given me a choice between being injured by one of the many power tools I used over my vacation or plywood, I would have taken the latter. That being said, it’s amazing how much damage several thick and heavy sheets of melamine coated plywood can do if they drop suddenly. If you’re not squeamish, this is my finger eight days after the initial injury.

img_1706

Taking advantage of a break in the weather, I picked a good day to take a road trip through some beautiful country.

img_1803-animation

My destination was a place I try and visit every summer, one of the few swimming holes with a waterfall I have a shot at having to myself.

img_1916

A day after that, the whole family packed up and headed up north to one of our favorite towns in Maine. Town being a somewhat generous term in this instance.

We took up a full size station wagon and a midsize pickup truck. Both were absolutely packed. Traveling with kids is no joke.

img_1905

The view out of our cottage was not too bad.

img_1921

The view from the deck of the cottage was also better than average.

https://www.instagram.com/p/BJ_gi_1hKWH/

Eventually, I more or less gave up taking pictures because Kate was getting shots like this one.

img_2157-animation

Because Poseidon hates me, the better part of the week was characterized by truly massive surf, the ancillary effects from Hermine, a truly unique storm system. The swells were big enough, in fact, that when they impacted the granite ledge the cottage sat on, you could feel it.

img_2427

When we weren’t at the beach, out on a seal watch, or walking the neighborhood, life was hard.

Exhibit A: Wednesday, we had a family outing to Oxbow.

img_2432-pano

On Friday, we returned to Monhegan Island. Two things made this trip stand out. First, it was by far the roughest crossing I’ve ever had out to the island thanks to Hermine. I didn’t get seasick, thankfully, but it’s the first time in a long time where it seemed like a possibility.

https://www.instagram.com/p/BKJIdb4ho8g/

The other first for this trip was that I’d never visited the island as a dad before.

img_2431

Importantly, we also verified that the Monhegan Brewery is a) still there and b) still delicious.

img_2444-pano

While the weather was both colder and foggier over our week than was originally forecast – thanks again, Poseidon – it was, as ever, a great and relaxing week. We were also gifted with a very nice sunset to close out our time up in Chamberlain.

Now it’s time to get back to work, but I’m already looking forward to next year.

How to Build a Table from Used Pallets

IMG_3793

Two months ago, Kate and I got an email from her mother with a subject line of “Oops.” While my mother-in-law was watching our baby, she heard a dull thud outside and walked out on to our deck to investigate. What she discovered was that our glass patio table surface had decided to reorganize itself into thousands of smaller pieces of glass. As best we could reconstruct, a gust of wind lifted the umbrella up off the table, only to drop it right back down on to the glass surface, shattering it.

So much glass.

The good news is that no one was hurt. The bad news was that we needed a new patio table.

By the time July rolls around, however, most of the available patio table inventory is depleted and out of stock. Which meant that we were looking at throwing a few hundred dollars at a table that was of questionable quality, taste or both.

Which is how we ended up declining to go that route, and instead deciding to build a table from scratch. It certainly helped that we now have a pickup truck, which made acquiring the necessary materials substantially simpler, and also that I had vacation coming up on the schedule.

When it came time to selecting the style of table and the materials, I’m fortunate that Kate appreciates the rustic and reclaimed wood aesthetic, both because that makes construction simpler in that it’s easier to hide mistakes, and because the cost of materials was zero dollars – but I’ll come back to that. In the meantime, here’s how to build a pallet table of your own.

Tools Used

IMG_1644

  • Hammer (Estwing)
  • Cat’s paw
  • The Extractor (Jefferson Tools)
  • Prybar (Stanley Wonderbar)
  • Drill (Makita)
  • Jigsaw (Makita)
  • Chop saw (Hitachi)
  • Sawzall (Dewalt)
  • Drillpress (Delta)
  • Thickness Planer (Ryobi)
  • Pocket-hole jig (Kreg)
  • Brad-nailer / compressor (Senco)
  • Glue (Titebond)
  • Lots and lots of clamps
  • Shop-vac (Rigid)

Step One: YouTube

This first stop in building a table, as with every home improvement project I work on, was YouTube. For anyone interested, here’s a YouTube playlist of a few of the videos I watched as background. I didn’t follow any of them precisely, because Kate’s preferences were not for some of the fancier implementations like the Herringbone table. Collectively, however, they provided the ideas, tips and tricks I needed to build the one we wanted.

Step Two: Sourcing Pallets

If you’re going to build something out of pallets, it’s pretty important to have pallets. I had one left over from the drop off of the materials I used to build our woodshed last year, but tables require more than one pallet. Craigslist provided several interesting options. There were a number of places that offered pallets for sale for prices ranging from $3 to $7 a pallet, which is still enormously more cost effective than purchasing new lumber. But it also turned up a number of sources that just wanted to be rid of pallets, and made them free for the taking. So two or three times, I stopped by a warehouse out west of Portland, loaded up the truck with four or five pallets and ferried them home for deconstruction.

Note that I did not need all those pallets for just the table: four or five would probably suffice.

Step Three: Deconstructing Pallets

IMG_1599

Most of the pallet construction videos I watched suggested that taking the pallets apart was actually the hardest and most time consuming part of the project, and for the most part that was correct. Everybody seemed to have their own preferred style, but having watched a lot of videos on the topic, there are basically three ways to take apart a pallet.

  1. Use a Prybar:
    The advantages of this approach are that you don’t need any particular power tools, and that you don’t risk said powertools encountering a hidden nail. Or cutting something off you’d prefer remain attached. The disadvantages are that it is by far the most time consuming, and depending on the thickness of the pallet slats, you may not be able to pry them lose without splintering them.
  2. Use a Circular Saw:
    In several videos, people decided not to pry anything off, and simply cut slats out between where they were fastened. This is by far the fastest approach, but it means that you’re limited to very short sections of pallet wood which may or may not work for your project.
  3. Use a Sawzall:
    The hybrid approach is to take a sawzall, and attack the pallet slats where they are fastened to the 2×4’s, simply cutting off the nails they’re fastened with. This isn’t as fast as using a circular saw, but it leaves you with longer pallet slats and they are usually, if not always, less damaged than if you pried them up by hand.

I didn’t try the circular saw approach because I wanted longer slats. Instead, I relied on a combination of prybar and sawzall, depending on the pallet and what I needed to extract from it.

IMG_1637

One quick note on the second tool from the right. It’s called “The Extractor,” and I picked it up off Amazon for $29.99. It is unbelievable at extracting nails, even those that have been broken or cut off and are thus impossible to pull with the claw end of a hammer. If you’re going to be doing any work with pallets, I recommend this tool highly.

It’s also worth noting that all pallets are not created equal: if you want a wide plank look, for example, look for that. If you need 2×4 equivalents, look for pallets that provide those.

In general, however, if I had three recommendations for working with pallets, they’d be:

  1. Watch for nails
  2. Watch for nails
  3. Watch for nails

Step Four: Build the Frame

IMG_1606
With the pallets deconstructed, the next phase was building the basic frame of the table. For dimensions, I roughly copied our old table. Nothing’s exact when you’re dealing with pallet wood, but it’s also more forgiving in a sense. To build the frame, I picked out all of the thicker, center sections of the pallet that were approximately the dimensions of a typical 2×4 – some slightly thinner, others thicker. As best I could, I matched like segment to like. Once the frame was complete, I clamped on the legs, squared them as best I could and bolted them on.

Step Five: Fit the Surface

IMG_1621
Once the frame was in place, and knowing I had a specific overhang in mind, I picked out wider pallet slats for the edges, measured them out and then glued and nailed them down. From there, I simply had to fill in the middle segments. Because I don’t have a table saw, I didn’t try and cut pallets down to a uniform width. Instead, I mixed and matched and picked the ones that fit the width most closely, then cut them to fit length-wise. There were a few gaps, but these were acceptable in a “rustic” piece. I also had to trim two pieces slightly with a jigsaw to slot them into place. But eventually, I had a frame and workable – if uneven – surface.

One quick note on the uneven nature of the surface: many of the tables on YouTube are even surfaced, as their builders put all of the pallets through a thickness planer to make them uniform. While I had to thin a few of the thicker segments using a Ryobi planer I bought off Craigslist for $75 from an electrician five miles away, ultimately I decided that some variation was preferable and more consistent with the overall aesthetic. We’ll see if I come to regret this decision later.

Step Six: Sand Everything

IMG_1616

Once your table is complete, it’s time to sand. Generally with furniture, you start with a rough grit and keep sanding at higher and higher increments. Given the preference to preserve some of the pallet wood’s character, however, I stopped after a thorough sanding at 80 grit. This smoothed out the wood enough to prevent splinters and shave off sharp corners, while opening it for staining and sealing as necessary. It didn’t take off enough of the surface to lose any of the unique coloring, stains and stamps from the pallet wood, however.

One quick safety tip: while I hooked our sander up to the shop-vac to reduce dust, it’s still important to wear a respirator while sanding pallet wood because you never know what’s in it.

Step Seven: Polish and Seal the Table

IMG_1629

This being an outside table, one of the primary concerns was not just polishing the rough pallet wood to highlight the varying natures of the lumber types used, but sealing it against the elements. For this task, Kate asked if there were any natural sealants we could use rather than a standard polyurethane. After a bit of Googling, I turned up a recipe – and YouTube videos, naturally – for making a sealant and polish out of linseed oil (aka flaxseed oil) and beeswax, in a 4:1 ratio.

2016-08-23 20.56.38-1

Making this couldn’t be easier.

  • First, you cut up beeswax into small pieces and melt it in a can placed inside a pot of boiling water. This double boiler set up is necessary because directly heating the beesax can apparently set it on fire, which is bad.
  • Once the beeswax is melted, you slowly stir in four times as much linseed oil. It congeals at first, but stirring will cause it to dissolve into the wax.
  • Once you’ve mixed the two completely and you’re left with a clear liquid mixture, turn the heat off and let the solution cool. It will harden into a thick wax.

The wax is not the easiest thing in the world to apply, but it goes on without too much effort and, once applied and buffed out, gives the wood a nice and warm tone, while not being tacky to the touch. And as for water resistance, so far anyway water beads up on contact rather than soaking in.

This natural sealant is both less effective overall and much less durable – it’ll have to be applied annually, at a minimum – than alternatives like polyurethane. But it’s much less damaging environmentally, and it’s easier to work with, so at least at this point it’s been a welcome development.

Step Eight: Build a Bench

IMG_1659
Normally, step eight should be have a beer and enjoy your new table. In my case, however, the completion of the table was followed immediately by a project to build an accompanying pallet bench. With the exception of the mortice and tenons, which my friend Joe talked me out of in favor of pocket screws, I followed this build pretty closely. Originally my plan had been to follow this I Like to Make Stuff model, but I made the mistake of showing the first video to Kate and she preferred the wide plank layout and asymmetrical legs.

Because I was headed down to Fenway Park (good guys lost), I ran out of time yesterday afternoon and haven’t finished sanding and sealing the bench yet, or applying trim to the sides, but the bench is in functional shape now. Hoping to finish that up Monday morning. Then it’s time to start on our closet organizer build.

In the meantime, I hope this writeup helps anyone who’s interested in building pallet furniture. As long as you have YouTube, it’s really not that challenging.

About the Truck

Friday afternoon, I got out of work a couple hours early and bought a truck. Or more accurately, I leased a truck, but I’ll come back to that. A lot of people have had questions about the truck, beginning with: why did you get a truck? So that seems like a good place to start.

Why a Truck?

The answer is mostly: our house. That’s not the only reason, of course – I spent almost a half hour trying to shoehorn our stroller into the passenger seat of my Volvo S40 last weekend because it didn’t fit in the trunk, for example. But it’s mostly the house. As has been documented here many, many times previously, we have done and will continue to do quite a bit of work on our home. It’s a lot better than it was when we bought it, but there’s a lot left to do.

Which means picking up everything from plywood to drywall to solid core doors to gravel to 8′ weather treated 4×4’s to fill. Taking construction debris to the dump. Picking up random free pallets to build a pallet wall. Trailering down my father-in-law’s Kubota. And on and on.

To his credit, my Dad’s been fantastic about driving down with his F-150 whenever we’ve needed him. But I could honestly have him down here two or three times a week, which is a bit much to ask given that he’s forty minutes up the road and that my parents have a schedule of their own (they are literally the world’s worst retired people).

A truck, then, is something we’ll get a lot of use out of. Having sadly failed to persuade Kate to get one when we replaced her car, then, the job fell to me. Even though I hate driving trucks and have always driven sports cars (Mustang/Thunderbird) or sportier sedans (Taurus SHO/S40).

Why not an SUV?

This is the second most common question I got. The short answer is that there are enough things I need to pick up (e.g. plywood sheets) that either a) wouldn’t fit or would be awkward to fit in an SUV or b) would destroy a carpeted rear cargo area (e.g. fill or gravel), that an SUV is optimal only for a subset of what we need it to do. A cargo space not constrained by a roof that I can clean with a hose has advantages for what I need it for.

Conversely, as a two adult and one baby household that also has a station wagon, we’re not in desperate need of additional interior storage space. The versatility of an open bed, therefore, was preferable.

Why a Midsize?

Theoretically I get better marginally better mileage, but really it’s the size. As someone who drives to and parks in Portland a lot, I was in the market for the smallest pickup that would work for what I need, and the midsize (Chevy Colorado/GMC Canyon, Honda Ridgeline, Toyota Tacoma and Nissan Frontier) are basically as small as it gets.

My Dad’s full size F-150 counterintuitively helped sell me on a midsize. His has a short bed – around the same length as my own – but still could handle 4×8 sheets that we braced and hung over the tailgate. Seeing that I could generally get what I needed in a more compact footprint made a midsize pickup seem like a reasonable option.

Oh, and it doesn’t hurt that the midsize trucks start at eight or ten grand less than their full size counterparts.

Why a Tacoma?

When I first started looking, I really thought I’d end up with a Chevy Colorado, as that is getting the best reviews in the class at present. But it was narrowly edging the Tacoma, for the most part, and Toyota’s truck offered two things the Colorado didn’t: a manual transmission option on any engine, and a moonroof.

The latter sounds dumb, but I’ve really grown accustomed to having an open roof, and it’s not available on the Colorado at all. Even on Chevy’s full size Silverado, the moonroofs are available only on models that start at $50,000 – far more than I wanted to spend on a pickup.

As for the stick, you wouldn’t believe how hard it is to find a manual transmission on anything these days. Basically zero full size trucks come with one, and the Chevy Colorado comes with a stick but only on the most basic models with a tiny four cylinder engine. Outside of Subaru, Toyota is one of the few vendors selling a standard on any engine you like – though it’s not available on their highest end Tacoma model, the Limited.

Car people will tell you that automatic transmissions have come a long way in reliability and efficiency, and that they are now superior to humans with manual transmissions in both aspects. I have no doubt that they are correct. For me, however, there is something profoundly enjoyable about how a manual transmission involves me in the driving process in a way that an automatic or even manual paddle shifters never could.

So yeah, I might be able to do without a moonroof, but once I found out I could get a stick with the Tacoma’s V-6, I was pretty much sold.

Do You Hate the Environment?

I don’t, and it’s unfortunate that the mileage on a pickup isn’t better. But the work that needs to get done on our house is going to be done by a truck, whether we own it or not, so the net loss to the environment by a truck sitting in our driveway is marginal. That being said, if Tesla ever gets around to making a pickup – a prospect which is reportedly not as crazy as it sounds given that electric motors apparently can produce virtually infinite torque – I’ll be first in line.

One other helpful development: bus service from Freeport down to Portland starts this Thursday, so wherever and whenever possible, I’ll be taking public transportation.

What Don’t I like?

Apart from the fact that Toyota puts reverse on the other side of the gearbox from Volvo, which means that I keep stalling out the truck while trying to back up because it’s in 6th, the most unfortunate thing about the Tacoma so far is its electronics package. GM has wisely, in my opinion, punted and acknowledged that they are probably not as good at developing consumer electronics systems as Apple or Google, so they support both Android Auto and Apple CarPlay. Toyota, meanwhile, has borrowed from Ford’s playbook and is attempting to outcompete the consumer tech giants. The result is Entune, a poorly reviewed – to put it charitably – app that patches your phone into the Tacoma’s electronics package, allowing the passthrough of apps like Pandora. It’s not Ford Sync bad, but it’s not great.

The good news for Toyota is that my S40 was literally the last model Volvo ever made that was incompatible with an iPhone adapters, so I’ve been patching my phone into my car stereo with clumsy Monoprice FM radio adapters forever. By comparison, Entune – warts and all – is a godsend.

Why a Lease?

Generally speaking, my preference is to buy a car, both because I have no interest in always driving a new car and because the years without car payments are really enjoyable. In this case, however, I’m leasing for three reasons. First, because my brother who’s in finance ran the numbers for me and told me to lease. Second, because I have no idea whether or not I’m going to be able to adapt to driving a pickup after spending years driving things that actually handled well, so limiting my commitment to three years makes sense. Last, because a lease allows me to hedge against factors I can’t predict right now. What’s the trajectory of gas prices three years from now? How much progress have electric vehicles made in that span? And so on. If I buy, particularly given the unnaturally long lifespans of Toyotas, I’m locked into the Tacoma for a decade plus. With a lease, I can reassess the landscape in three years and re-up if that makes sense, or head in an entirely different direction if gas costs $4 a gallon again and electric vehicles can make it from Maine to Fenway and back on a single charge.

What Did You Do With Your S40?

Normally it’s bad news when they don’t offer you much for your trade-in. In my case, it was something of a relief. I get to hang on to my S40 for a little longer, providing it continues to run, and hope against hope for some sort of last minute miracle that restores it to working order so we don’t have to donate it to charity.

As Kate said today, people may think it’s a little weird that the first thing I’d do upon winning Powerball would be to fully restore my ten year old car with a hundred and ninety thousand miles on it, but those people have never driven my car.

How Did Our Heating Upgrades Pan Out?

IMG_20150413_131825 (1)

One of the things you do when you’re an analyst is try to turn everything into numbers. Which you can then analyze. If anything, this tendency has gotten worse since becoming a parent, because I find myself up late but not in a position to watch one of my movies which typically involve explosions, a lot of yelling or both.

The latest target of this unhealthy fixation on metrics is our heating costs.

By way of background, our house is a modestly-sized single floor ranch built in the 1970’s. When we bought it, we believed that the house had both adequate attic insulation and an oil burning furnace of a relatively recent vintage. Both of these things were later proved to be untrue. Which is how we ended up paying around $2,800 to heat our house two winters ago.

Part of that was oil that cost two dollars more a gallon than it did this winter, but still, that’s bad for a house of our size, even in a climate like Maine’s. Terrible, actually. Worse was the fact that we’re using the word heat very loosely. Up until this past winter, we kept our house cold: heat set to 50 the majority of the day, bringing it up to 60 during the morning when we left for work and for a few hours when we were making dinner.

Humans really are adaptable creatures, so this felt normal to us. Friends wore mittens when they came over. This, for almost $3,000.

So we did the logical thing: we contacted an energy auditor. He had a lot of recommendations, new attic insulation among them. What we thought was adequate was actually somewhere around R17 versus the recommendation for new construction of R49. Thankfully, when we got bids for attic insulation, they came within a reasonable enough margin of the DIY cost, so I didn’t have to crawl around our attic with a respirator getting stuck with tiny shards of fiberglass. I have legitimately never been more relieved than when the winning bid came in.

One of the other recommendations from our auditor was ductless minisplit heat pumps, which are hyperefficient relative to our old and inefficient oil furnace. Not believing the technology was quite ready, we instead swapped out our fireplace for a fireplace insert (a Jøtul Rockland 550, specifically). If you’re unfamiliar with the product, it basically crams a woodstove into an existing fireplace. Wood is not a perfect heat source and has its environmental drawbacks, obviously, but given that the new EPA approved model wood stoves burn much cleaner and that after loading all of the costs oil doesn’t look too good we didn’t have much debate about the insert.

We made many other smaller changes to the house – I hung storms on two windows that were so leaky we used to get snow inside, we sealed cracks with spray foam and so on – but the major changes were the new layer of insulation in the attic and the stove. The question was: were they worth it?

Having run the numbers, the answer is an unambiguous yes – in spite of the cratering of price of oil.

Examples:

  • As mentioned above, in 2013 we spent $2,821.29 on heating oil. In 2015, we spent $610.62.
  • The huge difference is not attributable to any single factor, of course. The average temperature was a few degrees warmer this year, and most obviously, oil cost a lot more in 2013. But the savings would be massive even without the huge price drop: at 2013 prices, we would have spent $1,368.29 on oil.
  • We would have spent less than half as much because we used less than half as much oil. In 2013, we bought 827.6 gallons of oil. This year, that number was down to 401.4.

The pricing numbers are slightly misleading, however, because a wood stove obviously requires fuel of its own. We spent a little less than a thousand on wood. If we take that thousand, then, and add it to what we would have paid for oil if it cost as much it did in 2013 we’d come out just shy of $2,400.00. A savings of better than $400 over our 2013 costs, but substantially less impressive. Except for the real wild card in all of this.

Remember how I said we kept our house cold? We did not – could not – do that this winter, because we came home from the hospital with a tiny human in December. What this meant in practical terms was first that we needed to keep the house a lot warmer than we usually do, and second that we needed to heat it essentially round the clock while we were home with the baby. So instead of heating the house to 60 for a few hours a day, we had to keep it at 68 or higher from December through March, 24 hours a day. All of a sudden, the numbers look a lot more impressive.

The analyst side of me desperately wants to extract and assign the precise savings per investment – the fireplace insert saved us X, the insulation Y – but even if that’s possible with any degree of precision, it’s not worth worth it. It’s enough to know that the combined investments have the potential to save us hundreds (potentially thousands) a year while allowing us to make the house much more comfortable for a child. The insert is also an excellent hedge against fluctuations in the market price of heating oil.

All in all, it’s money well spent. And when we build a fire now, it actually heats the room.