Every so often in life you have the opportunity to put whatever meager skills you’ve managed to cobble together over the years to work for a good cause. For me, in most cases that’s helping friends or family with the technology in their life: problems with their devices, issues with their broadband or trying to figure out how to get high speed access to an area in the foothills of the Sangre De Cristo mountains that has none.
Occasionally, however, I get called on to build something. Usually, and appropriately, I’m the option of last resort, because I seem to have inherited my grandfather’s fine carpentry skills, and he was an outstanding rough carpenter. This past weekend was one of those times, where I was tasked with building a ramp for a temporarily wheelchair bound family member who shall go unnamed in case they would prefer not to be included here.
Never having built a wheelchair ramp, or a ramp of any kind for that matter, I had many questions. Among them:
- How steep – or not – can a ramp be?
- How do I determine and cut the necessary angles?
- If I know the angles, how do I determine length?
- Can I build this solo?
The good news is that thanks to YouTube, I had answers to the first three questions inside of an hour. Specifically I relied on this one for the ramp construction and this one for the dark arts of using a speed square. As for the fourth question, that was the easiest to answer, which was that it didn’t matter because I didn’t have a choice. A number of people were amazing in their offers of assistance, but trying to social distance in the middle of a project being built in half the bay of a garage would be impossible, so as much as I appreciated the offers, this was on me.
If any of you find yourself in the position of having to build a ramp, then, hopefully the following is of some use. This is how I constructed the ramp in question. Before I proceed, because my wife is a lawyer, let me state here clearly that I am not a professional, and I offer no warranty on this advice whatsoever: use it at your own risk. Let me also be sure to thank said wife for watching our daughter the whole day so I could knock this out.
Step One: Determine the Height
The most important number you need to have is the height of your entryway. Everything will follow from that. In my case, this number was 31″, which was a lot higher than most of the videos I watched – they tended to be in the 16″ – 24″ range most often. The reason this is important is that the higher the entryway is, the longer your ramp will have to be because of the slope.
Step Two: Determine the Slope
Per the first linked video above, according to the ADA the maximum allowable slope for assisted usage of the ramp is 9.5 degrees. If you’re building a ramp for someone who will need to use the ramp on their own, unassisted, the max slope is 4.8 degrees.
Step Three: Determine the Dimensions of the Ramp
Originally I thought I was going to have to use the Pythagorean Theorem myself and do some actual math, but it turns out Googling “right triangle calculator” yields a large number of sites that let you skip the math. So I took advantage of this one because time was of the essence.
All you need to calculate the dimensions of a triangle are one side and an angle, fortunately. After providing height A and the opposite angle – 9.5 in my case – I had the dimensions that I needed. To come down from 31″ at 9.5 degrees, my ramp would need to be about sixteen feet long. The problem for me was that seventeen feet away from the door in question was a shop sink, so unless I wanted to rip that out from the wall, and I very much did not, I was looking at two ramps. One ramp down to a platform, and then a second ramp off that platform at 90 degrees.
Like so.
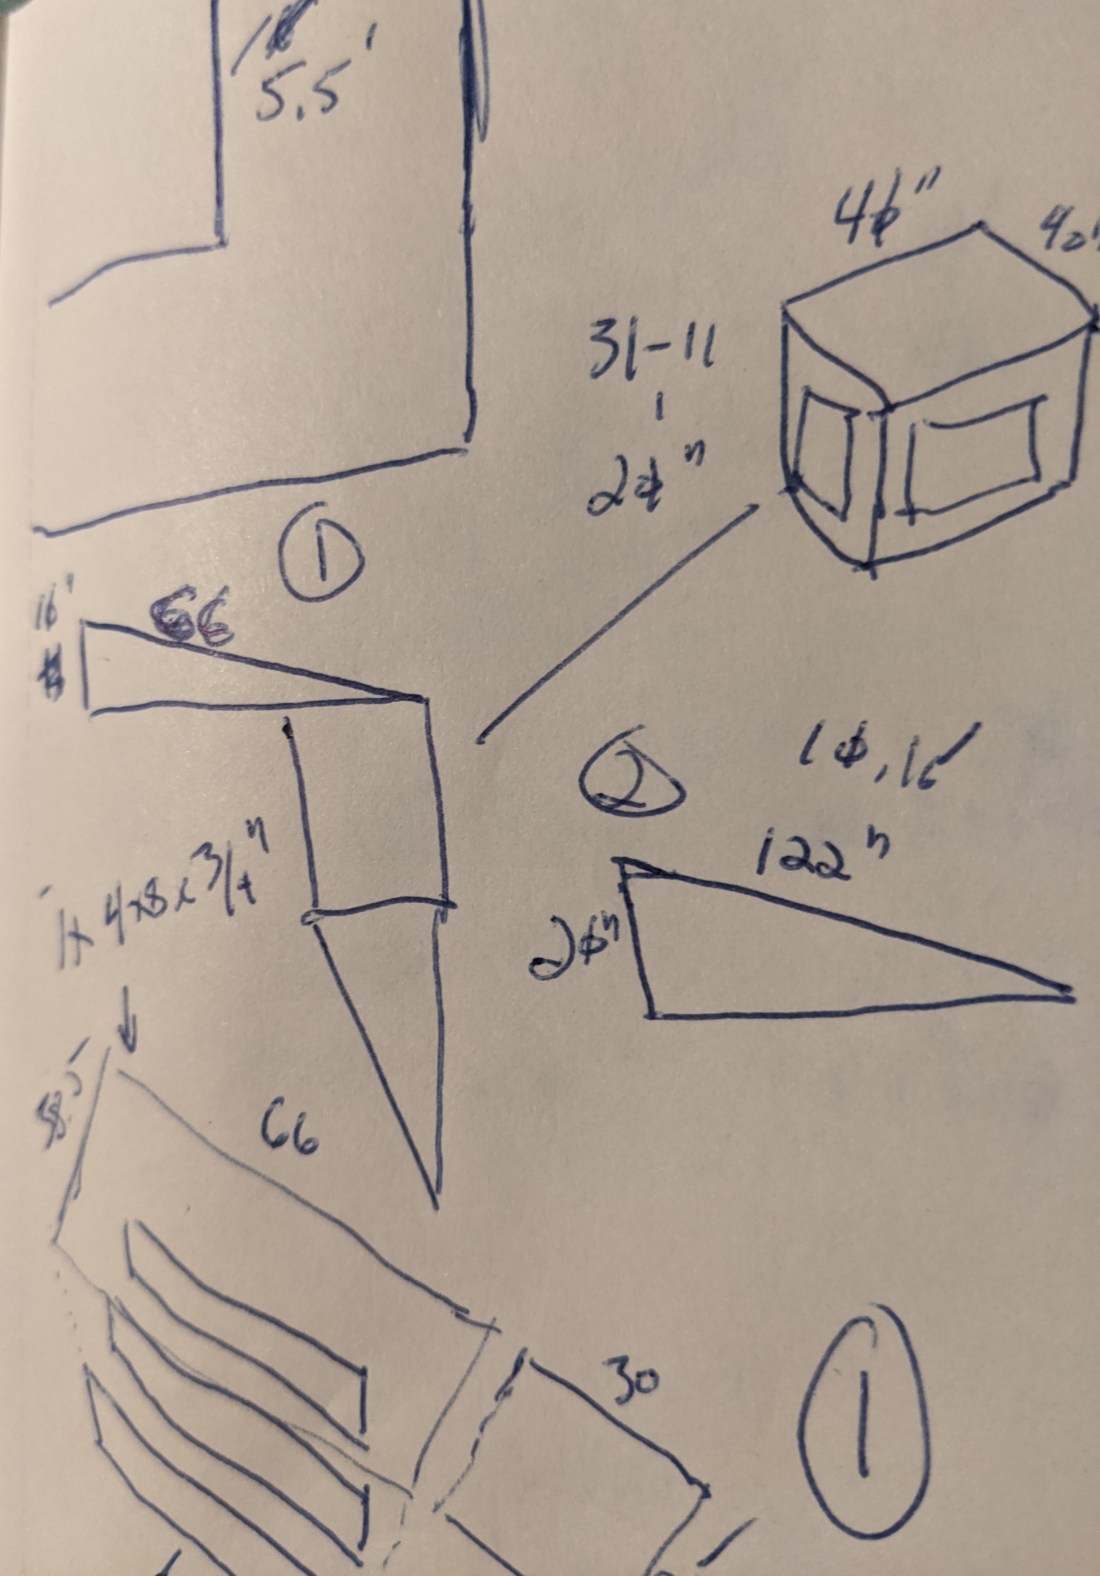
I know, I’m quite the artist.
Anyway, the first one would step it down about 10″ to a 40″x40″ platform 20″, and the second ramp would pivot 90 degrees to drop that 20″ to the floor.
Importantly, there’s some play in both heights because I had to account for the height of the plywood sheeting. Basically what I did on the ground was recompute my right triangle dimensions for 3/4″ less than the original height and build the ramps accordingly. This allowed me to fit the sheeting in without issue.
At any rate, I now had everything I needed to begin preparing a cutlist.
Step Four: Prepare a Cutlist
Unlike the right triangle thing, I have yet to find an app that can prepare a general cutlist outside of specific, common use cases like decks. So I had to prepare a list of the materials I needed.
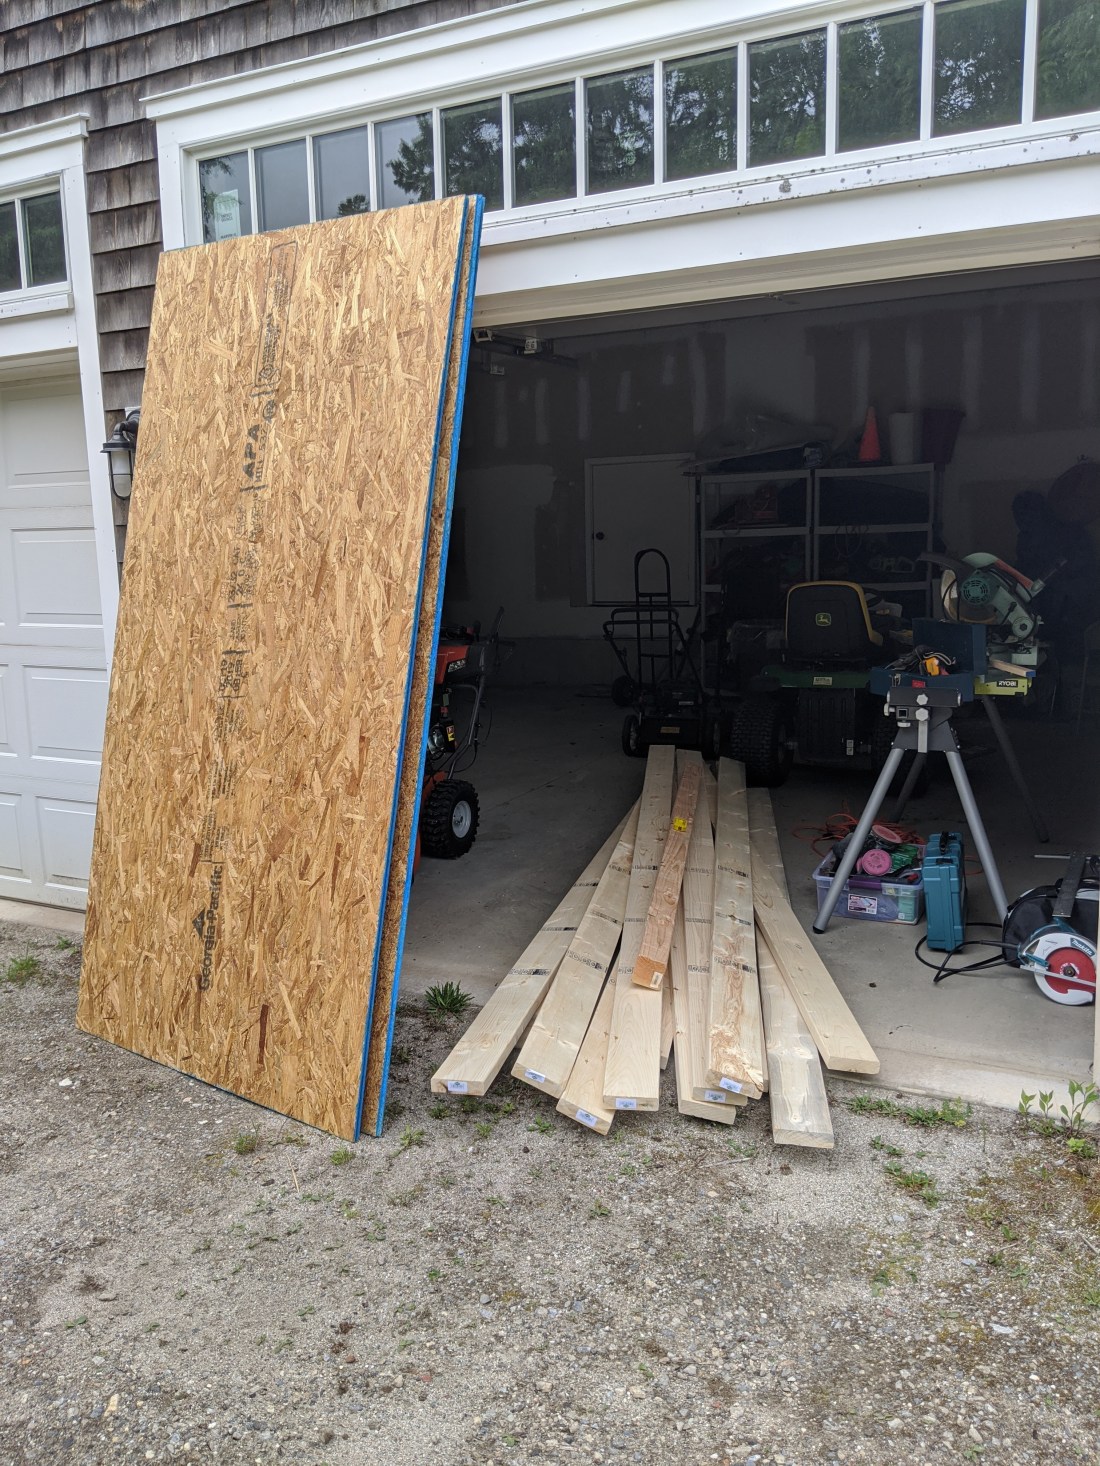
In my case, I went with standard 2×6 dimensional lumber and 3/4″ plywood. I picked up, or was supposed to anyway, 11 2×6’s, 3 sheets of 8’x4′ 3/4″ plywood, some 2×4’s in case I needed a railing and a single 8′ 4×4 for the platform legs. All in, it cost a little over $200 for the materials (I had a lot of 1 1/2″, 2″ and 3″ fasteners lying around so I didn’t need that).
Under normal circumstances, I’d just drive up to Home Depot, pick the stuff up and walk out. With the pandemic, however, we’re only doing curbside. I called the store to confirm, placed the order – though oddly only after it was nearly complete did it mention the curbside availability – and was done.
Step Four: Stage the Tools
Not having room in the truck for both tools and lumber, I ran the tools up the day before and set them up for usage. It’s nice having a pickup for things like this, I have to say.

Step Five: Pickup the Lumber
This was an ordeal. I ordered Saturday afternoon in two separate orders because I’d forgotten the 4×4 initially. Sunday morning I got an email that my order was ready to pickup, and they only brought out the 4×4. Kind of tough to make a ramp just from one eight foot piece of lumber. After some haggling back and forth through the car window, he went back in, found the other order, and brought it out – only there was no plywood. After communicating to him that without the sheeting the whole thing was moot, I finally was able to order 3/4″ OSB instead which he went back in again to get. And came out with an extra sheet – thanks mobile app!, that I could not return without going into the store.
At which point, I gave up, thanked him and started loading the truck. So the ordering part was complicated, thanks to the virus. Also complicated was having to turn down multiple very kind people in the parking lot who saw me loading a lot of lumber by myself and offered to help. One even offered to drive it over because he doubted it would fit in my mid-sized truck.
They were wrong, it did.
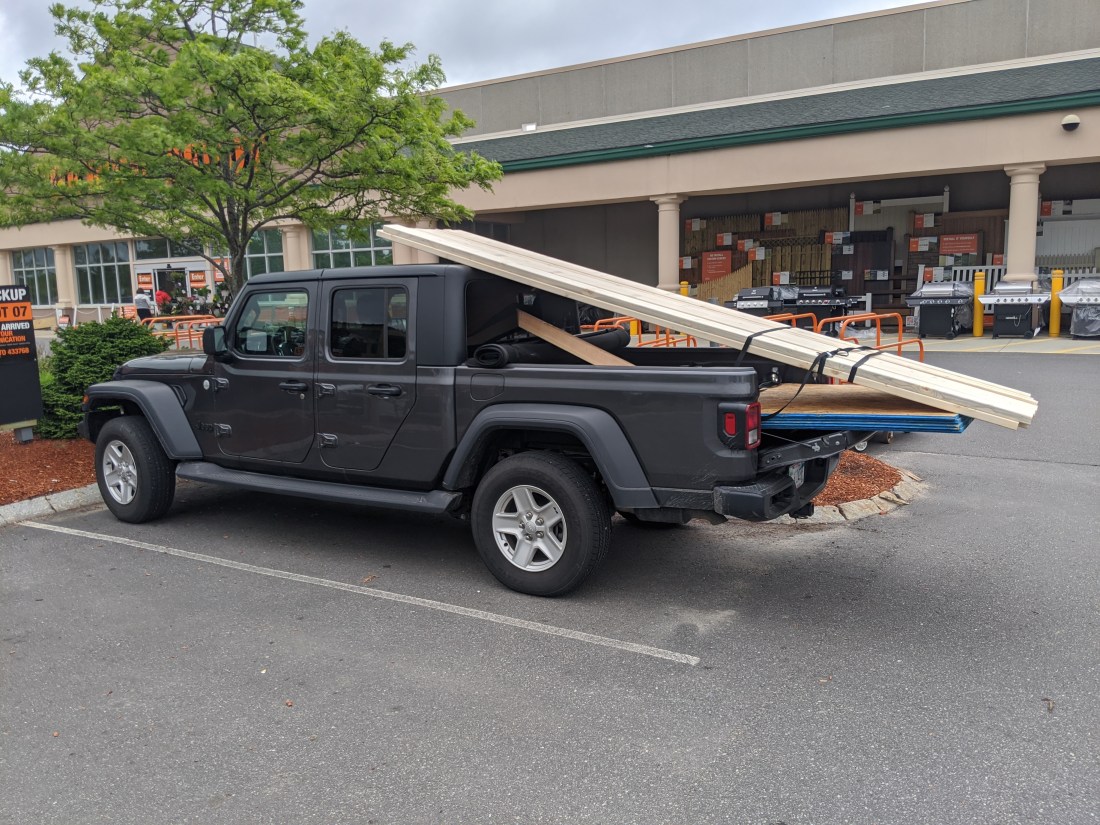
Between the messed up order and the loading, I was at the store for over an hour and then it took me twice as long as it should to get the project site because I had to stop every few miles to prevent the wood from sliding out.
Not good times, bad times.
Step Six: Unload the Lumber
Self-explanatory.
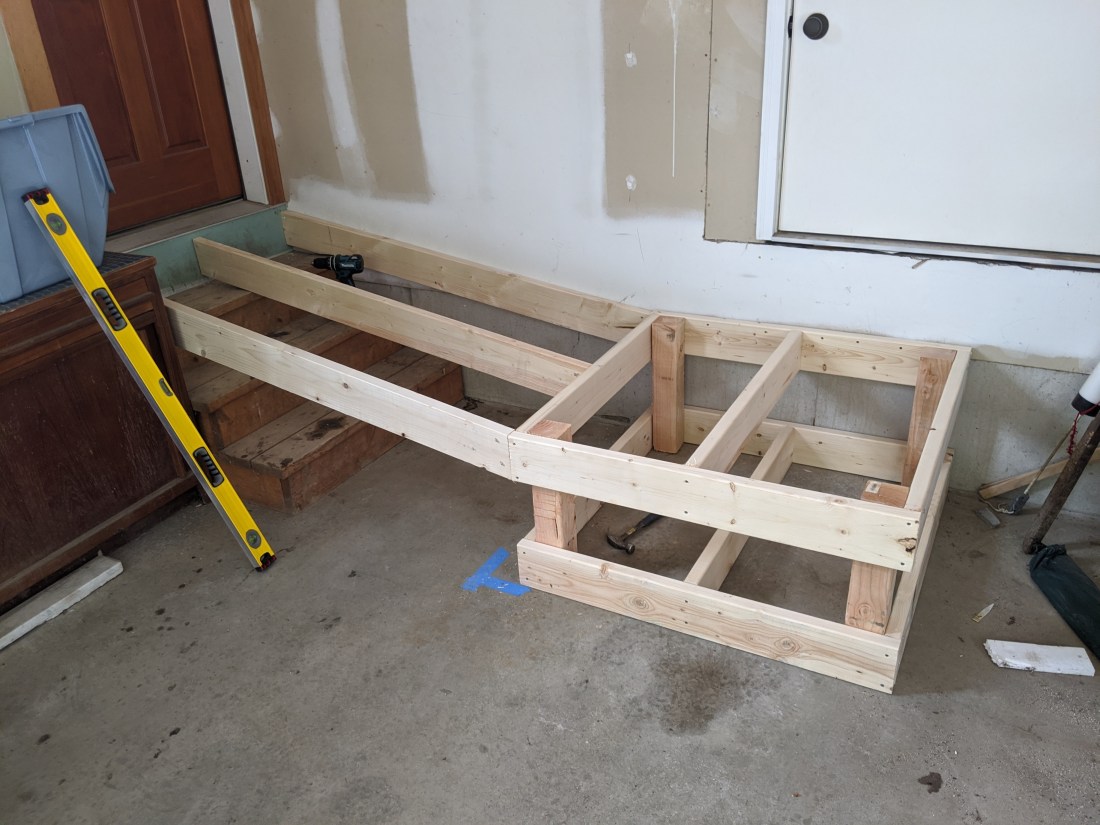
Step Six: Build the Platform
Because I wasn’t sure of my angles yet and wanted something to physically test from, I built the platform. It’s just a frame of 2×6’s around 4×4 legs. Pretty straightforward.
Step Seven: Build the First Ramp
This is where the angles came in. I needed to determine what angles to cut on the joists to connect the platform to the entryway. With that, I turned to my speed square. You’ll notice on here that it has a table for common rafter conversions. This is how that works.
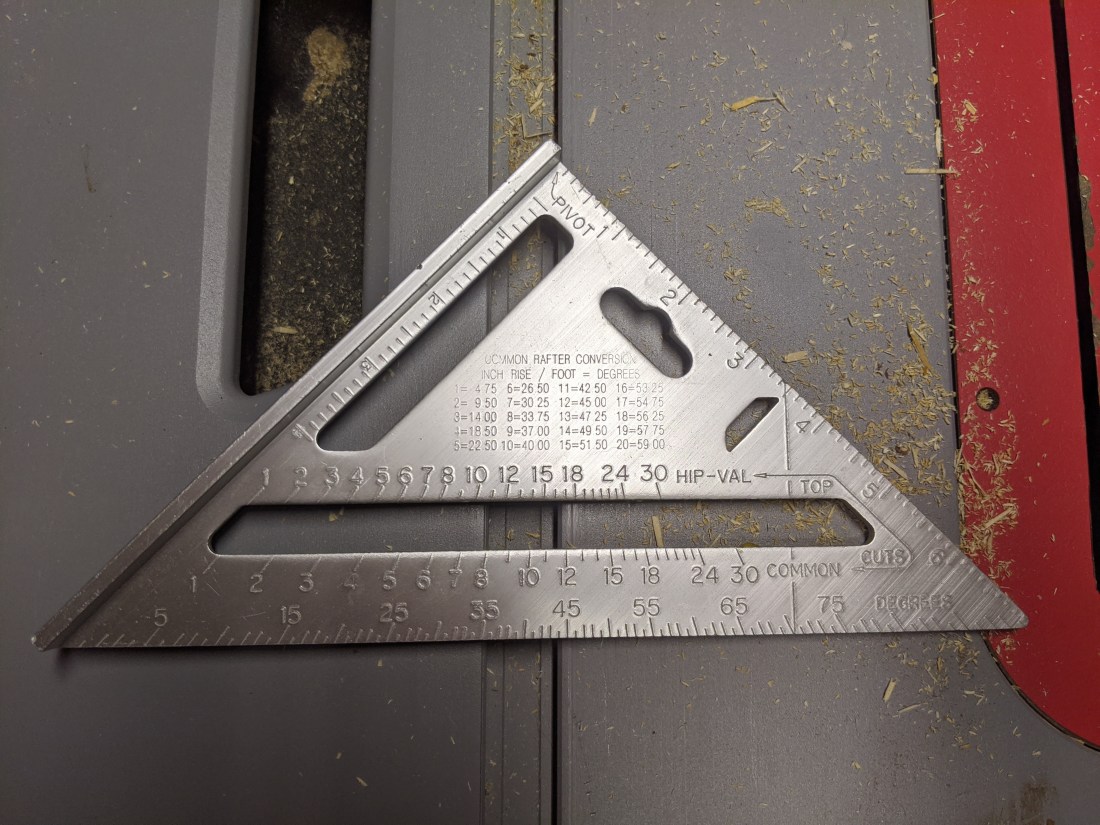
- Find your angle on the table: in my case, 9.5 degrees.
- According to this table, that equates to a 2″ rise every 12″.
- Place the square on your lumber, and pivot it “2” on the COMMON scale. That’s your angle. Make a line, and cut to that. If you’re like me, you’re wondering about the angle for the floor – but hold that thought, we’ll come back to it.
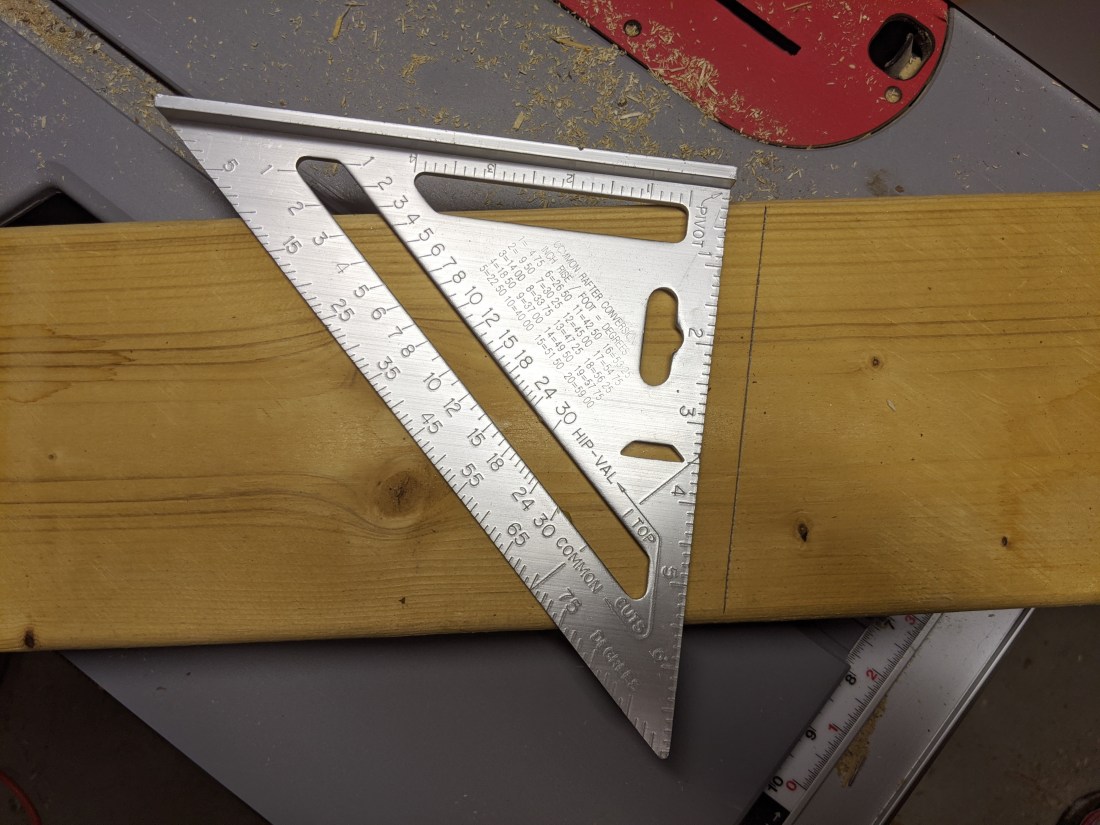
Once I had the angle process above worked out, I measured the distance of the platform to the entryway, and fixed the former to the back wall so it wouldn’t move. Then I cut 2×6 segments to that angle to the appropriate length and toenailed them to the entryway and the platform like so.
You can’t see it because it’s behind the drill drive in that photo, but I had to bird’s mouth – that is to say, notch out – the far joist to have it seat properly. The process for that is simple. Make a mark with the same angle you’re cutting the rafter at – 2, in my case – and then make a perpindicular line connecting to that at whatever height you need to remove for it to seat.
Step Eight: Built the Second Ramp
One thing I was unsure of before I started the process was the angle of the joists that connect to the floor. I understood the process as outlined above for determining a rafter angle like cut, but what about the pieces connecting to the floor? As it turned out, this couldn’t have been simpler: it’s the same angle as the rafters.
The only difference is that instead of pivoting on the long side of the joist, you pivot from its end, like so.
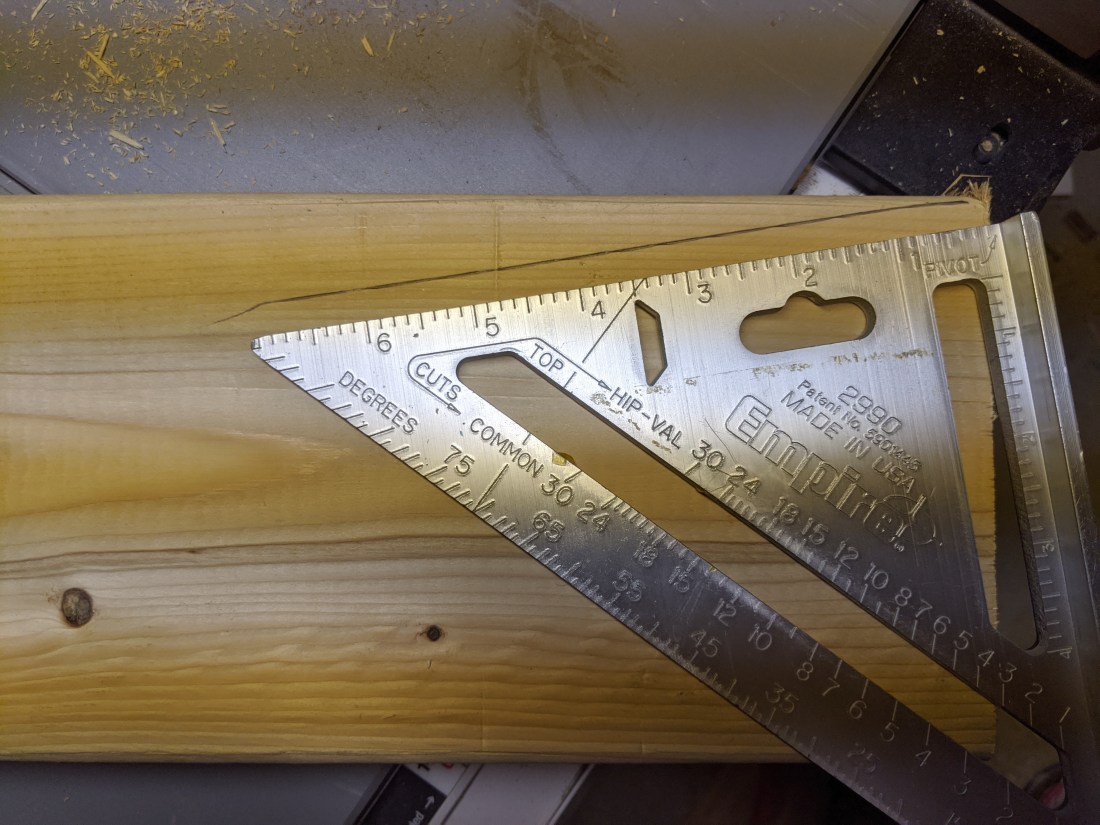
That gave me the long angle I needed to have the joists seat properly on the floor, as you can see.
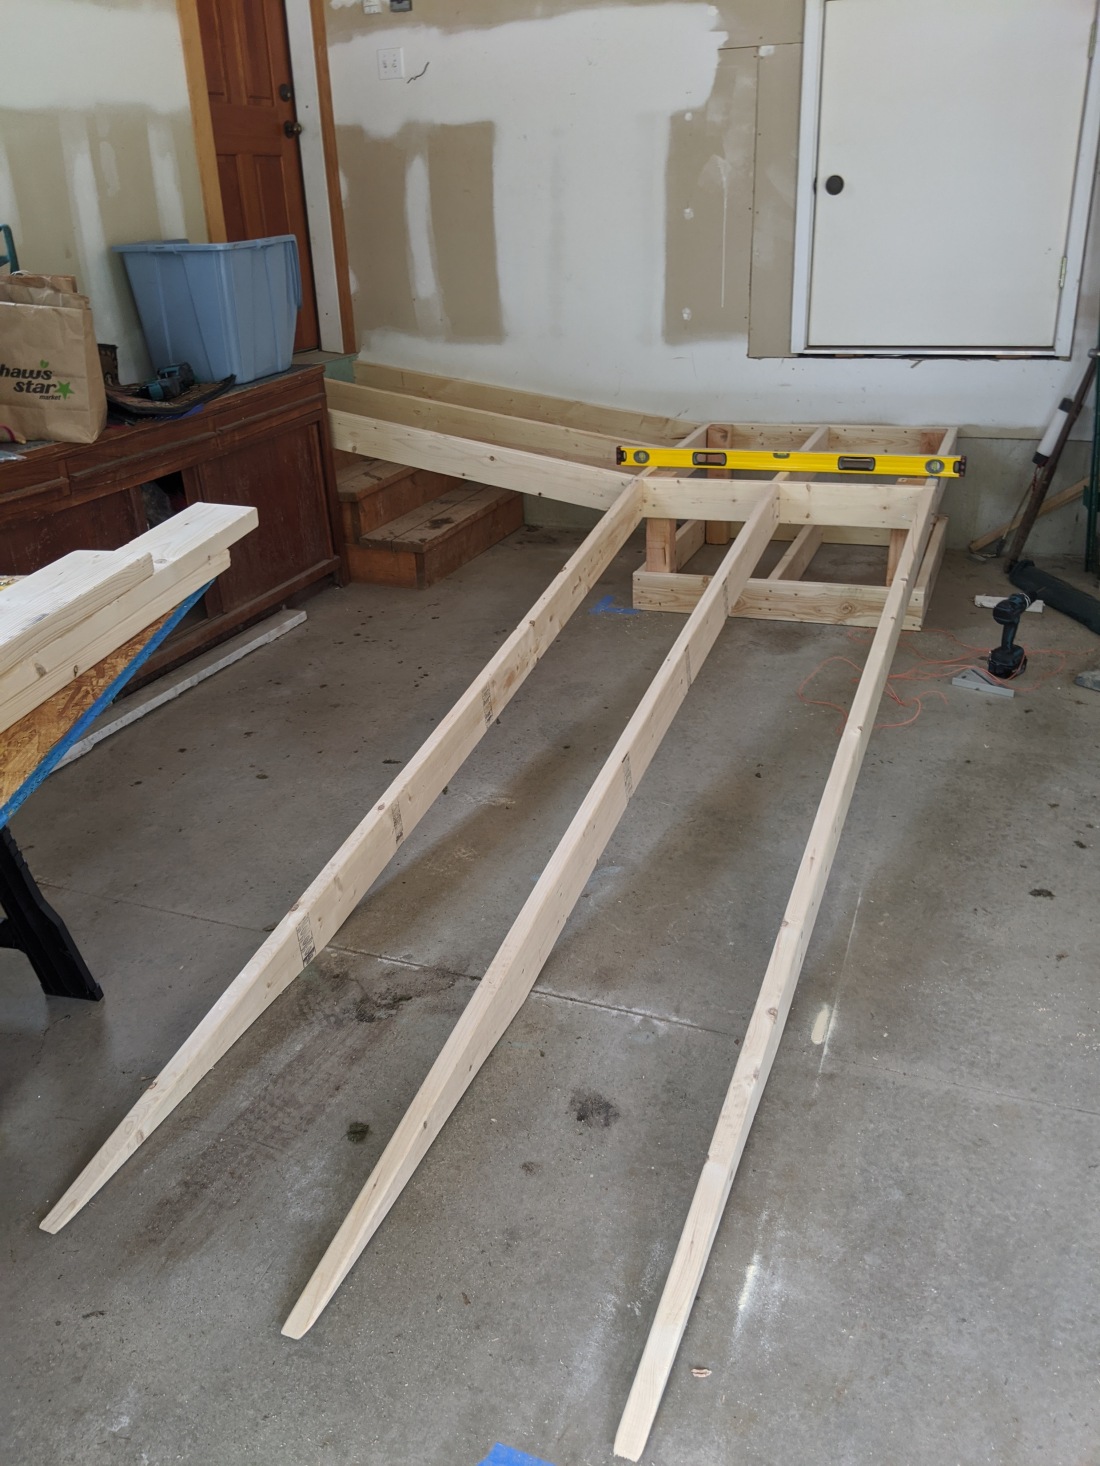
I went back later and added some cross braces between the joists for extra stability, just in case.

Step Nine: Sheath the Ramps and Platform
Ideally, I’d prefer to cut my sheet goods on a tablesaw, but the cuts I needed to make here exceeded its maximum fence depth so that was out. Instead, I cut everything freehand with a handheld circular saw. The work wasn’t perfect, but for this project it didn’t need to be so long as it was workable. I worked from the entryway down, laying the OSB down on it as I went.
One other minor thing: I beveled the edge of the OSB where it met the floor to make it even slightly easier to get a chair up on to.
Step Ten: Install Edging
While the slope is gradual and ADA approved, I would prefer to not be responsible for someone careening off a ramp I built and therefore installed 2×6’s around the edges of the ramp. Where necessary, the angles were cut using the exact same process outlined in Step Seven.
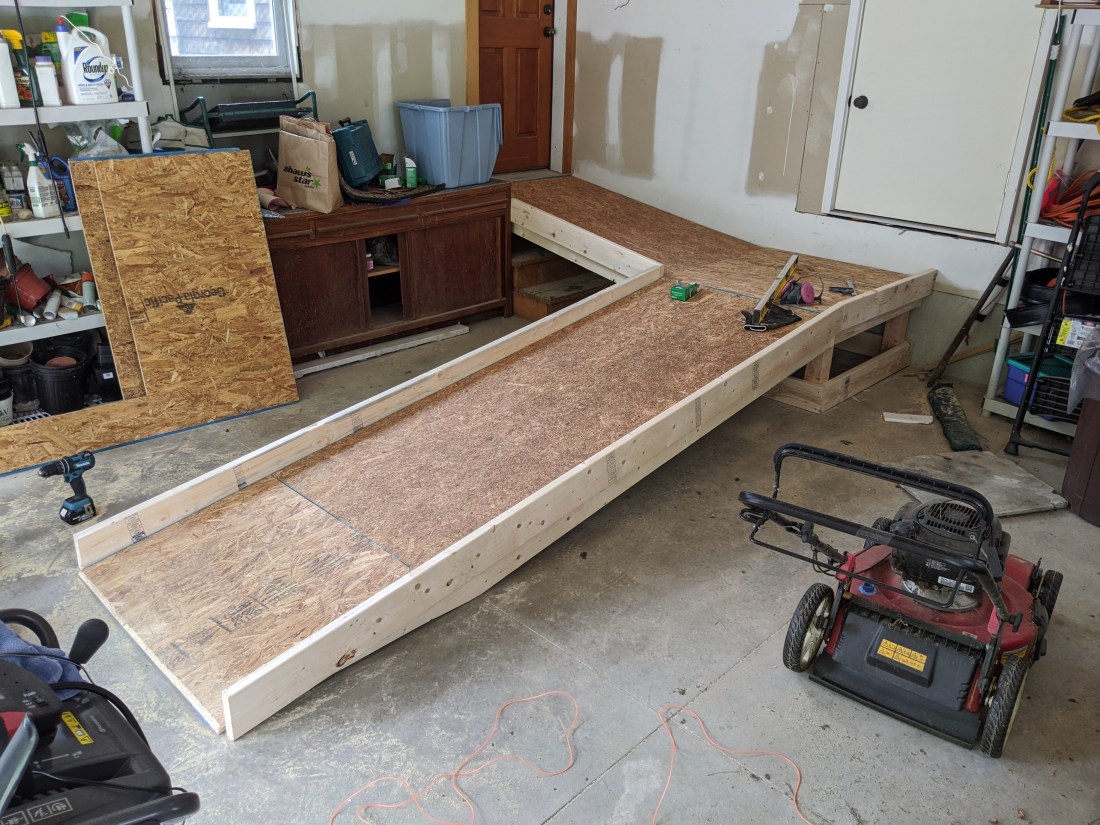
Here’s the finished product.
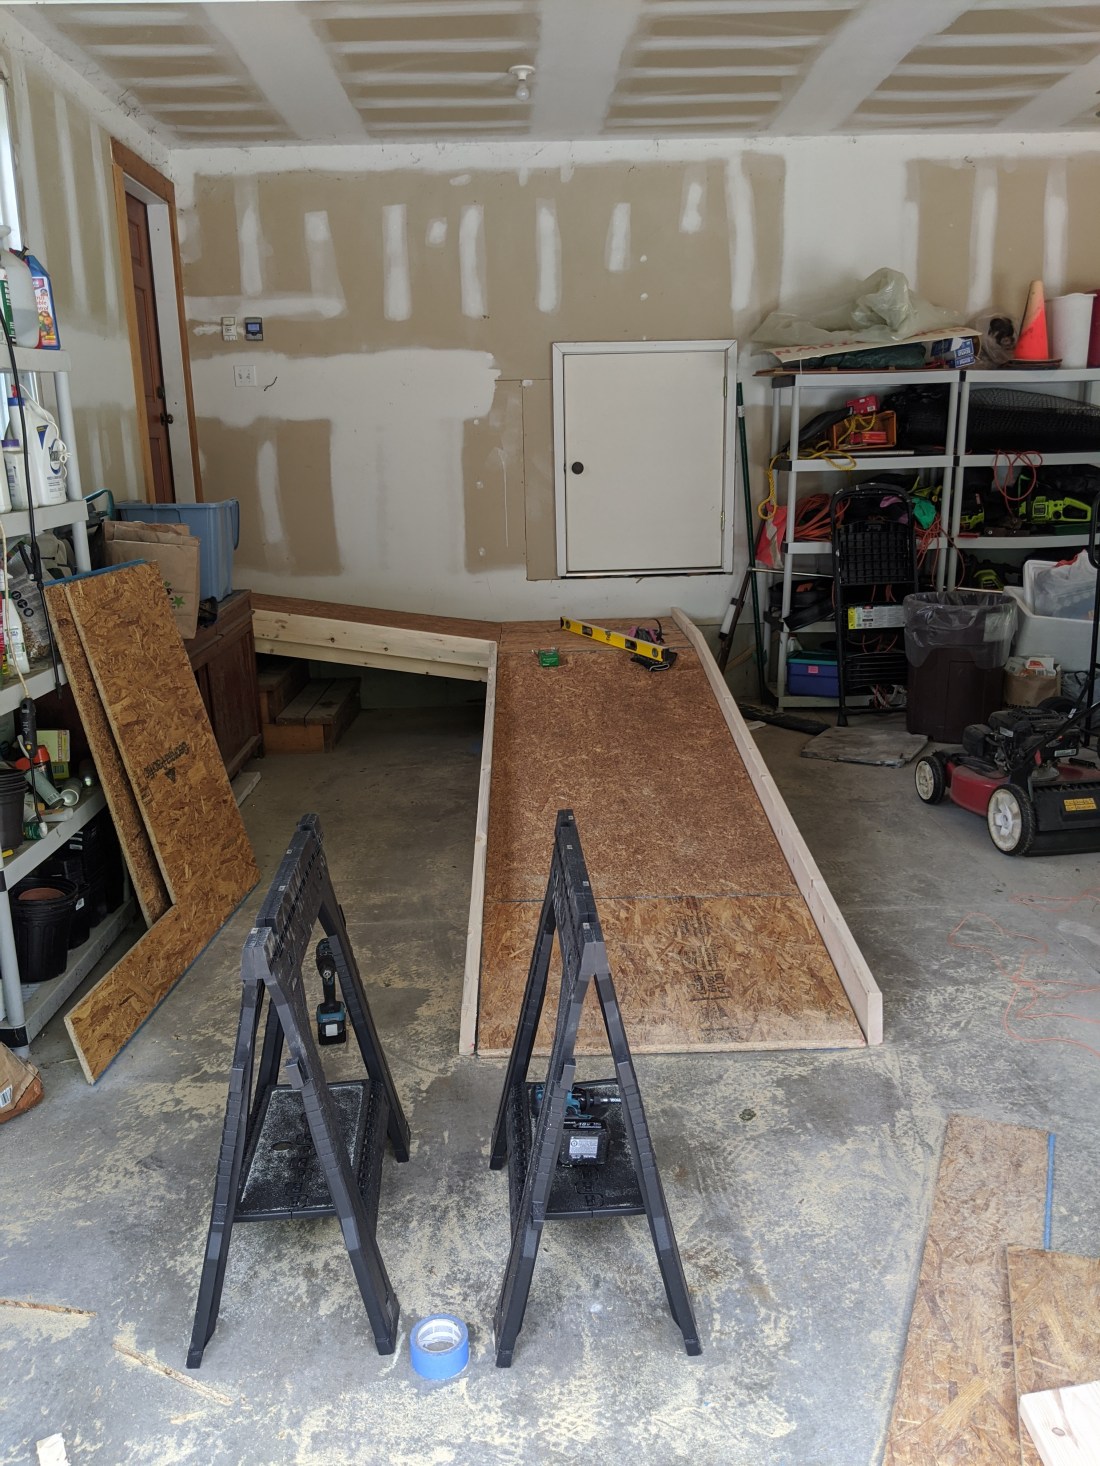
There are some rough parts, for sure, which I expect that one friend in particular will find and point out, and I would not expect this to last forever. But as a temporary measure to meet an immediate need, it should be serviceable.
Step Eleven: Shower Beer
The best reward for a completed project is a shower beer – Maine Beer Company’s Lunch in a travel mug, in this case. And as it turned out, the hot shower itself was necessary because having to crouch over for the better part of a day left my back pretty stiff.
Step Twelve: Takeaways
The net is that a ramp is not a hard thing to build. The angles are the only tricky part, but once you figure that out with a speed square it’s very straightforward. Some of the cuts – specifically the long cross grain cuts using a circular saw – were a bit of a pain in the ass, but those notwithstanding there’s nothing particularly complicated about the build.
Total project time was from maybe 10:30 in the morning working straight through to around 4:30 in the afternoon, and the cost as mentioned was in the $215-$225 range assuming you don’t actually buy an extra sheet of OSB you don’t need.
Bonus: The Only Injury
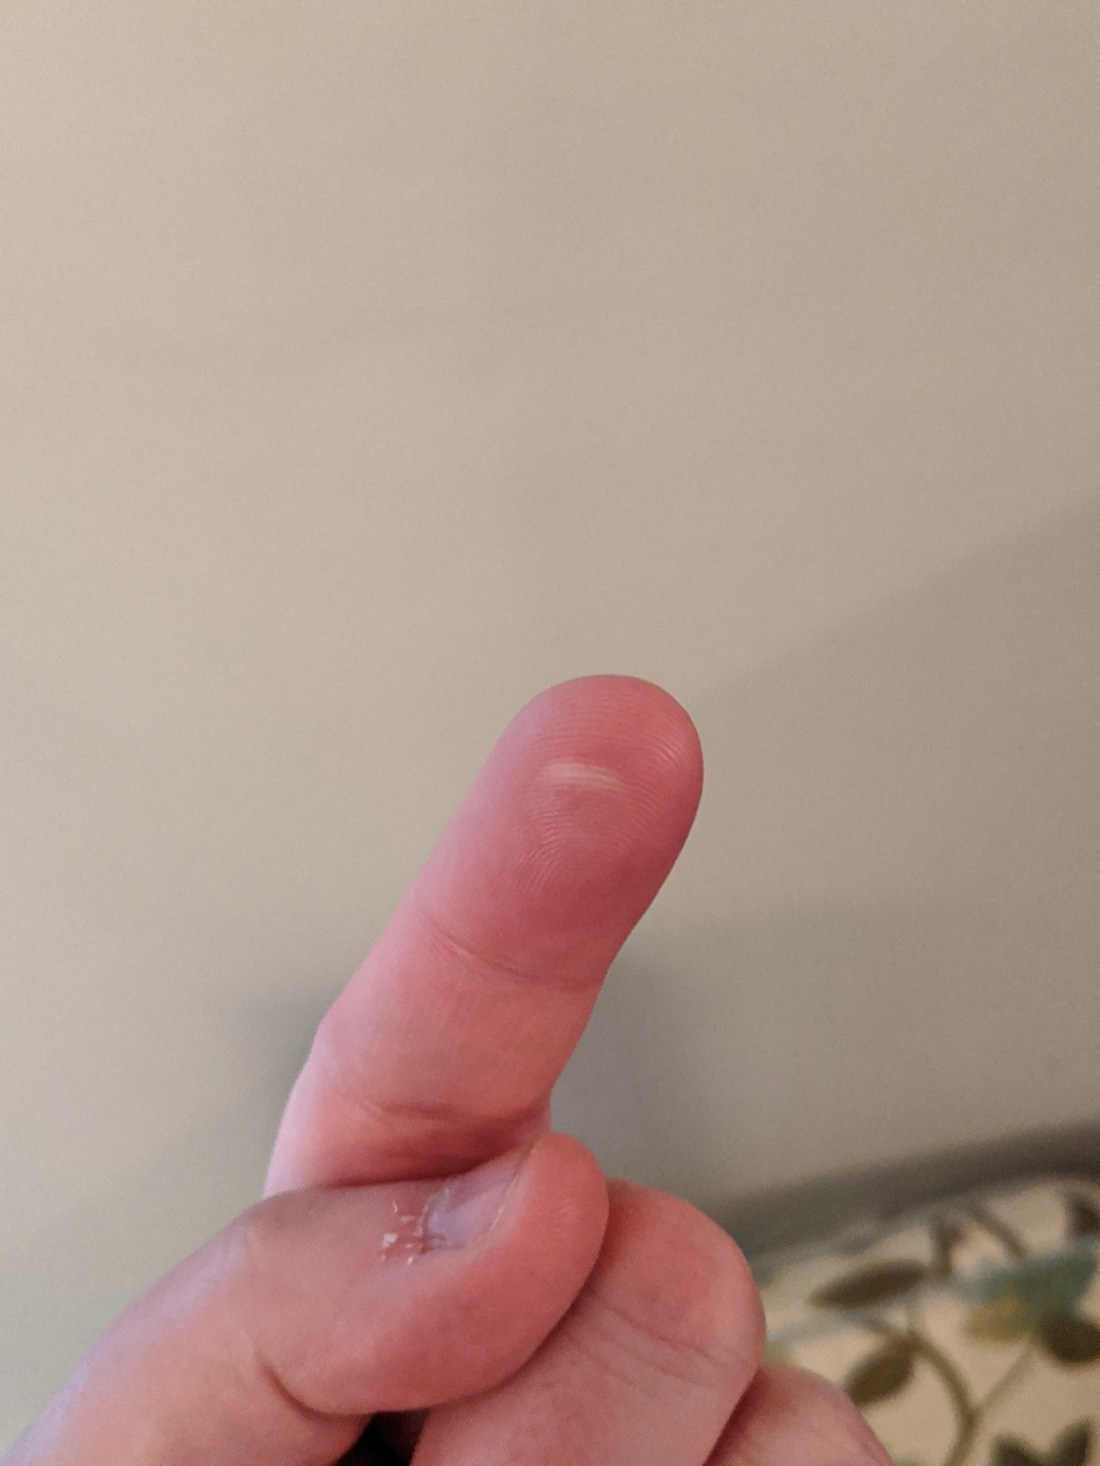
Unusually, I had almost no worksite injuries on this project. Apart from some nicks and scrapes on my arms and legs from the OSB, the only notable problem was the blister I got on my index finger. Word to the wise: if you are having a tough time driving a screw in and the driver has worked on it for a while, do not touch that screw. Damn thing burned the hell out of me and hurt like hell while it blistered.
As my injuries in these thing go, however, I’ll take it.

It’s good to know that we need to measure the entry-way and then build the rest of the ramp on that information. My son is having some health issues and will be in a wheelchair for some time. We need to find a good chair and build a ramp so that he can get around the house easier.