When I was in the middle of installing our Dakboard-based family dashboard / calendar / to do list / weather station / Red Sox schedule / etc display for the third time (we’ll come back to that) Kate asked me if my botched installation was going to be a part of my writeup. I demurred initially, saying that I had no intention of writing this up and her response was laughter. "Of course you’re going to write it up. Here’s what worked, here’s what I messed up, and so on."
Well, chalk one up for Kate because here’s the writeup I said I wasn’t going to write up.
Why set up a Family Dashboard?
I blame my colleague Rachel for this entire debacle exercise. She posted a picture of her family’s Dakboard set up with calendars and so on a month or two back, and while I resisted for a while, eventually the sheer potential utility of it wore me down. So I tapped my personal fun money budget and here we are.
What do you use it for?
There’s no one thing. In contrast to some of the devices we have at the house that serve a single, specialized purpose – think the Honeywell D6 thermostats we have that control our heat pumps – the family dashboard performs a number of tasks.
Some examples:
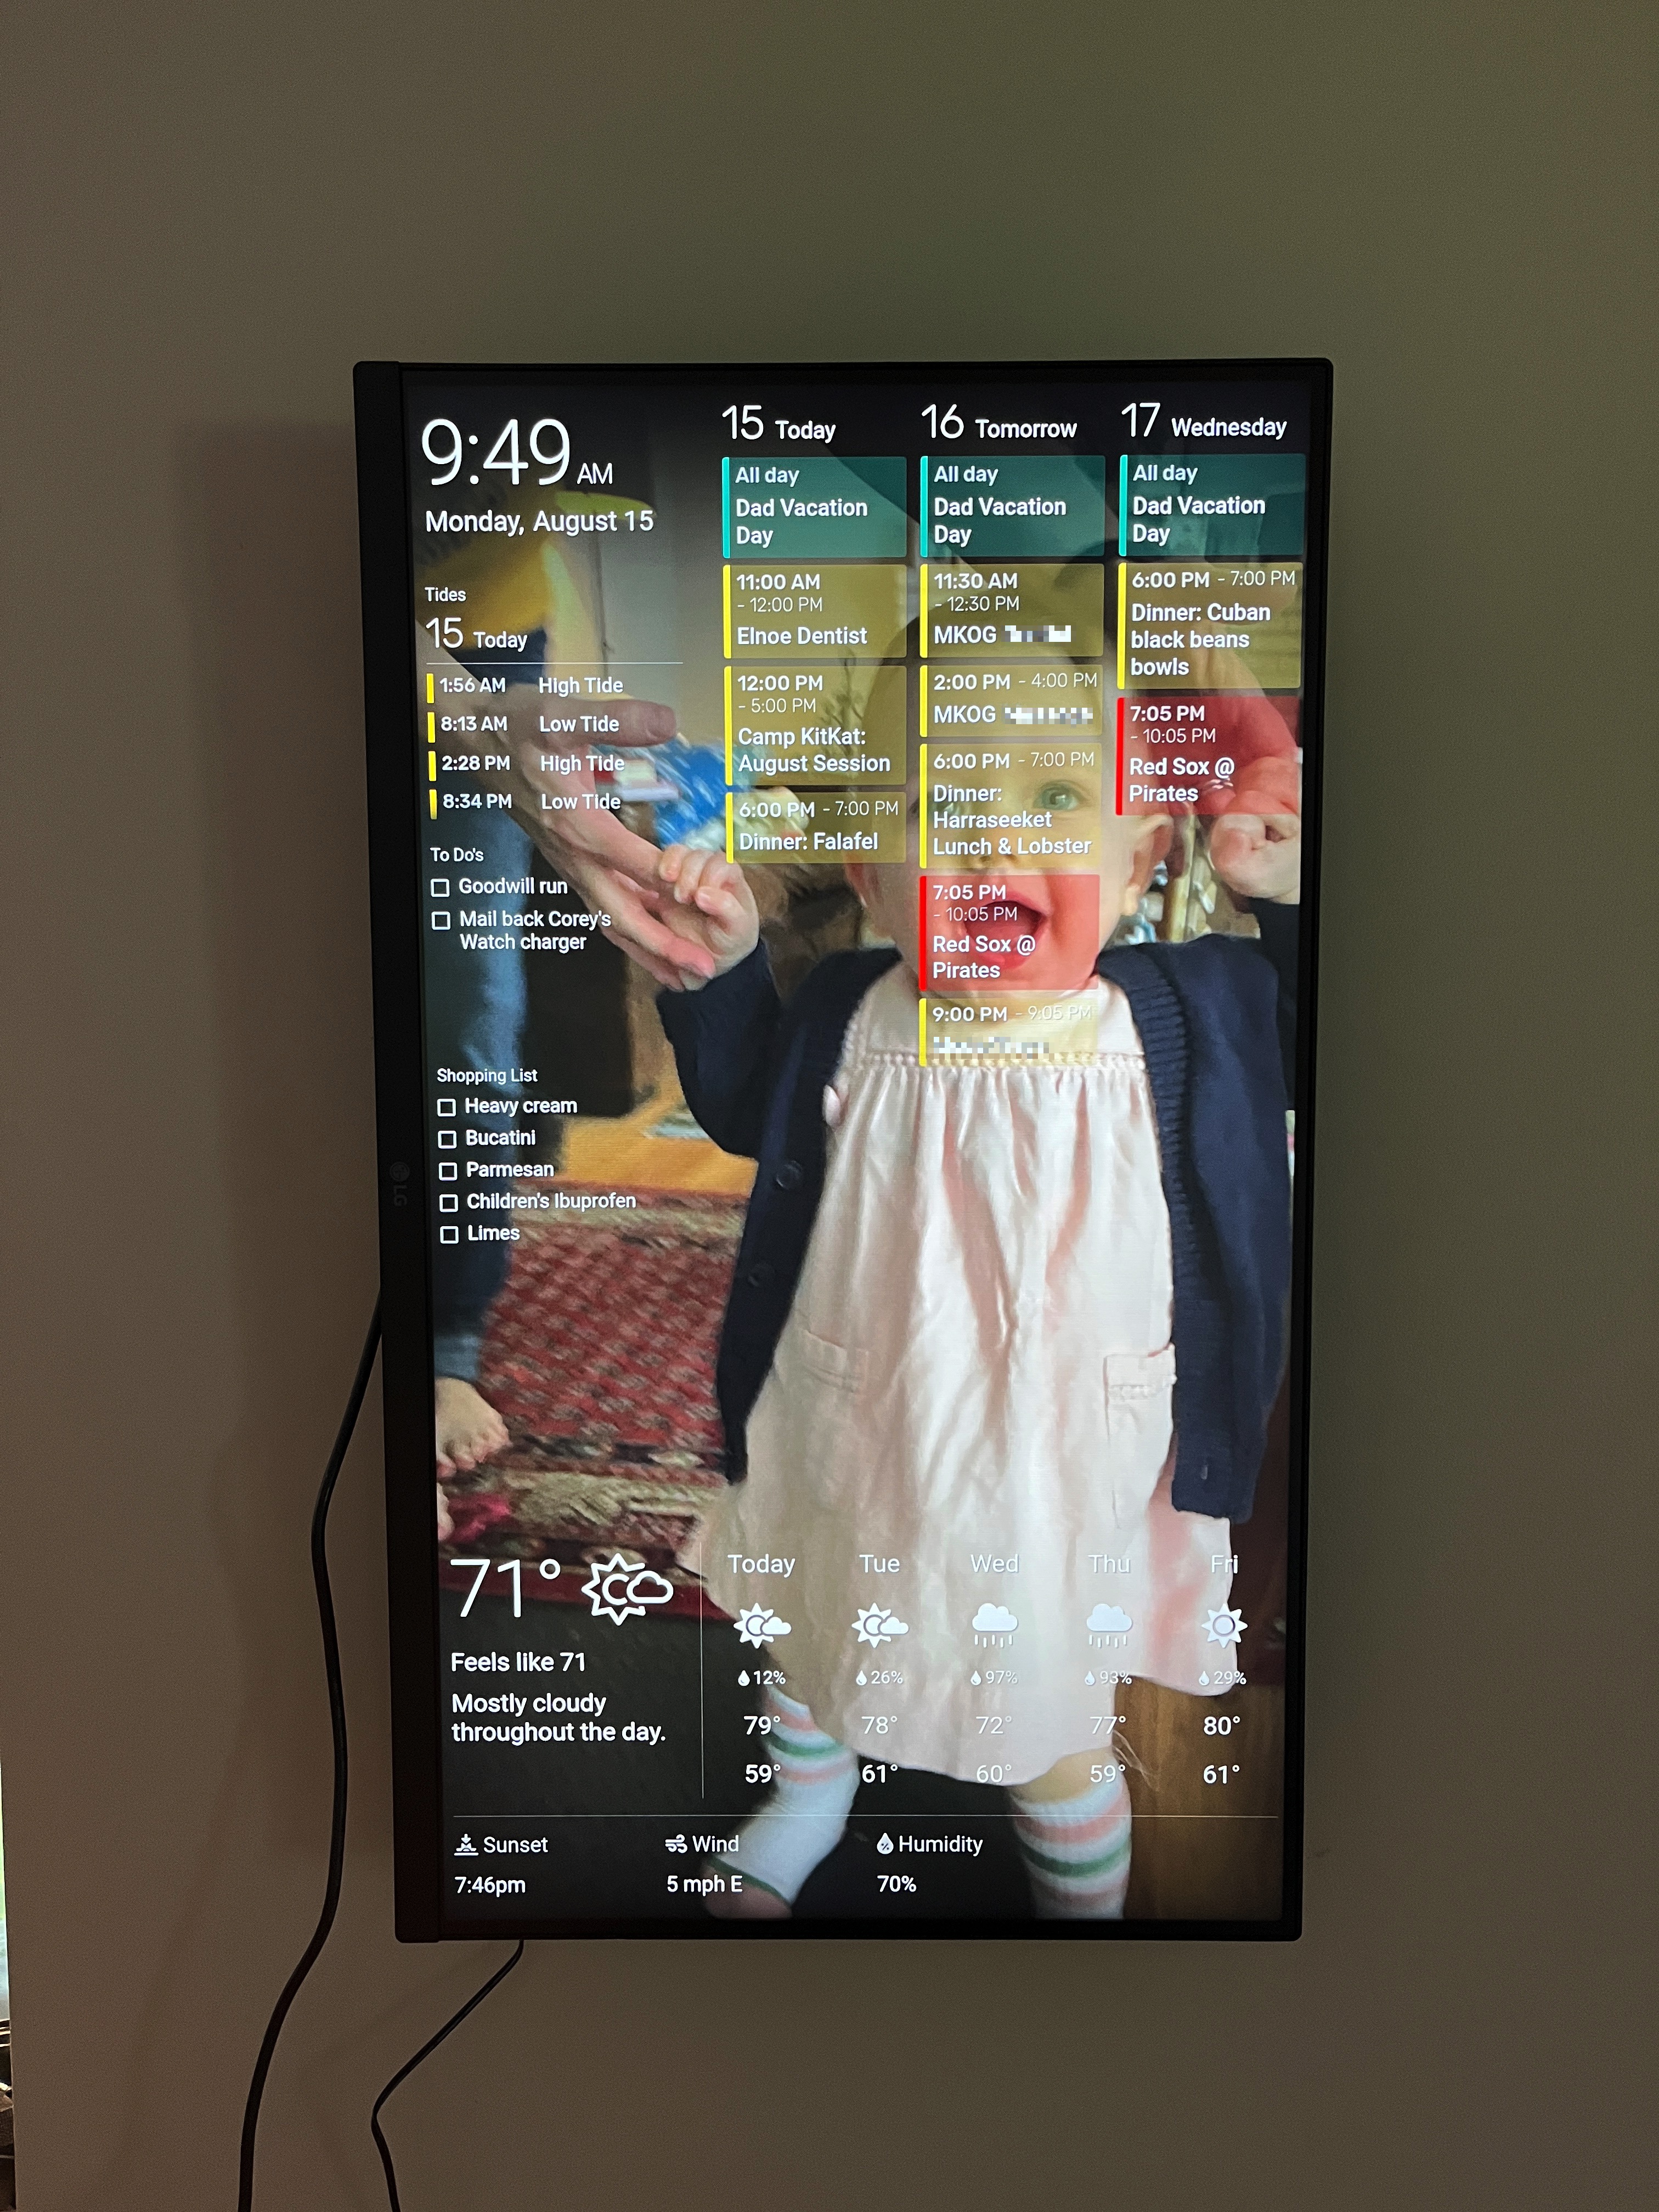
- Kid Activities: when you have kids, there are activities. Plural. Keeping track of them all is hard, and as with a lot of people who live by their calendars my rule has always been that if it’s not on the calendar, it doesn’t exist. So from camp to grandparent sleepovers, keeping track of kid activities is huge.
- Tide Chart: we live right near a beach, and said beach is tidal. So the tide chart is useful for determining whether the local beach exists at any given moment or whether it’s underwater.
- Pick Up and Drop Off: we haven’t used it for this yet, but having a display that tells us who is responsible for dropping Eleanor off at school and who’s responsible for picking her up will be a lot easier than frantic last minute texts. "You’re getting her, right?"
- Dinner Plans: when your life is busy, it can be difficult to remember what you’re supposed to be having for dinner. Hence the calendar entries that tell us what we’re supposed to be having for dinner.
- Shopping List: living on an island means that a trip to the grocery store is not a mere "pop over to the corner store" excursion. Instead, what’s useful is making sure that any trip to the mainland – to pick up your kid at school or camp, say – a two birds with one stone operation. Which means that having a running shopping list is very handy. This one’s especially useful because Todoist – the app responsible that integrates with Dakboard for our shopping list and to do’s – can updated by voice via the Google Assistant that lives in our kitchen. So when we run out of, say, pickled jalapenos, rather than having to remember that, as I’m cleaning out the jar in the sink I can just say "Ok Google, add pickled jalapenos to my shopping list." And they appear automatically on the dashboard as a visual reminder.
- To Do’s: think shopping lists, but instead of groceries it’s things we’re supposed to do. Like email Corey back the Watch charger we stole by accident.
- Weather: when you live in Maine, knowing what the weather is and might be is more important than it is in a lot of places. So having that available at a glance rather than having to paw through a phone is incredibly useful.
- Sunrise/Sunset/Humidity: just as the weather information is useful, understanding what time the sun is going to come up is useful for early morning walks, understanding what time the sun is going down is useful for planning evenings around the fire pit and understanding what the humidity is is useful for understanding why you feel so miserable.
- Red Sox Game Start Time: self-explanatory.
Why Dakboard?
The short answer to "Why Dakboard?" is because it’s what Rachel and her family used. The longer answer is that after looking around at a bunch of alternatives like Mango Display or Magic Mirror, Dakboard seemed to be the most mature and appropriate for our usage.
I will say that having gone down this path and spent money on it, I have essentially guaranteed that one or both of Apple and Google will very shortly make available a superior and potentially cheaper option. Certainly one that is less of a hodge podge than what I’ve thrown together.
Amazon has something similar-ish in the Echo Show devices, but they had some limitations in their service compatibility as well as features we didn’t want or want to pay for like cameras and speakers.
How much does it cost?
The cost could be $0 if you have a spare computer and display lying around – especially if you’ve got free counter space and don’t need to deal with a wall mount. In our case, the extra monitors we have on hand were either too old, not fit for a wall mount or both, and the only surplus computers were way too big for our kitchen, where we decided to put the device. We ended up spending maybe $340 or so all in.
Could we have saved money by taking a DIY approach?
Certainly, but I noped right out of that. The $50 or so I might have saved would not have offset the hours of research into compatible models, sourcing accessories and so on. That kind of thing would have intrigued me when I was 20 and didn’t have as much going on. These days I’m busy and only too happy to make that someone else’s job.
I did not, however, go for pre-integrated displays and compute elements because the premiums attached to those seemed higher.
What are the requisite pieces of a dashboard?
This is what’s necessary as well as what we did about them.
- Monitor: Most obviously you need a display. Almost anything will do, but I opted for a basic 27" LG IPS display – IPS because that apparently makes it viewable from wider angles, useful for a wall display. It weighs less than eight pounds as well, so is easy to wall mount even on drywall.
- CPU: Again, you can use almost anything, and I briefly debated wiring the display to an Intel NUC we have in the basement that serves as the basis for our local Netflix equivalent, sogflix. That would have meant drilling a bunch of holes in floors and walls to pass through an HDMI cable, however, and Kate understandably wasn’t super keen on all of that given that this is something of an experiment. So instead I opted for a Dakboard-built CPU which is basically just a Raspberry Pi that they preload and configure for you. As mentioned above you can save some money by investing more of your time in a DIY setup, but I wasn’t willing to make that trade.
- Wall Mount: So this was a bit of a debacle, as mentioned above. Having never set up a wall mount before, I simply looked up the specifications from the monitor – which were 100 x 100 VESA, four screw holes that are 100mm apart in other words – and found a universal monitor mount (this one). Technically this worked, but it was way too big and whether I set up the monitor in portrait or landscape mode the wall mount stuck out obtrusively. So I went back to the drawing board and ordered a second wall mount (this one). The good news was that this one didn’t stick out at all and was perfectly hidden by the display. The bad news was that once the wall mount was attached to the display, you could no longer plug in any cables. Third time was the charm, however, and if you are looking for a wall mount for the LG display above this is the one you want.
- Adapter: One last thing that I had not anticipated was the fact that when there is (ideally) not a lot of room between the display and the wall, this is a challenge for most HDMI cables that don’t have a right angle in them. Fortunately enough, however, I discovered that they make right-angle pass through adapters for exactly this purpose. You can grab them here.
- Dakboard: Oh and we pay Dakboard $5 a month. Technically it’s not necessary, as they have a free offering, but a) that didn’t let us do a few of the things we wanted to do and b) having invested in the gear I’d like the software it runs to stick around. Your mileage may vary there, however.
How long did it take?
The good news is that the set up is simple; wall mounting the gear took less than a half hour. Of course I’d already done it twice, so that likely was a factor. But the hardware setup – particularly if you know the gear works – is easy.
The software side of things is just as easy. Particularly if you pay Dakboard the couple of bucks a month, you can start with one of their templates and just drop in what you need. Connecting your calendars, to do lists and so on is the matter of a few clicks.
I have zero front end web skills and the design sense of a blind monkey, and it was still easy. In terms of degree of difficulty, then, this one is about as hard as setting up an Apple TV or Roku.
What was harder than expected?
- Finding a wall mount, obviously. Basically you need to know three things: what mount pattern the display uses, how physically large the wall mounting hardware is and whether it will be concealed by the display, and lastly how large the mount plate is and whether that will obscure the cabling connections. You can measure the first two things and the third was pretty easy to figure out once I knew to look for it.
- The other thing that was tricky was which calendars specifically we want to use. Historically, for example, I’ve only maintained one calendar, my work calendar. If I used that, however, all of the screen real estate would be gobbled up by my various meetings. Likewise for Kate. So in addition to easy adds like our tide calendar or the Red Sox one, we had to create a new third family calendar. As an aside, if anyone does this from their Google Workspace account and finds that they are unable to grant their partner/spouse edit rights to it, tell whoever administrates your account that they have to change that permission in two separate places. Thanks for nothing Google. Anyway, neither of us was thrilled to have to create another calendar, but it’s actually useful in some ways to separate family and work items and has been manageable so far.
Was it worth it?
We’ll know more after the school year starts, but so far it’s doing exactly what it’s supposed to do: providing easy visibility to a bunch of useful information in a high traffic area. No more having to turn to our phones to look things up. It’s all right there.
Particularly if you can learn from my mistakes, then, I think it’s worth it.
What’s your favorite part?
Surprisingly, as I’ve never thought much about them, it’s the digital photo frame. One of the features you can enable is photo backgrounds that pull from sources like Flickr, Instagram, Google Photos, Smugmug and so on. Most of the default templates just have standard landscape pictures for their backgrounds, but I connected it to a Google Photos album of pictures of Eleanor. A couple of times a day, then, one of us stops and says, "Oh, I remember this, come check it out." As with the picture of Eleanor dressed up as Eleven for Halloween in the picture at the top.
It’s pretty great.
What’s next?
On the software side that will depend on what Dakboard adds as far as further integrations. There seem to be more since I started playing with it, so that’s promising.
On the hardware side, assuming that we continue to leverage this and find it useful, I’ll be hiding the currently exposed cables with cable sleeves. And if we really like it, I’ll ultimately probably try and drop in a new electrical outlet behind the monitor so they don’t need be hidden at all. But I wasn’t ready to start playing with electrical boxes and Romex cable until we knew this was going to be here for a while.

Your screen looks great, nice density but not too busy!